How to Choose the Perfect Ham


Are you making a Ham for the holidays? Now is the time to start thinking about what kind of Ham to buy ...

So where to start?

A few years ago I came across an excellent ham buying guide from Cuisine at Home (Issue 50 April 2005)…. whenever I plan to make a ham.. I pull it out... it really helps me make decisions about the kind of ham I want and what to look for when buying it.

You can buy the expensive spiral-sliced hams available from various specialty stores, but the taste of a great ham baked yourself can’t be beaten. Hams are very easy to bake… the buying is where most cooks lose interest… labels can be confusing… and all the choices overwhelming… leading most cooks to wonder if they are making the correct choice… so they retreat and buy those expensive spiral hams.

This guide should answer most of your questions… or at the very least take some of the mystery out of buying a good ham. This is from Cuisine at Home…

I hope you find it helpful.


Butt Half

Ham comes one of three ways: whole, shank or butt. Whole is hard to carve, the shank has too much connective tissue, but the butt… is just right. Its large muscles provide pure meaty slices that are easy to carve.

Bone-In

You want a bone-in or semi-boneless ham- just not boneless. Boneless ham is nothing more than ground ham that’s mixed with a binder and re-formed. Bone-in ham is still easy to carve and will serve 2-3 people per pound.

No Slices Removed

Have you ever seen those nice individually-wrapped slices called “ham steaks”? They’re from the center of the ham… slices that should be on your ham. If you see the word “portion”, it means the best pieces have been cut out of the center of the ham. Try to find a half that says “no slices removed”.

Natural Juices or Water Added

Labels that read “Natural Juices”, “No Water Added”, or “Water Added” are all acceptable. Avoid anything that says, “Ham and Water Product Added”. These hams are spongy and weak tasting.

Natural Juice and No Water Added hams are excellent, but can be hard to cook – they can dry out unless you use a recipe that uses a moist heat (liquid in the bottom of the pan below the rack that the ham is on)…. Water added hams are moist and easy to slice…. but you won’t go wrong with either type of ham.

And finally.... remember the butcher is your friend... he has a wealth of information and most are more than happy to help you. Ask questions... ask advice... ask him to help you choose a ham that is perfect for you.

Fabulous Holiday Party Foods


Having a little holiday get together? Don't want to spend hours in the kitchen? Here are some great ideas to get you started...

How about a nice little gathering with bite sized appetizers… You might also want to end the evening with a small tray of sweets too…. a little something to serve with tea or coffee….

TIPS

When planning a menu keep in mind the “do-ahead” factor….. preparing ahead is key… after all.. you don’t want to be slaving in the kitchen missing all the fun.


Consider completing preparing ahead your selection of appetizers and simply saving the baking step for last.

Consider oven temperatures and baking times when choosing which appetizers to make.

Quantities will depend on a number of factors… things to think about… time the party starts… number of people and of course budget.

If you’re starting late… then I figure they’ve already eaten something before coming ….even if it was light….. and this will be considered extra munchies for them….


I like to serve a variety of about 6 different kinds of appetizers…. figure about 6 pieces per person….


I also make sure to have a vegetable or fruit tray with dips…. and one chip and dip item… one or two small choices of sweets to end the evening.


If I’m starting a bit earlier… then one of the appetizer/hors’dourves will be substantial…. such as Stromboli or Ham and Cheese Puff Pastry Squares…. or Sweet and Spicy Cocktail Meatballs.


For a very late starting party…. I would consider a very light munch…. a cheese tray perhaps with wine…. and coffee and tea with an assortment of 2-3 small desserts or baked items….

For more ideas see the Party Planning for past party planning posts…. see the Appetizer and Hors’dourves label for more recipes…. Desserts and Cake labels for those recipes…..


And don't forget my Coffee and Tea Buying Guide for a Crowd and Tips for Making Coffee and Tea for a Crowd.


Keep us on your favorites or sign up as a subscriber... still more ideas to come.

Here are some ideas to get you started thinking…. I’ve included baking temperatures and times where applicable to help you sort them out…


Baked Finger Foods... that can be prepared ahead and final baking just before serving:


Mini Spinach and Bacon Quiches... Bake at 375 degrees F for 25 minutes.


Tiny Ham and Pineapple Pot Pies... These are just adorable! Bake at 425 degrees F for 10-12 minutes.


Taco Bites... Bake at 375 degrees F for 8 minutes.


Lil Smokies in a Blanket…. Bake at 375 degrees F for 11-15 minutes.


Tomato Basil Pesto Tartlets... Bake at 375 degrees F for 8-10 minutes.


Crab Stuffed Mushrooms... Bake at 375 degrees F for 15 minutes.


Easy Boursin Stuffed Mushrooms... Bake at 350 degrees F for 10 minutes.


These foods can be baked somewhat ahead and served warm or at room temperature:

Raspberry Brie Tarts

Spinach Cheese Puff Pastry Swirls

More Substantial Foods:


Ham and Cheese Puff Pastry Squares


Stromboli…. is a perfect choice…. you can prepare one or more ahead… slice it and serve at room temperature… you can vary the ingredients between the different Strombolis.


Mini Ham and Swiss Party Sandwiches…. They’re quick and easy and can be made completely ahead… and won’t break the bank… don’t like Ham and Swiss? … make any combinations of meats and cheeses you want…. salami and provolone… turkey and pepper jack cheese….you can even make tuna melts… just make the tuna salad and use whatever cheese you want … be creative!


Italian Mini Party Sandwiches.. these sandwiches can be made with small party bread or rolls like the Mini Ham and Swiss Party Sandwiches…. perfect snack or horsdourves size…. they will require use of the oven… but you can bake them first… before foods that take longer… and serve them at room temperature


Sweet and Spicy Cocktail Meatballs

Classic Swiss Fondue

Requires no cooking or baking and can be made completely ahead:


Boursin Stuffed Cherry Tomatoes


Fruit Tray with Dips... try a terrific Yogurt Sauce

Vegetable Tray with Dips... Try a Ranch Spinach Dip

Chips or Crackers and Dip... Try a Baked Crab Dip made in a hollowed out bread... serve with pita crisps or crackers... just delicious!

Bread Dip... Try a Corned Beef Bread Dip


Candied Pecans.... a great holiday idea... totally addictive... delicious and an easy make-ahead snack.


White Chocolate Popcorn... another delicious sweet snack... perfect for the holidays... inexpensive to make and also another great make-ahead snack


The Finale:


Mini Cheesecakes


Bite-Sized Fruit Pies


Linzer Torte Bars

And of course, festive holiday cookies are always perfect!

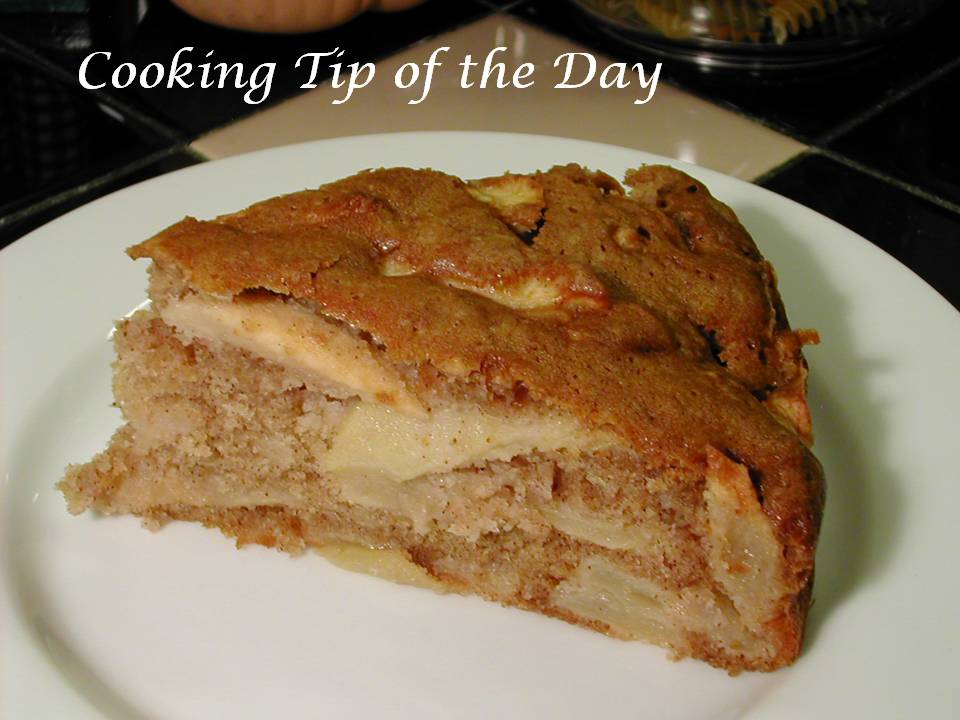
Recipe: German Apple Cake


German Apple cake is a delicious… apple-rich coffee cake… with a hint of cinnamon… this recipe is not overly sweet… a perfect breakfast cake… it just goes with coffee… a perfect way to start the day.

It can also be served as a snack cake.. or if you want it as a dessert cake… just increase the sugar a bit in the recipe… or serve it with a Brown Sugar Butter Sauce or Dulce de Leche… just heavenly!

TIPS

I like to use a springform pan…. it makes removing the cake from the pan a breeze.
It’s a good idea to wrap the springform pan in foil… to prevent any leakage of batter… as pans age they tend to leak and you don’t need that mess in your oven.

I use Macintosh apples to make this… Empire apples would also be a good choice.

The batter is thick… after adding the apples you may think you did something wrong… it looks like a little batter holding the apples together… it will bake up just fine.. remember the apples release moisture also…

Try making my recipe for Brown Sugar Butter Sauce to go over it.. it’s very easy.
This recipe uses butter… I think it’s important not to substitute the butter.. the butter flavor really enhances the flavor.

As I mentioned earlier.. this is more of a coffee cake.. perfect for breakfast… if you prefer a sweeter cake.. increase the sugar to 2 cups.

I hope you enjoy this terrific cake!


PRINT RECIPE

Recipe: German Apple Cake

All you need:

2 sticks plus 2 tablespoons (18 tablespoons) butter, melted
2 eggs
1 ¼ cup sugar
1 teaspoon vanilla
2 teaspoons cinnamon
½ teaspoon salt
1 teaspoon baking soda
2 cups flour
5 medium apples, peeled cored and thinly sliced

All you need to do:

Preheat the oven to 350 degrees F.

Grease and flour a 9 inch springform pan.

In a large mixing bowl, beat the eggs lightly.

Add the sugar and vanilla and beat at medium speed until well mixed.

Add the melted butter and mix well.

In a medium bowl, mix the flour, salt, baking soda and cinnamon.

Add the flour mixture to the egg mixture, beating at medium speed until smooth.

Add the apple sliced and stir with a spoon until the apples are well coated with the batter.

Pour the batter in the prepared pan.

Bake for 70-80 minutes or until a toothpick inserted in the middle comes out clean.

Cool on a rack for an hour. Run a knife around the sides and release the springform ring.

Serve with Brown Sugar Butter Sauce or Dulce de Leche.

Recipe: Brown Sugar Butter Sauce


This quick and easy recipe for Brown Sugar Butter Sauce is perfect for desserts and cakes… such as German Apple Cake… it’s also delicious on butternut squash and carrots.

TIPS

Use the real thing… butter… this is not the time to use margarine.

This will gel up after sitting… just reheat it and it will get runny again.

It literally takes a few minutes… 3 minutes to be exact… and only 4 ingredients…now how great is that?


PRINT RECIPE

Recipe: Brown Sugar Butter Sauce

All you need:

1 stick (8 tablespoons) butter
½ cup brown sugar
¼ cup cream
½ teaspoon vanilla

All you need to do:

Place ingredients in a small saucepan. Bring to a boil, stirring constantly. Boil for 3 minutes. Remove from the heat and stir in the vanilla. Serve warm on top of cake.

Recipe: Cappuccino Praline Bars


Are you a cappuccino lover? If you are… then these bar cookies are for you. These are easy to make… and are a great addition to a dessert or sweet tray. I cut most of mine into small, bite sized pieces so they would add to the variety of my holiday assortment. Of course… I did cut a few into typical “bar size” for my taste tester… who deemed them “pretty good” as he reached for another one…

This is a Betty Crocker recipe I found while searching for an old Cappuccino bar cookie recipe I have lost… while it wasn’t exactly what I was looking for.. I’m glad to have found it… it is delicious!

I made a few changes to the directions… nothing major… I added the espresso to the large mixing bowl and the other ingredients when making the crust not the other way around… and I beat the eggs a bit before mixing them with the other ingredients for the filling… I also noted a recommended change in pan size… see the tips below.

The original recipe called for butter or margarine.. I highly recommend you use butter… the flavor of the butter adds to this bar cookie.

TIPS

Definitely use espresso coffee granules… they are readily available in supermarkets… even Walmart… it’s not expensive and it really does add to the flavor of baked goods calling for it.

The recipe called for a 13 x 9 pan.. I used an 11 x 7 pan and I’m glad I did… these are thin bar cookies… I think a 13 x 9 pan would produce a bar cookie that is too thin… the 11 x 7 worked perfectly.

I always line my pans with non-stick foil… so they don’t stick… and they’re easy to lift out of the pan for easy cutting and clean-up. I did grease the foil as instructed in the recipe anyway to be sure they would come out easily.

When lining a pan with foil… shape the foil on the outer surface first.. then flip the pan over and place the foil in it … it makes getting the foil into those corners easier.

When pressing the crust into the pan… which can be a pain.. be patient and do it slowly.. it’s worth the trouble… to make it a bit easier.. when you dump the crust mixture in the pan.. try to spread it evenly over the bottom of the pan before starting to press it into the pan.

I hope you enjoy this delicious sweet treat!


PRINT RECIPE

Recipe: Cappuccino Praline Bars

All you need:

For the Crust:

1 teaspoon instant espresso coffee granules
2 teaspoons very hot water
½ cup (1 stick) butter
¾ cup sugar
1 ¼ cups all-purpose flour
¾ cup toffee bits (not chocolate covered)

For the Filling:

1 tablespoon instant espresso coffee granules
1 tablespoon very hot water
2/3 cup sweetened condensed milk (not evaporated)
1 cup sugar
3 eggs
2 tablespoons all-purpose flour
½ teaspoon baking powder
¼ teaspoon salt

All you need to do:

Preheat the oven to 325 degrees F.

Line a 13 x 9 or 11 x 7 pan (see tips…I recommend the 11 x 7 size) with foil.

Grease the sizes and bottom with shortening, then lightly flour it.

In a small cup, mix the espresso granules with the hot water.

Using a mixer fitted with the paddle attachment, beat the butter, sugar and espresso on medium speed until fluffy.

Lower the speed to low and gradually add the flour until well blended.

Press the mixture into the bottom of the pan. Sprinkle ½ cup of the toffee bits over the crust and gently press them into the crust.

Bake the crust for 15 to 17 minutes or until the edges are light golden brown. I did mine for 17 minutes… the color really didn’t change all that much… it turned a little darker and the color was all over not just at the edge… also remember I used the 11 x 7 size pan.

Meanwhile, mix the espresso for the filling with the hot water. Set aside.

In a mixer bowl beat the eggs until well mixed… add the sweetened condensed milk and the sugar and beat on medium speed until well blended… add the espresso (already mixed with the hot water in previous step). Beat until well blended.

Add the flour, baking powder and salt, mix well.

Pour the filling mixture over the hot crust.

Return the pan to the oven and bake for 28 to 33 minutes (mine took 30 minutes…. also remember I used the 11 x 7 size pan) or until set.

Remove the pan from the oven and immediately sprinkle the remaining toffee bits over the top.

Allow to cool in the pan on a rack for an hour. Lift the foil out and place on a cutting board and cut into desired size pieces.

Store in an airtight container.

Recipe: Chicken Cordon Bleu Sandwich


I saw a Chicken Cordon Bleu Sandwich on a menu recently and remembered I had put it on a “To Do” list ages ago and forgot about it. I used to make this sandwich with some oven fries for my son for supper sometimes and he loved it…

TIPS

You can use homemade Oven Fried Chicken Fingers or commercial ones… I highly recommend making your own… it’s really very easy. Click the link to go to my recipe.

If you do make your own… you can use your own crumb mixture or “Shake ’n Bake”…. If you use Shake ‘n Bake… follow the instructions on the box except only bake them for 15 minutes for larger chicken tenders or 10 minutes for smaller ones.

This recipe also works with breaded boneless chicken breasts or commercially made chicken patties… again.. I highly recommend making your own.

Do try to use my recipe for Honey Dijon Mayo… the flavor is so good with this… and takes a minute to make.

I happen to use hamburger buns since that’s what I had… sandwich rolls or hard rolls would be excellent with this.

I hope you enjoy this terrific sandwich!


PRINT RECIPE

Recipe: Chicken Cordon Bleu Sandwich

All you need:

Cooked breaded chicken fingers
Thinly sliced Swiss cheese
Thinly sliced smoked deli ham
Leaf lettuce
Sliced tomatoes
Honey Dijon Mayo
Sandwich rolls

All you need to do:

Preheat the oven to 400 degrees F

Place the cooked chicken fingers on a baking sheet.

Place 2 chicken fingers close together.

Put 2 slices of folded deli ham on top of f the chicken, then a slice of the Swiss cheese.

Bake at 400 degrees F for about 5 minutes or until cheese has started to melt.

Spread the Honey Dijon Mayo on both sides of the bread.

Layer lettuce, the chicken finger and ham and Swiss then sliced tomato on the bread.

Place the top on and serve immediately.

Recipe: Honey Dijon Mayo


This recipe for Honey Dijon Mayo is quick and easy…. it makes a great addition to sandwiches.. adds that little extra pizzazz especially to ham.

I know you can purchase flavored mayos… but they’re so easy to make and this way you make a small amount.. just what you need… and it’s always fresh… not to mention… you control exactly what goes into it.

TIPS

I always use Hellman’s Real Mayonnaise … you can use whatever brand you prefer… but I would not recommend using Miracle Whip… the taste will change considerably.

When I make condiments I try to use quality ingredients… they really do make a difference… after all you’re trying to enhance the flavor of the food… and for the most part you don’t use much… so the quality really matters.

I hope you try this… it goes perfectly on my Chicken Cordon Bleu Sandwich!


PRINT RECIPE

Recipe: Honey Dijon Mayo

All you need:

3 tablespoons Hellman’s Real Mayonnaise
2 tablespoons Honey
2 tablespoons Dijon Mustard

All you need to do:

In a small bowl, combine all ingredients until smooth.

Refrigerate leftovers in an airtight container.

Recipe: Marinara


This recipe for Marinara sauce is a basic one. I consider it a base recipe for a number of other sauces … but it is also delicious on its own. It’s an easy recipe… and depending on how much time you want to spend making it .. it can be quick also.

What I mean by “how much time you want to spend making it” is the recipe really can be ready after about 30 minutes of simmering. However, I like to simmer it much longer… giving the ingredients time to slowly cook… for an even better flavor.

Growing up I had a friend who's Mother probably doubled this recipe and then had it simmering for hours.. the house always smelled fabulous and the sauce was so good.. there always seemed to be sauce on the stove..

TIPS

As I said… this can be ready in 30 minutes… I would recommend if you are doing the 30 minute version.. use crushed tomatoes instead of the canned diced tomatoes … I think it will cook faster with those.

I use Hunts diced tomatoes… with Basil Garlic and Oregano. You can use plain or another variety.. whichever you prefer. If you use a different variety.. you will need to adjust the seasoning a bit.

Adjust the seasoning to your liking… but adjust them after it has cooked a while so you can get the full flavor of what you already have put into it.

Using diced tomatoes makes for a chunkier sauce… you can use an immersion blender or stick blender to thicken the sauce and make it less chunky.

If you prefer a smoother, thicker sauce… use crushed tomatoes and add about 1 tablespoon of tomato paste.

Tomato paste also is available in seasoned varieties.

Many recipes use brown sugar in their sauce… I’ve tried it… and really don’t see that noticeable a difference from using white sugar.

I added white wine to my sauce… the alcohol does cook off… however.. if you do not cook with alcohol… leave it out.. the sauce will still be delicious!

This will serve 4.


PRINT RECIPE

Recipe: Marinara

All you need:

1 large onion, finely chopped
2 large garlic cloves, finely chopped
2 tablespoons olive oil
2 cans Hunts Diced Tomatoes with Basil Garlic and Oregano
½ cup dry white wine
1 bay leaf
1 teaspoon oregano
1 tablespoon chopped fresh basil
2 tablespoons chopped fresh Italian parsley
1 tablespoon white sugar
1 tablespoon tomato paste (optional)

All you need to do:

In a sauce pot, heat the olive oil over medium high heat.

Add the onions and garlic and cook until the onions are translucent.

Add the remaining ingredients and bring to a simmer.

Simmer for 30 minutes to 1 hour.

Optional: Remove from the heat and using an immersion blender, blend until desired consistency

Recipe: Hungarian Pork Goulash


This recipe for Hungarian Pork Goulash is started on the stove and finished using a crock pot… so easy and convenient… and so delicious with a little bit of sharpness of the Hungarian Paprika and the creaminess of the sour cream.

Having grown up in a German Hungarian house, loving Hungarian food just came naturally. Many Americans call a ground beef mixture “goulash”… that’s not what this is… nothing remotely like it.

You can also make this completely on the stove in a Dutch oven or stew pot.

TIPS

I used a little more paprika than I listed here… ours has definitely a zip to it… I used 1 ½ teaspoons sweet Hungarian paprika and 1 teaspoon hot Hungarian Paprika.

Start with the measurements in the directions and add more to your tastes if you like.

The brand and freshness of the paprika will greatly affect the sharpness of the paprika.

You should be able to find both Sweet and Hot Hungarian Paprika in the grocery store in the spice section.

If you can find pork stew meat, ask the butcher to cut you some.

Cook the onions in whatever grease from the meat and bacon are left. If you don’t have much grease left.. add a bit of olive oil. Don’t add much, just enough to cook the onions and garlic until soft.

It is important to remove the skillet form the heat then add the paprika. Don’t add the paprika over the heat.

Add the sour cream at the very end, just before serving.

I wasn’t going to be home while it was in the crock pot, so I added red peppers just before I left the house. Ideally, add them about half way through cooking so they keep some of their “substance”. Adding them like I did doesn’t hurt the dish, it just makes them soft.

Use the entire large onion, I only tell you to cut it in half so the slices are smaller.

This recipe will make about 4 servings when served over noodles.

I hope you try this delicious dish!


PRINT RECIPE

Recipe: Hungarian Pork Goulash

All you need:

2 slices smoked bacon
1 ½ pound pork stew meat
¾ cup flour
¼ teaspoon garlic powder
Salt and pepper
1 large onion, cut in half then sliced
2 large garlic gloves, finely chopped
About 1 ½ tablespoons of olive oil
1 teaspoon Sweet Hungarian Paprika * See Tips
¾ teaspoon Hot Paprika *See Tips
Chicken stock or broth
1 red bell pepper, sliced
¾ cup sour cream
Cooked Noodles

All you need to do:

Cook the bacon in a large skillet until cooked but still pliable (not crispy). Drain the bacon on paper towels.

In the meantime, mix the flour, garlic powder, salt and pepper in a wide bowl.

Dredge the meat in the seasoned flour.

Brown the meat in the bacon drippings over medium high heat.

Remove the meat with a slotted spoon and put in a crock pot.

Add the onions and garlic to the skillet and add any needed olive oil (see Tips).

Lower the heat to medium and cook the onions and garlic until soft. Stir frequently and do not allow them to brown.

REMOVE the onions and garlic from the heat. Add the paprika and mix well.

Add the onion and garlic mixture to the crock pot.

Add enough chicken stock or broth to cover.

Cook on high until it simmers, then reduce the heat to low and cook about 5 hours.

Add the sliced red bell pepper about ½ way through cooking. (see Tips)

Add more chicken stock as needed.

When cooking is complete, turn off the crockpot and remove a ladle of cooking liquid to a bowl. Add the sour cream and whisk until smooth.

Add the sour cream mixture back into the pot and stir well.

Serve over hot buttered noodles.

How to Sugar Coated Pecans (Candied Pecans)


Sugar Coated Pecans are a wonderful holiday treat…. and so easy to make… and far less expensive to do it yourself. They also make a terrific gift.

TIPS

Use non-stick foil to line your baking sheet… it will help the pecans not stick to the pan and clean-up will be infinitely easier. However, still grease the foil.

Mix the sugar, cinnamon and salt with a wire whisk to blend the ingredients evenly.

Put them out to snack on or use them to garnish desserts… everyone will love them.


Recipe: How to Sugar Coat Pecans (Candied Pecans)

All you need:

1 pound pecans
2 egg whites
1 tablespoon vanilla
1 ½ teaspoon cinnamon
1 ½ cup sugar
1 teaspoon salt

All you have to do:

Preheat oven to 225 degrees F.

Line a baking sheet with non-stick foil.

Grease the foil lightly.


Beat the egg whites with the vanilla until frothy.


Mix the cinnamon, sugar, and salt in a large bowl or pie plate.


Add the pecans to the egg white mixture and stir to coat them well.


Then remove the pecans with a slotted spoon and add them to the sugar mixture. Toss well after each addition to coat them well.


Spread them out on the baking sheet and bake at 225 degrees F for 30 minutes.


Stir to loosen and allow to cool until you're able to handle them, about 10 minutes.

Store in an air tight container.

Recipe: Sweet Tamale Pie


This quick and easy Mexican beef, tomato and corn casserole is a perfect one-dish family meal. The casserole relies on its ingredients to provide the flavor… unlike a lot of other Mexican dishes.. this one does not add spices.

The recipe is from people at Hunts. I like my Mexican food with some kick to it.. but as Warren pointed out.. a lot of tamales are not made with spices… so I resisted the temptation to tinker with the recipe and left it as is. It was a bit bland for my tastes the night we had this.. but oddly enough, I ate the leftovers the next day for lunch and really liked it…

I did make a change, rather than using only 1 cup of corn, I used the whole can… we did not find it to be too much and I didn’t want to have any leftover corn to use.

TIPS

As I mentioned, this recipe does not use the typical Mexican spices.. which may work best for families that have members that are not fond of spicy food…

If you want to spice it up.. you can always add some Fajita Seasoning … I have a terrific recipe for Fajita seasoning that I make and fill a jar with… then whenever I want to add some spice to some Mexican dishes.. I add a bit… click the link for my seasoning recipe.

Make sure you drain the tomatoes and corn well, otherwise you will have excess liquid in the pie plate, which isn't a tremendous problem, but if you want it to look perfect, drain them well.

I recommend you let the casserole stand 5 minutes before cutting. The first serving did not come out of the pie plate perfectly. The rest of the servings cut easily and stayed in wedges.

You will need to use a large spoon to scoop out the serving to keep the filling together since nothing really binds it.

This makes 4 large servings or 6 average size servings.


Recipe: Sweet Tamale Pie

All you need:

1 pound lean ground beef
1 medium onion, chopped
1 medium green pepper, chopped
2 cloves of garlic, minced
1 can (14.5 oz.) Hunts diced Tomatoes, drained and divided
1 can whole kernel corn
1 can (4 oz.) diced green chilies, divided
½ teaspoon salt
½ teaspoon ground black pepper
1 egg
1/3 cup reduced fat (2%) milk
1 pkg. (8.5 oz.) corn muffin mix
1 cup shredded Cheddar cheese
Cooking oil spray

All you need to do:

Preheat the oven to 400 degrees F.

Spray a 9 inch pie plate with the cooking oil spray. Set aside.

In a large skillet, over medium high heat, brown the meat with the onions, garlic and green pepper.

Drain the mixture.

Remove ¼ cup tomatoes from the can and set aside.

Add the remaining tomatoes, corn, ½ of the can of chilies the skillet and season with salt and pepper. Mix well.

Reduce the heat and simmer for 5 minutes.

Spoon the mixture into the prepared pie plate.

In a medium bowl, beat the egg with the milk. Add the corn muffin mix and stir until just moistened.

Add the reserved tomatoes, chilies and cheese, mix well.

Spoon the mixture evenly over the beef.

Place the pie plate on a baking sheet and bake at 400 degrees F for 20 to 30 minutes or until a toothpick inserted in the center comes out clean.

Let stand 5 minutes then cut into wedges and serve.

Looking for More Recipes?

If you are looking for more recipes click the "Older Posts" link to page back to older posts or go to the archives in the right column. The list of labels at the bottom in the right column will help you find specific types of recipes or try our search engine at the top and search by name or ingredient.


What's more comforting on a cold day than Homemade Chicken Noodle Soup? .. and it's so easy to make!

Chicken Noodle Soup