Showing posts with label French. Show all posts

French Onion Soup


This recipe for French onion soup is from my son, Erik’s friend, Hillary. It’s simple to make … it does simmer for a long time… so I started it a skillet… and put everything together in my crock pot and let it simmer for about 5 hours… so quick and easy… and the result was awesome…

TIPS

Her recipe calls for 8 onions… she didn’t specify the size… my onions were very large… I only used 5. She uses four garlic cloves… mine were extremely potent so I used only two.

The wine does not have to be expensive… as she put it… even cheap wine is okay…. but do not use cooking wine… it’s too acidic and salty.

Hillary never made mention of the bread in the soup… so I did it as I was taught… slicing a day old baguette … spread butter (or margarine) both sides and place in a hot skillet… lightly brown both sides and it’s ready for your soup. The light butter flavor really adds to the soup.

In traditional French onion soup you should use Gruyere … but Swiss will also work…

This is a truly wonderful soup. Thanks Hillary!

Bon Appetit!


PRINT RECIPE

Recipe:  French Onion Soup

All you need:

8 onions, sliced thin
2 tablespoons butter
4 garlic cloves, minced
½ cup red wine (Cabernet is fine)
1 tablespoon flour
1 container (26 ounces) beef stock
16 ounces (½ container 32 ounce size) beef broth
Salt to taste
1 baguette
Butter or margarine for the bread
Gruyere or Swiss cheese, shredded

All you need to do:

In a large skillet over medium heat, melt the 2 tablespoons butter.

Add the onions and cook until the onions are mushy and brownish in color.

Add the garlic when the onions are just translucent... allow to cook until onions are mushy.

Add ¼ cup (half the wine) to the onions and cook until the wine is absorbed into the onions.

Sprinkle the flour over the onions. Mix well.

Add some of the stock and make sure there are no lumps of flour.

In a crockpot, pour the beef  broth and the remainder of the stock in.

Add the onion mixture.

Add the rest of the wine.

Turn the crock pot on high and let simmer for 4-5 hours.

If you want to make this on top of the stove…. Simmer on low for 1 ½ - 3 hours.

Slice the baguette into ¼ inch slices.

Spread butter or margarine both sides of the bread and place in a heated skillet.

Cook until lightly brown on both sides.

Fill oven proof bowls 2/3 full with soup…. Add the bread and add more soup. Put a handful of cheese on top.

Place the bowls on a baking pan and put into a 400 degree F pre-heated oven for about 10 minutes or until the cheese has melted and slightly browned.

Makes about 6 servings.


Madame Croque


Madame Croque is a fabulous French bistro sandwich, wonderful anytime of day... perfect for breakfast, lunch or a light dinner.  It was one of my son's favorite growing up, I made it occasionally for Sunday breakfast or brunch.

So what exactly is a Madame Croque?

It's a version of the popular  Monsieur Croque sandwich…which has a number of versions also but is basically a grilled ham and cheese (gruyere) sandwich…. sprinkled cheese or sauce (variations use either a bĂ©chamel or Mornay) is drizzled ladled over it and broiled…. very yummy!..... well…… the Madame Croque is the same except that an egg is on top of the sandwich… either fried or poached egg.

First a bit of trivia about the Madame Croque… according to Wikipedia … many dictionaries attribute the name to the egg resembling an old fashioned woman’s hat.  So I used a poached egg which looks more like a bonnet.

TIPS

Gruyere tends to be very expensive… a less expensive alternative is using a mix of Swiss and gruyere.. Sargento makes an Artisan Blend of Swiss and Gruyere that’s excellent and more affordable.

Some recipes only toast the bread … I tried that method… but found it a bit too dry.   I suggest you follow my instructions that spreads butter or margarine (margarine works fine) on the outer sides of the sandwich bread and then grills the sandwich in a grill pan.

This Mornay sauce should be a little thinner than the sauce used in a Croque Monsieur... it doesn't get broiled at the end so you want a thinner sauce to run over the top of the sandwich.

This recipe makes 4 sandwiches.


Recipe: Madame Croque

All you need:

For the Mornay Sauce:

2 tablespoons unsalted butter
2 tablespoons flour
2 cups milk
¼ cup Sargento Artisan Blend Shredded Swiss and Gruyere Cheese
¼ cup grated Parmesan cheese
Salt to taste
Pepper to taste
Pinch of nutmeg

For the Sandwich:

8 slices of bread (I use white sandwich bread)
About 2 tablespoons of butter or margarine (for spreading)
½ lb. baked deli ham
2 cups of shredded Gruyere and Swiss blended cheese
Dijon mustard
Poached Eggs

All you need to do:

To make the sauce:

In a small saucepan, melt 2 tablespoons unsalted butter.

Add the 2 tablespoons of flour and stir well.

Cook for about 2 minutes to “cook off” the flour taste.

Slowly pour the milk into the saucepan, whisking constantly with a whisk.

Whisk vigorously to make sure there are no lumps. Sauce will thicken fairly quickly.

Remove from the heat and add the shredded cheese, Parmesan cheese, salt, pepper and nutmeg. Stir well until cheese is melted… about 2 minutes. Sauce will be very thick. Set aside.

To make the sandwich:

Spread butter or margarine on one side of each slice of bread.

Place slices, buttered side down, on a cutting board.

Spread Dijon mustard on 4 of the non-buttered sides.

Place a few slices of ham on top of the Dijon mustard.

Place about ½ cup of shredded cheese (Gruyere-Swiss mix) on top of the ham.

Place with a slice of bread, dry side down, on top of the cheese…with one the buttered side up.

Repeat for each sandwich.

Heat a grill pan over medium heat.

Place sandwiches on the grill…. grill until bottom is golden brown.

Carefully flip the sandwiches over and grill other side until golden brown and cheese has melted.

TIP: To keep the bread from sliding off when flipping over, place a spatula over the top to hold the bread in place and use another spatula to flip it over.

Place a poached egg on top of the sandwich.

Spoon Mornay sauce over the egg and sandwich.

Sprinkle with nutmeg.

Repeat for each sandwich.

Classic Quiche Lorraine


This recipe for Quiche Lorraine is a classic one. Growing up, my best friend was Michele. Her Mother was French Canadian and taught me to make this recipe….. actually she taught Michele and me. We were inseparable.

The beautiful thing about cooking at Michele’s house… she had 4 younger brothers… they ate anything… so while we learned… the not so perfect recipes got wolfed down anyway.

I used a ready-made pie crust because in the interests of time it was easier. You can do the same or use your favorite pie crust recipe.

Do-Ahead Tips

I wanted to make this for supper and didn’t want to prepare everything when I had to bake it… so I baked my pie crust about 5 or 6 hours before I needed it and set it aside uncovered….

I chopped the onion, julienned the ham and cheese slices ahead (I use ham…I rarely use bacon…it’s your choice…if you use bacon, you will have to crisply cook and crumble about 8 slices of bacon). I put in on a plate and covered it with plastic wrap and kept it in the fridge until I was ready to assemble the Quiche.

Cheese Info

I used Swiss cheese that was thinly sliced and I just made julienne slices. Gruyere is usually used, but I must warn you it is very expensive. One small piece will run you about $16 (US dollars)…. I love Gruyere… but for a weeknight supper… we use Swiss cheese.

Baking Tips

You will need to check on it frequently after the first 30 minutes or so of baking. You don’t want the edges to get too browned… if they start to brown… lay foil over the edges.

I needed to bake mine just over 1 hour… which is what I typically have to do… my oven is pretty accurate…. after about 50 minutes of baking I would recommend you check the center by inserting a knife… if it comes out clean… it’s done… this way you prevent over-baking. If it’s not done… check in 10 minutes again.

Let the Quiche rest about 10 minutes after baking for easier cutting.

Pie Crust Tip

I made this one with a pre-made pie crust, which I thought was greasy enough… the directions on the box didn’t recommend spraying the Quiche dish with spray oil… my crust stuck in spots… next time if I’m using a pre-made crust… I will spray the bottom lightly with butter flavored spray oil.

Whew!... those are the tips for success for a Quiche Lorraine and pointers on doing it in advance.

I hope you find this helpful.


Recipe:  Quiche Lorraine

All you need:

1 pie crust for a 9-inch Quiche or Pie Plate
1 cup julienned thinly sliced deli ham OR 8 slices bacon, cooked and crumbled
1 cup shredded Swiss cheese
1/3 cup finely chopped onion
4 large eggs, lightly beaten
1 ½ cups half and half cream
¼ teaspoon salt
1/8 teaspoon pepper
1/8 teaspoon cayenne

All you need to do:

Prepare the pie crust according to package directions … or follow your recipe.
Gently press the pie crust into the dish.

Carefully line the pastry with a double thickness of foil…gently pressing the bottom and sides and corners. Make sure the foil reaches about an inch past the rim.

Place pie weights or dried beans in the bottom to prevent shrinkage.

I baked my pie crust for 10 minutes at 425 degrees F.

Meanwhile, prepare other ingredients (slicing and chopping).

Allow pie crust to cool slightly after baking. **you can stop here if you are making this ahead**

Sprinkle ½ the ham slices on the bottom of the crust.

Sprinkle ½ the cheese slices on top of the ham.

Sprinkle remaining ham slices.

Sprinkle remaining cheese slices.

Sprinkle the onion over the top.

In a large bowl, beat the eggs lightly with a whisk.

Add the half and half cream… beat lightly with a whisk.

Add the salt, pepper and cayenne to the cream mixture.

Carefully pour over the ingredients in the pie shell.

Bake at 325 degrees F for 60-65 minutes or until a knife inserted in the center comes out clean.

Allow Quiche to rest 10 minutes before serving.

French Crepes


Glorious crepes... so versatile and delicious... from savory to sweet.. there's something for everyone!

TIPS

You can revise it in a number of ways to suit what you plan to fill it with.

For one thing…. if the crepe will be a crepe with a sweet filling…. I add one teaspoon vanilla to the batter….

If the filling is savory…. I usually leave the batter plain. You can add subtle spice to the crepe too…. personally… I’d rather the filling be the star of the event…. The crepe just makes it that much better.

When making savory or what I call non-sweet crepes... breakfast crepes or dinner crepes... I add 1 1/2 cups of milk and omit the water.. it makes a thicker batter which makes a little firmer crepe.. better suited for a savory crepe...the water .. in my opinion makes them more delicate and better for light fillings.

Use whole milk... lower fat milks make the batter runnier.... if you want to lower the fat.. then I would suggest you use fat free half and half.

You can add 2 tablespoons melted butter to the batter... I add that sometimes to savory crepes... although it's not necessary.. and my family never did that, I recently tried it when making breakfast crepes.. and liked the slight buttery flavor.. it went well with the scrambled eggs.

Several things are important to making great crepes…. a good crepe pan helps. I have one I bought a number of years ago from Williams Sonoma…. I think I paid about $30- $40 (US) for it.

Mine pan is non-stick…. the non-stick seems to be a commercial grade…. I’m lucky… they never stick. If you don’t have a crepe pan…. you can use a saute or omelet pan …. My grandmothers and my mother used whatever they had available…. their crepes came out perfect. The key is knowing your pan and your batter.

You may have a few “throw-aways” before you get the hang of it…. but believe me…. you will get the hang of it and then you will be able to do them time and time again.

Know your batter….. the consistency of the batter should be like heavy cream. If your batter seems a little runny after resting the required ½ hour… then add a tablespoon of flour and whisk it in…. repeat until you have something like heavy cream. If the batter is a little thick… and a tablespoon or two of milk.

Your pan needs to be greased… I use butter flavored cooking oil spray…. You can use melted butter or margarine … and brush it on in between crepes…. if you have a non-stick…. use the spray… now you might ask me why I use cooking spray when I have a good non-stick pan…. one for taste…. and two I think the crepe slides out even easier…. and you definitely want that.

Your pan needs to be hot…. we have a gas stove…. and I use the high setting…. I spray the pan away from the flame… and set the pan on the heat for about a minute…. you want it to sizzle slightly. DO NOT BURN THE BUTTER…. that will definitely ruin the taste… if that happens… just whip it out and start over…. no big deal.

Then I remove the pan from the heat…. and using a 1/3 or 1/2 cup measuring cup not quite filled ( depending on the size of your pan), holding the pan slightly vertically, I pour the batter into the pan…. turning the pan in a rolling motion to cover the bottom of the pan evenly.

The pan should be hot enough to have the batter cling to the pan. If you use a sautĂ© or omelet pan… your edges are rounded ….so be careful not to coat the sides up too far.

Set the pan back on the heat. Allow plenty of time for the batter to set. You can carefully peek underneath lifting an edge with a spatula… but be careful the crepe is delicate. When the bottom is lightly brown… flip it over for about 10 seconds…. Then slide the crepe out of the pan onto a work surface or platter.

If you stack them… I place them between pieces of waxed paper. They can be refrigerated and then quickly microwaved before serving, if you are making them ahead.

I have learned just how much batter will evenly cover the bottom of my pan…. I use measuring cups to measure out my batter… so that the amounts will be consistent…. every pan will vary a bit…. it takes a little practice to figure out what works best for your pan…. hence the throwaways….. believe me, if I were to change pans…. I would have throwaways too.

Try it.. they really are easy... you too can become a crepe-making master!


PRINT RECIPE

Crepes Recipe:

All you need:

1 cup sifted flour
2 tablespoons sugar
4 eggs
1 cup milk
1 cup water *See TIPS
1 teaspoon vanilla (optional)

All you need to do:

Sift together the 1 cup sifted flour and sugar.

Beat 4 eggs.

Add the dry ingredients to the eggs.

Beat the mixture until smooth.

Add gradually the 1 cup milk and the 1 cup of water, beating after each addition.

The batter will have the consistency of heavy cream.

Let the batter stand for 30 minutes.


Madame Croque - A Delightful Bistro Sandwich


Madame Croque is a fabulous French bistro sandwich, wonderful anytime of day... perfect for breakfast, lunch or a light dinner.  It was one of my son's favorite growing up, I made it occasionally for Sunday breakfast or brunch.

So what exactly is a Madame Croque?

It's a version of the popular  Monsieur Croque sandwich…which has a number of versions also but is basically a grilled ham and cheese (gruyere) sandwich…. sprinkled cheese or sauce (variations use either a bĂ©chamel or Mornay) is drizzled ladled over it and broiled…. very yummy!..... well…… the Madame Croque is the same except that an egg is on top of the sandwich… either fried or poached egg.

First a bit of trivia about the Madame Croque… according to Wikipedia … many dictionaries attribute the name to the egg resembling an old fashioned woman’s hat.  So I used a poached egg which looks more like a bonnet.

TIPS

Gruyere tends to be very expensive… a less expensive alternative is using a mix of Swiss and gruyere.. Sargento makes an Artisan Blend of Swiss and Gruyere that’s excellent and more affordable.

Some recipes only toast the bread … I tried that method… but found it a bit too dry.   I suggest you follow my instructions that spreads butter or margarine (margarine works fine) on the outer sides of the sandwich bread and then grills the sandwich in a grill pan.

This Mornay sauce should be a little thinner than the sauce used in a Croque Monsieur... it doesn't get broiled at the end so you want a thinner sauce to run over the top of the sandwich.

This recipe makes 4 sandwiches.


Recipe: Madame Croque

All you need:

For the Mornay Sauce:

2 tablespoons unsalted butter
2 tablespoons flour
2 cups milk
¼ cup Sargento Artisan Blend Shredded Swiss and Gruyere Cheese
¼ cup grated Parmesan cheese
Salt to taste
Pepper to taste
Pinch of nutmeg

For the Sandwich:

8 slices of bread (I use white sandwich bread)
About 2 tablespoons of butter or margarine (for spreading)
½ lb. baked deli ham
2 cups of shredded Gruyere and Swiss blended cheese
Dijon mustard
Poached Eggs

All you need to do:

To make the sauce:

In a small saucepan, melt 2 tablespoons unsalted butter.

Add the 2 tablespoons of flour and stir well.

Cook for about 2 minutes to “cook off” the flour taste.

Slowly pour the milk into the saucepan, whisking constantly with a whisk.

Whisk vigorously to make sure there are no lumps. Sauce will thicken fairly quickly.

Remove from the heat and add the shredded cheese, Parmesan cheese, salt, pepper and nutmeg. Stir well until cheese is melted… about 2 minutes. Sauce will be very thick. Set aside.

To make the sandwich:

Spread butter or margarine on one side of each slice of bread.

Place slices, buttered side down, on a cutting board.

Spread Dijon mustard on 4 of the non-buttered sides.

Place a few slices of ham on top of the Dijon mustard.

Place about ½ cup of shredded cheese (Gruyere-Swiss mix) on top of the ham.

Place with a slice of bread, dry side down, on top of the cheese…with one the buttered side up.

Repeat for each sandwich.

Heat a grill pan over medium heat.

Place sandwiches on the grill…. grill until bottom is golden brown.

Carefully flip the sandwiches over and grill other side until golden brown and cheese has melted.

TIP: To keep the bread from sliding off when flipping over, place a spatula over the top to hold the bread in place and use another spatula to flip it over.

Place a poached egg on top of the sandwich.

Spoon Mornay sauce over the egg and sandwich.

Sprinkle with nutmeg.

Repeat for each sandwich.

Potage St. Germaine - Fresh Pea Soup


This is an excellent version of a Potage St. Germain (Fresh Pea Soup) recipe. As you can see by the ingredients, it is made from chicken stock only… the flavor of the soup is almost totally dependent on the quality of the peas.

TIPS

Using shelled fresh peas would be best… however, frozen peas make a good soup too. Make sure you thaw them first… if you cook them frozen… the soup will not be as flavorful. If you are using fresh peas, you will need about 5 or 6 pounds (before shelling).

This soup is filling, so I would serve it in small bowls or cups.


Recipe:  Potage St. Germain - Fresh Pea Soup

All you need:

4 tablespoons butter
6 shallots, finely chopped
6 cups shelled fresh peas or frozen peas, thawed and rinsed
4 cups fat free chicken broth
¼ teaspoon salt
1/8 teaspoon pepper
½ cup whipping cream
Salt to taste
Freshly ground pepper to taste
Small dollop of sour cream…or Dash of Sherry

All you need to do:

Melt butter in a large pot.

Add the shallots and cook over medium high heat for about 3 minutes, stirring constantly. You do not want the shallots to brown… if they begin to… lower the heat.

Add the peas and the broth and season with ¼ teaspoon salt and 1/8 teaspoon pepper.
Cover and simmer over medium high heat for about 15 minutes or until peas are cooked tender but still fairly firm not mushy. Do not over-cook the peas.

Remove pot from heat and allow to cool slightly.

Ladle the peas and a little liquid into a food processor and pulse until smooth. You may have to do this in batches… put the batches into a large measuring cup to hold them until all the peas are out of the pot.

Pour the pea-chicken broth that is still left in the pot in a measuring cup in case you need more of the broth later on to thin the soup.

Place a strainer on top of the empty pot and strain the processed peas, taking a cooking spoon and stirring vigorously to strain the peas. Press them firmly to get all the soup out of the peas… discard the mashed peas left in the strainer.

Return the pot to the stove and cook over low heat to heat the soup through.
Add the whipping cream, stirring to completely incorporate.

Add salt and freshly ground pepper to taste.

Serve with a small dollop of sour cream or crème fraiche; or a dash of sherry.

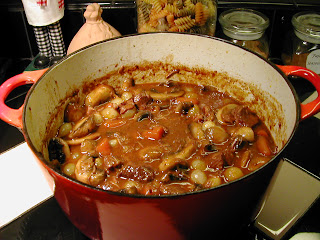
Recipe: Beef Bourguignon


Beef Bourguignon is basically a fancy beef stew… here in the United States we claim beef stew to be our own… but in reality.. it has deep roots in Europe… especially France…. Their version of beef stew is cooked with wine… lots of it… and cooked very slowly in a low heat oven… and finished off with pearl onions and mushrooms... just delicious!

Americans also throw in a host of vegetables… the French pretty much limit it to onions and carrots… in any case the result is melt in your mouth beef and a fabulous gravy with it… oh and let’s not forget those carrots…

This is extremely easy to make… it takes some time cooking…… but the reward is a wonderful meal! The house will smell fabulous!

My family has made a version of this for as long as I can remember… it was just natural to add wine to it… albeit not as much as this recipe has today.

One tip I found especially helpful from Ina Garten was using frozen pearl onions instead of fresh ones… I loved the result and it did cut down on the work a bit.

TIPS

Many recipes thicken the stew toward the end… my recipe thickens naturally while cooking… because I dredge the meat in seasoned flour before I sear it… if you haven’t tried this method… try it you just may like my way better.

Use a good table wine.. one that you would consider drinking… don’t use those “cooking wines” .. they have terrible flavor and add a lot of salt to your dish. I suggest a Pinot Noir.. it doesn’t have to be expensive.

You can make this in a crock pot… BUT… you lose some of the flavor from the crusty browning remnants.. if you do decide to do this in a crock pot as opposed to baking in the oven… be sure to follow the first steps of cooking the bacon and searing the meat and softening the onions, garlic and carrots… place them all in the crock pot.. then deglaze the pot with some of the wine and pour that into the crock pot as well… then follow the rest of the instructions.

Note that I don’t add salt.. the bacon and the little bit of salt in the seasoned flour should be enough.. if it’s not to your tastes… and some at the end to your tastes.

This recipe makes about 5-6 servings… you can easily cut it in half .. as I usually do since there is only two of us… I usually have about a serving leftover… which makes for a mighty nice lunch.

Serve this with fresh bread and a small salad… and enjoy!


Recipe: Beef Bourguinon

All you need:

3 strips thick sliced smoked bacon, chopped
2 ½ pounds chuck beef cut into 1 inch cubes
½ cup flour
Salt
Pepper
Garlic powder
2 tablespoons olive oil
2 onions, chopped
2 large garlic cloves, finely chopped
About 2 cups carrots, chopped
3 cups dry red wine
3-4 cups beef broth
2 bay leaves
½ teaspoon dried thyme
1 ½ tablespoons tomato paste
1 small bag frozen pearl onions
3 tablespoons butter
1 pound mushrooms, thick sliced

All you need to do:

Preheat the oven to 325 degrees F.

In a Dutch oven that can go into the oven also, cook the bacon over medium heat until slightly crisp and fat has rendered.

Remove the bacon with a slotted spoon and drain on a paper towel. Set aside.

Meanwhile, pat the meat dry with a paper towel then dredge in seasoned flour (flour, sprinkle of salt and pepper, and a heavy sprinkle of garlic powder).

Sear the meat in batches in the hot bacon grease. Add a bit of olive oil as needed if the pot gets dry.

Remove the meat with a slotted spoon to a plate.

You will need about 2 tablespoons of fat or olive oil in the pan… if you don’t have that much bacon grease left.. add olive oil.

Add the onions, garlic and carrots and stir well. Cook until onions are soft.. about 10 minutes.

Add about a cup of wine to deglaze the pot.

Add the meat, bacon and vegetables back to the pot. Add the rest of the wine.

Add enough beef broth to cover the meat to 2/3 or so. Stir well.

Add the tomato paste and stir well.

Add the thyme and bay leaves.

Bring the pot back to a low simmer.

Put a lid on the Dutch oven and place in the preheated oven.

Add beef broth as needed about 1 ½ into the cooking and stir. You don’t want it swimming but you don’t want it too thick either. Stir well.

Cook for another 1- 1 ½ hours or until meat is tender.

Add the pearl onions, replace the lid and continue cooking.

In a large skillet, melt the butter.

Add the mushrooms and cook until they are light brown and have rendered their juice.

Add the mushrooms and their juices to the pot… replace the lid and cook on top of the stove for about 15-20 minutes. Add any additional beef broth to get to consistency you want.

Remove the bay leaves and serve in bowls.

Recipe: Eggplant Provencal over Penne Pasta


Eggplant Provencal over Penne Pasta is a simple and versatile dish that is absolutely delicious! … a terrific meatless dish that’s ready in under a half hour.

Before we get into the recipe… and what makes it versatile… let’s talk about Provencal. So what exactly is Provencal? Provencal or Provence refers to a region in France. According to Wikipedia it is a region of southeastern France on the Mediterranean adjacent to Italy. The cuisine consists of basic ingredients such as olives, olive oil, garlic, various fish, lamb and goat.

Some popular French dishes, such as bouillabaisse and ratatouille find its origins from this region. Ratatouille, the recipe made famous by the animated feature by the same name, has been a dish my family has made for years. In case you don’t remember, it is a vegetable stew known as a hearty “peasant” meal served often with crusty French bread.

The spice mixture known as Herbes de Provence or Provencal herbs is a mixture of dried herbs from Provence said to be “invented” in the 1970’s, invented used as a loose term since cooks from the region have used them in various quantities for years. They simply “standardized” the mixture.

The standard mixture contains savory, fennel, basil and thyme… other spices such as marjoram and lavender (lavender is only added in American mixes) are also included in some recipes. It was in the 1970s that standard mixtures were formulated by spice wholesalers, including Ducros in France which is now part of McCormick & Company... Although a quick search yields many different recipes... so much for a standard mixture!

The recipe for today is one that I found and adapted from a small soft cover book titled “Just Eggs” by Chef Express. The recipe is really a basic one and is versatile… it was intended to be a base for baked eggs… that will be a separate post.

After reading the recipe, I decided it would be perfect to serve over penne pasta, and in keeping with the “leftover” theme of the last few days… I happened to have leftover penne in the fridge.

Grilled chicken or beef would be a great addition if you didn’t want this to be meatless… also the addition of chopped black olives would add great flavor as well.

The only adaptation I made was to add spice to the dish, the original was missing the Herbes de Provence and in my opinion was a bit bland for my tastes and what I am used to. I also used far less oil than the original recipe… it does not need a ¼ cup of oil.

TIPS

As I mentioned, I had leftover penne pasta in the fridge, obviously you can boil a fresh batch of pasta for this dish. …

As far as reheating pasta, I know many sources say pasta does not reheat well… however… I have never had a problem reheating it… You can easily microwave it to reheat it… or do as I did… I needed a bit more pasta to have enough for another meal… I simply put the leftover pasta in a colander and when I went to drain the new batch.. I simply poured it over the leftovers… it worked fine.

My directions use a “pinch” of each of the herbs… taste the dish and add more according to your tastes… I was a little more heavy handed with the thyme and the basil… or if you have a commercial blend of Herbes de Provence… simply sprinkle it in the dish to your tastes.

Make sure you add the spices during cooking, not at the end… you want the flavors to infuse into the dish…. I often add the spices at the beginning when I add the oil to the skillet, but you can add it when you add the tomatoes and wine before the dish is simmered.

The directions call for 2-3 tablespoons of tomato paste… the original instructions used 3 tablespoons, I feel it made the mixture a bit too thick.. I use 2 tablespoons… however much you use is up to you.

The original recipe uses 4 large tomatoes chopped, I used 1 can of petite cut tomatoes instead.

For the white wine, I used a Sauvignon Blanc by Turning Leaf.

Make sure you use “unseasoned” tomato paste.. not a tomato paste with added herbs.. add the herbs in yourself.

Serve with fresh crusty bread.

I hope you try this delicious dish.


Recipe: Eggplant Provencal over Penne Pasta

All you need:

1 medium sized eggplant, peeled and chopped
1 large onion, chopped
2 large garlic cloves finely minced
2 tablespoons olive oil
1 can (14.4 oz) Hunts Petite-cut Tomatoes
¼ cup white wine
Pinch or two of thyme
Pinch of savory
Pinch of fennel
Pinch or two of basil
1 tablespoon chopped fresh parsley
Additional chopped fresh parsley for garnish
Cooked penne pasta

All you need to do:


In a large skillet over medium heat, add the olive oil.

Add the onions and garlic. Cook until the onions are soft, about 3 minutes. Be careful to make sure they don’t brown. Stir frequently.


Add the eggplant and toss to coat with the oil. You may have to add a bit more oil… no more than about a tablespoon.

Cook the eggplant, stirring frequently for about 5 minutes.


Add the remaining ingredients


And simmer for 10 minutes until eggplant is cooked but still slightly firm.


Spoon over cooked penne pasta and sprinkle with chopped fresh parsley (for garnish).

Recipe: Chicken and Sausage Cassoulet


This recipe for Chicken and Sausage Cassoulet combines some traditional elements of a French Bean Stew with some different ingredients. Traditional cassoulets use a variety of meats… beef, pork, chicken even duck have been used and in various combinations. Some variations even use Italian sausage.. I recently came across a recipe that used Kielbasa which grabbed my attention.. we love Kielbasa. It seems the kinds of beans used can vary also but not seen as often.

I decided to use cut-up boneless skinless chicken breasts with the Kielbasa … I used Northern White Beans which is traditional … and the rest of the ingredients are typically found in Cassoulet recipes. The result was delicious… we had it with a large Cuban bread…. a terrific meal.

TIPS

One recipe added a crumb topping toward the end of the baking… against my better judgment … I tried it… while it added additional seasonings to the Cassoulet…. I wouldn’t do it again… most of it sunk in and we decided we didn’t care for the texture it left. … so I added the seasonings to the recipe and omitted the bread crumbs.

The baking time is 1 hour and 15 minutes… which is pretty accurate… any longer the beans and carrots will get too soft…

I used a Dutch oven… you can use a large casserole dish.

If you decide to use a casserole dish… you will need to use a large skillet first to sautĂ© the sausage, chicken, onions and garlic.

I used Sauvignon Blanc for the white wine.

You can omit the wine and use additional chicken broth in its place… but the wine does give this dish a wonderful flavor.

I hope you like this as much as we did!


Recipe: Chicken and Sausage Cassoulet

All you need:

2 medium onions, sliced
2 large garlic cloves, finely diced
2 boneless skinless chicken breasts, cut into chunks
1 Kielbasa, cut into slices
Olive oil cooking spray
2 cans (15.5 oz.) Great Northern Beans, drained and rinsed
1 can (14.5 oz.) Delmonte Diced Tomatoes with Garlic and Onion
1 Hillshire Farms Kielbasa, cut into ¼ inch slices
2 tablespoons plain tomato paste
1 teaspoon dried thyme
2 tablespoons fresh parsley, chopped
1 cup white wine
2 cups chicken broth
1 cup sliced carrots
¾ teaspoon salt
¼ teaspoon black pepper

All you need to do:

Preheat oven to 375 degrees F.

Spray a large Dutch oven with olive oil cooking spray.

Add the sliced Kielbasa and chicken breast chunks.

Brown lightly over medium high heat for about 5 minutes.

Add the onions and garlic and cook, stirring frequently until onions are soft.

Add the remaining ingredients, stir well.

Cover the Dutch oven and bake at 375 degrees for 60 minutes.

Remove the cover and bake for an additional 15 minutes.

Serve with fresh bread.

Recipe: Banana Soufflé


Many people are intimidated about making soufflĂ©s… and they shouldn’t be.. they really are very easy to make… very simple steps… and you have a wonderfully airy dish… and depending on the ingredients… soufflĂ©s can be the main dish, side dish or dessert…

I learned how to make soufflĂ©s as a teenager… my parents would have to go to a meeting one Sunday a month and would leave me to take care of my brother… invariably I would forget to defrost meat… and back then we didn’t have microwaves… and I knew nothing of speed defrosting.. so I learned to make a lot of different egg or pasta dishes... oh.. and tuna too… it’s amazing how many things you can come up with … with those ingredients.

So I was left to read cookbooks and make the best of what I had… I learned how to make soufflĂ©s from reading my Mother’s Gourmet cookbooks… with a little practice.. I began experimenting with different ingredients and sizes of soufflĂ© dishes… I was 14…. so trust me, you can do this.

This recipe for Banana SoufflĂ© is so delicious… a perfect finish to a special meal… or even a brunch… and for you dieters… this is surprisingly something most dieters can consider… it has very little sugar.. and is mostly egg whites…

TIPS

Follow the directions in the steps I will break out for you… and you will have a perfect soufflĂ©.

I wrote the recipe for rum extract… you can substitute rum for it. Since I used 1 ½ teaspoons of rum extract… it is approximately equal to 2 ½ tablespoons of rum… I would eyeball the ½ tablespoon…

To make this without the rum flavor… substitute vanilla for the rum extract amount… (in addition to the vanilla extract in the recipe).

Want to WOW your guests? …. here’s a serving suggestion


To serve on a serving plate… use little small round hot pads… and cover them with a small paper doily or a flattened paper muffin wrapper… or … I have heat resistant plates… so I cut about a quadruple thickness of thick paper towel into a circle a little larger than the soufflĂ© dish.. then place a flattened paper muffin liner over it…

These are individual soufflĂ©s… and they make a fabulous presentation… perfect for a dinner party… these bake in 15 minutes… so while your guests linger at the table… excuse yourself and do the last couple of steps… see instructions below to make these partially ahead.

So.. there’s lots to show you.. so let’s get to it!


Recipe: Banana Souffle

All you need:

1 tablespoon butter, melted
2 very ripe bananas
1 large egg yolk
1 tablespoon lime juice
4 tablespoons sugar, divided
½ teaspoon vanilla extract
1 ½ teaspoons rum extract
3 large egg whites
Pinch of salt
Confectioner’s sugar (for garnish)

All you need to do:

Preheat the oven to 400 degrees F.


In a small processor or blender, add the banana, the egg yolk, 2 tablespoons sugar, lime juice, vanilla and rum extracts. Process until smooth.


Pour the banana mixture into a large bowl and set aside.


Brush 5-6 one cup soufflé dishes with the melted butter (I used only 4 because that's what I had at the time.. I discarded the rest of the unused batter.


Put 1 tablespoon sugar in a small custard cup…. gently pour about half the sugar into a souffle dish and turn completely, coating with the sugar… dump the excess sugar back into the custard cup and repeat until all souffle dishes have been coated… discard any leftover sugar (you shouldn’t have very much left).

Place the soufflé dishes on a baking sheet and set aside.


Using a large mixer, place the egg whites and a pinch of salt into the mixer bowl. Beat until soft peaks.


Add 1 tablespoon sugar to the egg whites and beat until stiff peaks form when the beater is stopped and pulled up… the egg whites should be glossy.


Using a spatula, fold in the egg whites into the banana mixture, a quarter of the egg whites at a time… do not over mix… but the egg whites should be well distributed throughout the banana mixture.


Spoon the mixture into the soufflé dishes, fill to slightly above the rims. Tap them gently on the counter top.

With a knife, flatten any peaks and then using the knife gently cut a circle in the top of the mixture… it should be a circle about half the size of the soufflĂ© dish.


Place in the center of the preheated oven and bake for about 15 minutes.. keep an eye on them… you want them risen and browned slightly but not burned…


Remove and place on a protected serving plate and dust with powdered sugar.

Serve immediately.


Note: Do not panic about how fast they will fall… and they will fall… this photo was taken about 10 minutes after coming out of the oven… even after falling the soufflĂ© is still light and airy and beautiful.


To make partially ahead…

Prepare the individual soufflé dishes and set aside (see instructions above).

Prepare the banana batter portion .. and set aside.

Keep the egg whites in the fridge in a small cup ….

Have all your ingredients for the egg whites ready.

Set up the serving plates ahead of time and set aside…

Preheat the oven.

Five minutes before the oven is done preheating… follow the instructions for beating the egg whites.

Fold the whites into the banana batter and spoon into the prepared individual soufflé dishes.

Bake for 15 minutes… leave the oven light on and watch… the tops shouldn’t brown too much.

While the soufflĂ©s are baking… prepare the confectioners sugar in a small strainer… set it down near where you plan on plating the soufflĂ©s.

When they come out of the oven… place on prepared plates.. sprinkle with confections sugar and serve.

Recipe: Croque Monsieur


A Croque Monsieur is a hot ham and cheese grilled sandwich. It’s a popular French bistro or cafĂ© sandwich. The name means "crispy mister"... the origin of the name is unknown. The original Croque Monsieur was simply just a grilled ham and cheese sandwich using emmentaler or gruyere cheese. Numerous more involved variations have developed… this recipe is among them.

The recipe I have grills the sandwich… then adds a thick Mornay sauce (bĂ©chamel sauce with gruyere cheese)on top…sprinkled with some more grated cheese then set under a broiler to melt the top cheese and brown slightly.… this version is absolutely delicious!

TIPS

Gruyere tends to be very expensive… a less expensive alternative is using a mix of Swiss and gruyere.. Sargento makes an Artisan Blend of Swiss and Gruyere that’s excellent and more affordable.

Some recipes only toast the bread … I tried that method… but found it a bit too dry… I suggest you follow my instructions that spreads butter or margarine (margarine works fine) on the outer sides of the sandwich bread and then grills the sandwich in a grill pan.

This Mornay sauce recipe makes for a very thick sauce… which is desirable… you essentially spread it on the top of the grilled sandwich before broiling it… if you make Mornay sauce for any other purpose… it would be a somewhat thinner sauce.

This recipe makes 4 sandwiches.

I hope you try this version of a Croque Monsieur..


PRINT RECIPE

Recipe: Croque Monsieur

All you need:

For the Mornay Sauce:

2 tablespoons unsalted butter
2 tablespoons flour
2 cups milk
½ cup Sargento Artisan Blend Shredded Swiss and Gruyere Cheese
½ cup grated Parmesan cheese
Salt to taste
Pepper to taste
Pinch of nutmeg

For the Sandwich:

8 slices of bread (I use white sandwich bread)
About 2 tablespoons of butter or margarine (for spreading)
½ lb. baked deli ham
About 3 cups of shredded Gruyere and Swiss blended cheese
Dijon mustard

All you need to do:

To make the sauce:


In a small saucepan, melt 2 tablespoons unsalted butter.

Add the 2 tablespoons of flour and stir well.

Cook for about 2 minutes to “cook off” the flour taste.


Slowly pour the milk into the saucepan, whisking constantly with a whisk.

Whisk vigorously to make sure there are no lumps. Sauce will thicken fairly quickly.


Remove from the heat and add the shredded cheese, Parmesan cheese, salt, pepper and nutmeg. Stir well until cheese is melted… about 2 minutes. Sauce will be very thick. Set aside.


To make the sandwich:


Spread butter or margarine on one side of each slice of bread.

Place slices, buttered side down, on a cutting board.


Spread Dijon mustard on 4 of the non-buttered sides.


Place a few slices of ham on top of the Dijon mustard.

Place about ½ cup of shredded cheese (Gruyere-Swiss mix) on top of the ham.


Place with a slice of bread, dry side down, on top of the cheese…with one the buttered side up.

Repeat for each sandwich.

Heat a grill pan over medium heat.

Place sandwiches on the grill…. grill until bottom is golden brown.

Carefully flip the sandwiches over and grill other side until golden brown and cheese has melted.

TIP: To keep the bread from sliding off when flipping over, place a spatula over the top to hold the bread in place and use another spatula to flip it over.

Preheat the oven to broil.


Place grilled sandwiches on a baking sheet.

Put a generous helping on of Mornay sauce on the top of each sandwich and spread over the top.

Sprinkle about ¼ cup shredded cheese on top of the sauce.

Broil sandwiches until the top has slightly browned and started to bubble. Remove immediately.

Watch carefully because once the sauce and cheese starts to turn brown… it will quickly burn if you don’t take it out of the oven immediately.

Serve hot.

Recipe: Chicken Cutlets with Hunter’s Sauce


This recipe for Chicken Cutlets and Hunter’s Sauce evolved years ago when I worked on the recipe to mimic a restaurant dish I had liked in a German restaurant.

The chicken cutlets are prepared as you prepare schnitzel…. and smothered with the sauce.

Usually if you ask for Schnitzel with Hunter’s Sauce you would be served Jagerschnitzel… which is very different from this… this dish uses a French Hunter’s Sauce or Sauce Chasseur as the base for the sauce… it has a few changes from the classic sauce… I assure you… you will love this dish.

This dish is fairly quick and easy to prepare.

TIPS

This dish can be somewhat prepared ahead… I wouldn’t make this more than an hour ahead… you don’t want the cutlets to dry out in the warm oven.

To save time, you can prepare the chicken to just before the cooking step... store in the fridge until you are ready cook them.

To reheat the sauce simply heat in a saucepan over medium low heat… or microwave, stirring occasionally.

Make sure you dice the carrots fairly small…. I took small Belgian carrots and sliced them… smaller pieces cook quicker and look better for a terrific presentation. Be aware the carrots take a considerable amount of time to cook… you want them cooked but still with a little crunch.. not mushy.

This dish can be made with thin veal or pork cutlets instead of the chicken.

I figure on 2 cutlets per person.

I used a Sauvignon Blanc for the wine… Monkey Bay from New Zealand is good… or use a good American made one.

I served this with creamy garlic mashed potatoes….it was truly delicious… and nice enough to make for a Valentine’s Day celebration for two.


PRINT RECIPE

Recipe: Chicken Cutlets with Hunter’s Sauce

All you need:

For the Chicken:

4-6 thin sliced boneless skinless chicken cutlets
Plain bread crumbs (amount depends on the quantity of cutlets)… about 1 cup for 4-6 cutlets
1 egg with a dash of milk, beaten
Flour seasoned with salt and pepper (amount depends on the quantity of cutlets)… about ½ cup for 4-6 cutlets
2 tablespoons butter
2 tablespoons olive oil

For the Sauce:

2 tablespoons butter, divided
1 tablespoon flour
1 cup beef broth
2 shallots, finely chopped
1 clove garlic, finely chopped
¾ cup diced carrots, small dice
2 plum (Roma) tomatoes, seeded and chopped
½ lb. fresh mushrooms, stems removed and sliced
¾ cup dry white wine
1 tablespoon fresh parsley, finely chopped
Snipped chives (about 2 teaspoons)

All you need to do:

To make the Chicken Cutlets:

Preheat the oven to 250 degrees F.

Set up 3 bowls (wide bowls, if possible).

In one bowl, mix the flour, salt and pepper.

In another bowl, beat the egg and milk until well combined.

In another bowl, add the bread crumbs.

Dip the cutlets, one at a time, first in the flour (make sure the entire cutlet is covered in flour).

Then dip the floured cutlet in the egg mixture.

Then dip the cutlet in the bread crumbs, covering the cutlet completely.

Place on a plate and repeat the steps until all cutlets have been breaded.

At this point, you can cover the cutlets and store in the refrigerator until you’re ready to fry them.

When ready to fry, heat a large skillet on medium high heat.

Add the butter and olive oil to the skillet. Do not let butter burn.

When the butter is melted, add the cutlets to the skillet.

Cook until the bottom is brown and crispy (about 3 minutes).

Flip the cutlets and cook the other side until brown and crispy (about two minutes).

Remove cutlets from the skillet and lay on paper towels to pat off excess grease.

Put the cutlets on a oven proof plate and keep warm in the preheated oven while you cook the remaining cutlets. Cover loosely with foil…. you don’t want moisture from the steam to make the cutlets lose their crispiness.

You will be using the same skillet to make the sauce…see below.

To make the Sauce:

In a small saucepan, melt 1 tablespoon butter.

Add the flour and mix into a paste… let the paste cook for about a minute to cook off the flour taste.

Add 1 cup of beef broth and whisk vigorously until all lumps are out.

Cook the sauce over medium heat until it begins to thicken… whisking constantly.

Add the carrots and the tomatoes,let them cook in the sauce while you start the rest of the sauce in the skillet you made the chicken cutlets in, stirring occasionally.

Add 1 tablespoon butter to the skillet and melt over medium low heat.

Add the shallots and garlic and cook for 2 minutes or until shallots are softened…do not brown.

Raise the heat to medium.

Add the mushrooms and cook for about 3 minutes.

Add the wine and deglaze the pan (scraping up any bits on the bottom of the pan).

Pour the sauce with the carrots into the skillet and stir until incorporated.

Cover and bring sauce to a boil and lower heat and simmer over medium heat for 20 minutes.

Remove the cover and let the sauce simmer and reduce for 10 minutes or until carrots are cooked.

Remove the warmed platter of chicken cutlets from the oven.

Remove the foil and spoon a generous amount of sauce over the cutlets.

Sprinkle with chopped parsley and chives.

Serve immediately.

Serve the excess sauce at the table in small bowl with a ladle.

Looking for More Recipes?

If you are looking for more recipes click the "Older Posts" link to page back to older posts or go to the archives in the right column. The list of labels at the bottom in the right column will help you find specific types of recipes or try our search engine at the top and search by name or ingredient.


What's more comforting on a cold day than Homemade Chicken Noodle Soup? .. and it's so easy to make!

Chicken Noodle Soup