Fabulous Sides for that Backyard BBQ


Grilling season is in full swing.. hot weather.. cold drinks... and BBQ... summer is the time for lots of fun and great food...

So what better time to post recipes for terrific sides to go with that BBQ... easy to make... and a perfect accompaniment for whatever you're grilling.


Here are some suggestions....


Salad - Make it a green salad...Lettuce is in season.. all kinds... so mix it up... make a big bowl.. it's not only healthy but delicious too.

Make a favorite dressing.. why buy bottles dressing when it takes only minutes to make your own? Here's a link to the Salad Dressing Collection Post...

9 Terrific Salad Dressing Recipes for Green Salad


Pre-Made Salads - Always a perfect side to BBQ.. there are a plenty of salads to choose from... from Potato to Three-Bean... and of course the timeless favorite... Macaroni Salad... here's a link to a recent post ...

Salads for Every Occasion


Deviled Eggs - these are a great "make ahead" addition to your menu.. make them Classic or Zesty.. either way they are sure to be first to go.


Boston Baked Beans... easy to make.. it really makes itself.. and it can be made ahead... a great go-together with grilled franks.


Grilled Vegetables - including Grilled Corn on the Cob ... easy to make... always perfect with whatever you are serving.. just click the links for easy how-to's


Hush Puppies - they cook quickly and are a nice change from ordinary fries


Cheesy Corn - a great dish with BBQ ribs and coleslaw


Baked Potatoes - always terrific along side a steak and just about anything else you grill... loaded or plain.. they're always a hit.. click the link for a how-to to make the Perfect Baked Potato


Grilled Cheesy Potato Packets - another quick and easy recipe with tips on short cuts to make it even easier.


Seasoned Oven Browned Potatoes - a perfect potato side if your grill is not big enough to accommodate the grilling of the meat and the potatoes..


Brown Rice with Mushrooms Garlic and Onions - Brown rice is not only healthy but has a wonderful .. almost.. nutty flavor... a perfect backdrop for the mushrooms, garlic and onions... great with Shish Kabob, steak or any other grilled meat...

Recipe: Easy Triple Berry Trifle


This quick and easy dessert is not only delicious it looks fabulous! With it’s red, white and blue colors.. it’s a perfect dessert for your 4th of July celebration.

TIPS

I used store bought pound cake… you can make your own or substitute white cake made in a 13 x 9 baking pan.. just cut it up.

I used homemade Chantilly Cream… whipped cream made with sugar and vanilla… the flavor is wonderful!

The size trifle is dependent on how many people you plan on serving.. the trifle in the picture was this recipe made smaller… I used less pudding and cut the remaining ingredients in half.. to fit in a smaller glass bowl.. I made only one layer.

You can use any pudding.. from scratch recipe or boxed (instant or cooked).. or Pastry Cream.. all work well.

I used white chocolate pudding… you can use vanilla, French vanilla or coconut cream. If you can’t find the larger size box, you can use 2 of the smaller boxes instead.. just use more or you may have pudding left… not that having extra left is a bad thing.. just ask your taste testers.

If you don’t want to use any alcohol.. substitute a berry juice… pick a raspberry or strawberry combo.. white grape would also work… even a berry punch…. there are many choices in the juice isle at the grocery store. If it’s a sweetened juice, cut the sugar back to 1 tablespoon.

To get a true red white and blue look.. use white cake, fruit and whipped cream… but using the pound cake and pudding… adds more flavor.

Make sure you lay your layers to the glass so they can be seen thru the glass and you get a striped effect.

Watch the fireworks and bring on the spoons!


Recipe: Easy Triple Berry Trifle

All you need:

Pound cake, cut into cubes
2 cups blueberries
2 cups strawberries, sliced
2 cups raspberries
2 tablespoons sugar
¼ cup raspberry liqueur or berry juice* see TIPS
1 pkg (5.7 oz. – 6 ½ serving)JELL-O instant pudding (use whatever flavor you prefer)* See TIPS
3 cups milk (if using the 5.7 oz pkg otherwise follow pkg directions)
Chantilly Cream or whipped cream

All you have to do:

In a medium bowl mix the raspberries, sugar and liqueur or juice and set aside.

Make the Chantilly Cream or whipped cream and set aside.

Make the pudding and set aside.

In a 3 quart trifle bowl or clear glass bowl, layer ½ the pound cake cubes.

Spread half the raspberry mixture over the pound cake.. then layer the blueberries… then strawberries…

If making the larger trifle.. layer the rest of the pound cake… then the rest of the raspberry mixture.. then the rest of the pudding…. then layer the blueberries around the outer rim of the pudding layer.

Place the remaining sliced strawberries in the middle… top with whipped cream or Chantilly cream in the very center.

Chill at least an hour or until serving.

Recipe: Fajita Seasoning


Original post - 5/5/2009

I first posted this recipe over 3 years ago.. and over the course of time I've heard from many readers telling me how terrific it is. I've had so many requests for this Fajita Seasoning recipe I decided to repost it. It's easy to make.. more economical than buying the pre-made mixes.. and you get to control what to include and what not to.

The seasoning makes fabulous Fajitas.. you'll never buy the packaged stuff again.

TIPS

I gave the most basic quanitities I could break it down to... so you can double.. triple... quadruple this recipe easily to fit your needs... I usually make up 4 or 5 times the recipe and store it in a jar...as you can see above...

The seasoning is really terrific in many things not just Fajitas... use it in what ever you want... it's easy to measure out..

I keep the seasoning in a small jar. I get my jars at Walmart and they really are cheap and well worth the cost. You can also use an airtight container or a zip loc bag.

If you do use a jar... choose a wide neck jar so it's easy to get a measuring spoon in.

Approximately 2 heaping tablespoons equals a seasoning pack you would buy....again.. making this yourself leaves the option up to you to use more or less depending on the amount of meat you are using.

I mix my spices in a bowl by using a wire whisk to blend... I found it's the best way to get everything evenly distributed.

I've included directions for using it when making your Fajitas... the directions are standard directions used on commercial blends... but I wanted to give it to you so you have them.


PRINT RECIPE

Recipe: Fajita Seasoning

All you need:

¼ teaspoon garlic powder
½ teaspoon onion powder
¼ - ½ teaspoon cayenne (amount depends on how much heat you want)
¼ teaspoon cumin
1 teaspoon paprika
1 teaspoon salt
2 teaspoons chili powder
1 teaspoon sugar
1 chicken bouillon cube, crushed

All you need to do:


Mix all the ingredients in a small bowl.


Store in an airtight container or Zip Loc bag until needed.

Directions for making fajitas with this seasoning:

Heat 1 tablespoon oil in a large skillet over medium-high heat.

Add 1 pound chicken or beef and cook until meat is completely cooked (no longer pink) and drain off excess fat.

Add 1/2 cup water and 2-3 tablespoons of Fajita Seasoning and stir well.

Add 1 bell pepper (cut into strips) and 1 medium onion (thinly sliced).. cook 2-3 minutes until vegetables are tender but still have a little crisp to them.

Serve with tortillas... toppings include sour cream, shredded cheddar cheese, cut-up tomatoes, chopped green onion and guacamole.

Recipe: Grilled Vegetable Pizza


Grilled vegetables are a delicious topping for pizza and a terrific substitute for those fat laden meat toppings… I can hear the gasps now.. what no meat??

That’s right… no meat… just grilled vegetables full of flavor. Trust me.. I love meat toppings on pizza as much as the next person… but I also love veggies… and sometimes a change of pace is what you need… so try it… you’ll love it!

TIPS

You can grill any vegetables you like… and do it by any method you prefer. You can put the veggies on skewers or in a grill pan… either way .. should work just fine.

I cut my veggies a little smaller for this … It’s just easier to cut the pizza with smaller pieces.

When I grill them.. and I’ve done both methods mentioned… I either baste them with olive oil and sprinkle with Italian seasoning and garlic powder… or… put them all in a bowl and drizzle a little olive oil on them.. sprinkle with Italian seasoning and a little garlic powder…toss them to coat them evenly.

Since these will be toppings on a pizza in a hot oven… I grill them a bit less than usual.. so they are just a little less soft.

Leftovers work well with this … I make grilled vegetables as a side for a meal and make enough for leftovers so I have a quick topping for pizza a night or two later.

Grill them when the grill is hot for about 5 to 10 minutes… different veggies cook faster than others.

I listed the shredded cheese as 1-2 cups… I use a quantity somewhere in between … it’s personal preference about how much to use.


Don't you wish you could eat it right off the page?... This was taken just before we devoured it..


Recipe: Grilled Vegetable Pizza

All you need:

Grilled vegetables… suggestions:

Red, green and/or yellow peppers
Baby Portobello mushrooms
Yellow squash
Zucchini
Sweet onions
Eggplant

Other Ingredients:

Shredded Italian Six cheese blend
3-4 tablespoons pesto
Sliced Plum (Roma) tomatoes
Pizza dough, homemade or store bought

All you have to do:

Preheat the oven to 450 degrees OR follow the instructions on the Pizza dough package.

Spread the dough on a lightly greased pan.

Spread the pesto evenly over the dough, leaving a small border around the edge.

Layer the grilled vegetables over the pesto. Then layer the sliced tomatoes over the vegetables.

Sprinkle the cheese evenly over the vegetables and tomatoes.

Bake for about 15-18 minutes or until the crust is golden and the cheese has melted.

Remove from the oven and allow the pizza to stand for about 5 minutes before cutting.

Recipe: Hush Puppies


This Southern favorite is a perfect side for fried fish, hot dogs and BBQ. Hush Puppies are very easy to make and cook really quickly…. start to finish in about 15 to 20 minutes.

TIPS

Use a Candy/Deep Frying thermometer… it makes life so much easier.. you get the oil just at the right temperature.. and you can back the heat down if it gets too hot .. you don’t want to burn your Hush Puppies.

I use beer… any beer will do…. I use whatever I have.. Warren never complains.. I need a ½ cup and he gets the rest.

If you don’t want to use alcohol.. then substitute whole milk.

You need roughly 3 inches of fat.. use a deep pot or Dutch oven to keep the splatters to a minimum. I used a large can of solid shortening…

This recipe uses self-rising Cornmeal mix and self-rising flour.. I can’t say enough good things about both.. they simply make great cornbread and other foods.. well worth having in the cupboard.

If you want to add more flavor.. you can add chopped green or red pepper and a chopped jalapeno pepper.

To get them perfectly round use a small scoop.. one that looks like an ice cream scoop but is very small (they’re used for cookies).

This recipe will serve four.


Recipe: Hush Puppies

All you need:

1 cup self-rising cornmeal mix
½ cup self-rising flour
1 tablespoon sugar
1 egg
½ cup beer (or whole milk)
1 medium onion, finely chopped
Oil for frying

All you have to do:

Combine the cornmeal mix, flour, and sugar in a large bowl.

In a separate bowl beat the egg… add the beer and stir well.

Add the wet ingredients to the dry ingredients.

Mix in the onion, and stir well.

Heat the oil in a deep pot to 375 degrees F.

Drop the batter into the hot fat by rounded scoopfuls or tablespoons.

Cook until golden brown (about 2 minutes)then flip over with a slotted spoon. Cook until the second side is golden.

Remove from the hot fat with a slotted spoon and drain on paper towels.

Serve hot.

How to Grill Vegetables


Grilling vegetables is an easy way to cook them… yet many cooks are intimidated by them… even my Grill Master was wary…. he had a million excuses until we bought a grilling basket… then to get him to use skewers was another story… and so it goes. You should have seen the look on his face the other night when I asked him to just grill vegetables … no meat… sacrilege!

I decided to write this post to take some of the mystery out of it… actually there really isn’t any mystery at all… honest!

Please Note: The prices given for some examples are subject to change and are listed for illustration purposes only. Please check the websites for the most up-to-date prices.


Heat Method

Charcoal Grill… just as with grilling meat … using a charcoal grill is a personal preference … prepare and heat it as you would if you were grilling meat… the coals are ready when they are mostly covered in ash.

The coal fire will give the vegetables a really nice smoky flavor as it does meat.

Gas Grill … again.. some people prefer a gas grill for meat… and the same will go for vegetables. The gas grill has the advantage of getting the grill up to grilling temperature faster and you can control the temperature better and easier.

You lose the charcoal taste.. although you can purchase special gas grill coals and wood to give your foods flavor. Still, even if all you use is the gas grill and no additives.. you do have the fire to give your foods that crusty charred flavor.


Grill Pan… I added this method simply because foods cooked in a grill pan are technically grilled vegetables… usually made of cast iron.. they will char your foods and make those sought after grill marks.

By no means is this a second rate method… I use a grill pan when I don’t have the opportunity to use the charcoal grill.. obviously you lose the charcoal taste.. or the taste a true fire will give foods.

The Grill Pan shown is a 10 inch pan made of cast iron and is by Emerilware. It is available at Casa.com and retails currently for $27.49

Pan, Basket, Skewer or Direct

BBQ Grill Pan… there are special pans that come in all sizes and shapes.


Choose a size and shape that will work well with your BBQ Grill. Also take into account whether you intend to grill the meat at the same time as your vegetables… make sure you have enough room for both if that is your intention.


We have a typical grill pan we bought .. found a great price and grabbed it. It wasn’t until we began using it did we think of things we didn’t like about it. Great price doesn’t necessarily mean you’re getting your money’s worth.

Who thinks of handles when buying them? …. The Grill Master did.. and just figured he’d use a mitt to move it around and remove it from the grill… it was awkward.. while he would still use a mitt.. a long handle would be better to help grip it… a few extra bucks for one with a handle would have been smarter.

Not all are non-stick… and as with pots and pans.. some are better at non-stick than others..as in everything else in life.. you get what you pay for...buy a pan by a quality manufacturer if you can... the price range is not all that wide.. it's not worth pinching a few pennies. The Grill Master complained about how hard it was to get all the pieces of vegetable stuck on it… especially in the corners.


Which brings me back to the shape… a BBQ Grill Pan.. with rounded sides.. like an omelet pan…. and non-stick.. with a handle will probably be our next purchase.


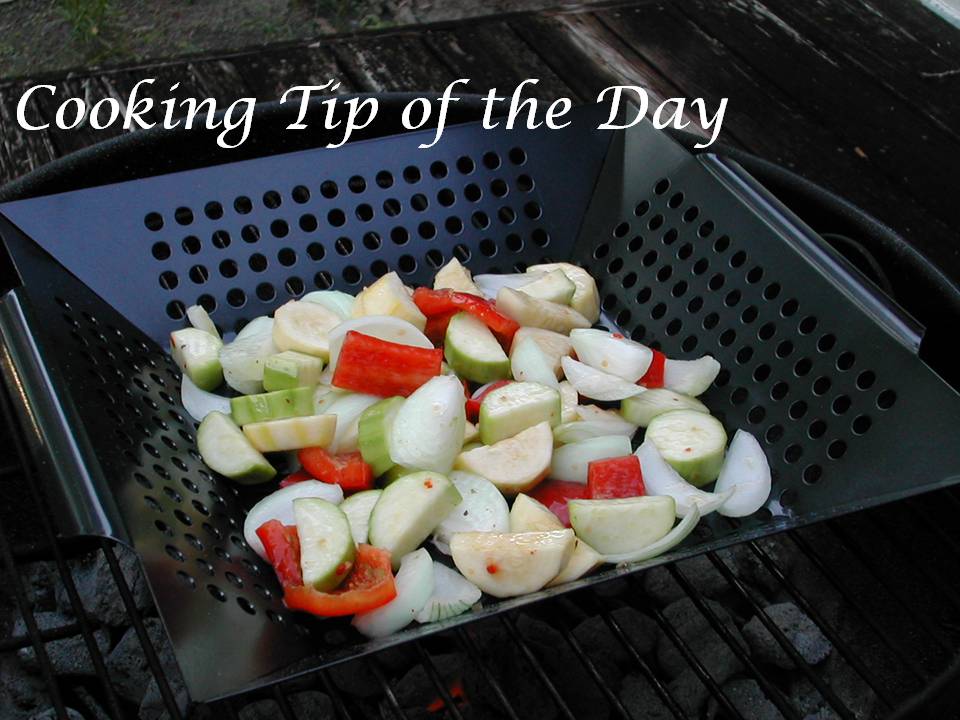
Baskets … these also work well… and unless you plan on getting a variety of baskets… choose wisely.

These come in all sizes and shapes as well. As with the BBQ Grill Pan.. keep in mind the same things as you would for them… size of your grill… and if you plan on the grill doing double duty ..grilling the meat and the veggies at the same time.

Let’s talk about the structure of the basket first. Some come as wire baskets.. again.. we purchased without thinking how we would use it.

Wire with its grill-like structure is okay for larger cut vegetables.. but for medium and smaller cut vegetables …. as the veggies cook they get soft and shrink and will tend to fall out… not good.


Mesh baskets work better for smaller cut vegetables. Also since the veggies are more exposed to the heat or flame, they will pick up more flavor in these kinds of baskets.


Rectangular thin “baskets” with a top grid to snap in place is excellent for flat cut slices such as eggplant. While you can lay the eggplant slices on the BBQ’s grill.. it is easier to use this kind of basket… quicker, easier and safer to flip the slices.. and no chance of it being dropped or falling into the coals… this also can be used for burgers and fish… sliced onions are particularly good this way…. as well as a host of other foods.. a good purchase to make.


Shape and size are things to consider, as well. As I mentioned earlier… think about the size and how it will fit on your grill. Also think about just how many vegetables you will be grilling for the number of people you normally feed… make sure the size of the pan is adequate.

Shape is something people rarely think about until they go to use it.. we didn’t. After just one use… my Grill Master complained about cleaning the corners of the square pan… and truth be told.. a rounded pan with sloped sides would have worked better.

Skewers


Skewers are great for grilling a variety of vegetables that are different in size and density.

The biggest problem grillers face when grilling mixed vegetables is that they don’t cook at the same rate, so you either cook them by adding the ones that take the longest to the pan first and adding the rest little by little … or adding them all at once and simply having some softer than others…

The best solution is to use skewers.. load up each skewer with the same vegetable or ones that cook at the same rate and remove them when they’re done.

This method is good also … if you load your grill up with all the veggies skewers… and begin removing them as they’re done.. you have space to add the meat… while not everything is done at once.. it really is an acceptable solution for those with a relatively small grill.

TIP: I lay them on a baking sheet with sides… keeps them from rolling off and the oil from getting all over the place.. a good place for one last baste before putting them on the grill. Another nice thing is .. as they finish cooking you can put them back on it.. it’s not like raw meat that contaminates a surface.

Direct

Direct… what I mean by direct is that you lay the slices of vegetables directly on your BBQ grill.

As I mentioned before… it certainly works and works well for larger pieces of vegetable… but it isn’t your best option… it requires more watching and work… while it doesn’t sound like much to flip each individual piece… and food network chefs make it look easy.. you don’t have a staff taking care of all the other details going into a meal… baskets and pans are relatively inexpensive.. and well worth the purchase… why sweat over a hot grill?

Price

The price of grill pans, baskets, skewers and accessories varies widely. The choice to make is truly an individual decision, just as the decisions you make when purchasing pots and pans.

I just urge you to make the decision wisely based on your needs and means… keep in mind the advantages of some of the “extras”… such as handles. Size and shapes are just what you prefer using and you should be able to find one in your price range. Prices are relatively reasonable overall.

What to Grill?


The possibilities are virtually limitless… if you cook it .. you can grill it.

Popular combinations are mushrooms, zucchini, summer squash, peppers (red, green, yellow…even jalapeno), onions, eggplant, potatoes, green beans, asparagus and cherry tomatoes… I’m sure you can think of even more.

I know we’re talking about veggies here.. but keep in mind.. fruits grill nicely too… and pound cake (I had to throw that in too).

Preparation

Prep the veggies as you normally would.. you can peel them or leave the skin on them.. whichever you prefer… when cutting or slicing them.. keep in mind what they will be grilled in.. as previously discussed.. you don’t want them falling into the fire as they cook.

Marinate them for extra flavor. I use oil based marinades… or I toss or brush them in olive oil and seasonings…

If using skewers… brush them with marinade or your seasoned oil during cooking to keep them from drying out (not always necessary).

Cooking Times

Cooking times vary depending on the density of the vegetable, the size of the pieces and the hotness of the grill.

Tomatoes and mushrooms are probably the fastest to grill with potatoes being the longest… figure the shortest time for about 5 minutes and 15 minutes as an average for the rest… you want them charred to your liking and also soft to your preference… whole potatoes will take longer… they can be wrapped in foil and placed right on the grill… follow your recipes instructions for prep and grilling times.

Best Advice

Give it a try… baskets and pans are not expensive… keep an eye on them until you get used to grilling them.. after a couple of times .. you will have it down to a science as to how hot you like your grill and how long to grill them to your liking.

Recipe: Grilled Ham and Swiss on Pumpernickel


This sandwich reminds me of my childhood…. ham and pumpernickel… to me.. it just goes together like salt and pepper… when I think of a sandwich made with pumpernickel bread… I just think of ham… and with ham goes Swiss cheese … grainy brown mustard… heavenly.. for sure.

Recently I saw it on a menu.. and debated about ordering it and instead chose something else.. but that sandwich was on my mind…. so.. pumpernickel, smoked deli ham and Swiss cheese went on the shopping list.

TIPS

This sandwich is delicious grilled or not… make it whatever way you prefer… grilled sandwiches are a nice change of pace.. and easy to make… so why not try it.

To grill the sandwich… use butter or margarine.. a little bit goes a long way. I use soft margarine…

As I mentioned in the beginning, this sandwich is great with a grainy brown mustard… however… I saw it on a menu with Thousand Island dressing… and decided to give it a try.. glad I did.. it was a totally different spin on the sandwich.. and delicious!

For a quick and easy killer Thousand Island Dressing ... click here for the recipe.

Serving suggestion… serve with homemade potato salad.


Recipe: Grilled Ham and Swiss on Pumpernickel

All you need:

Pumpernickel bread
Smoked deli ham
Swiss cheese
Thousand Island Dressing, homemade or store bought
Butter or margarine

All you need to do:

Spread margarine on one side of each slice of bread… then spread Thousand Island dressing on the dry side of one slice.

Layer smoked ham and Swiss slices on top of the Thousand Island dressing with Swiss being the top layer… place the dry side of the remaining slice of bread on top of the cheese… with the side with the margarine up.

Place on a hot grill for about 2 minutes or until the bottom slice has a grilled crunch to it… flip and cook until the bottom slice is grilled to a little crunch.

Serve immediately.

Recipe: Thousand Island Dressing


My Mother made Thousand Island Dressing all the time while I was growing up… in fact … when I was first married my hubby went to buy some and I was horrified that he would even consider buying it and not make it…. it’s quick and easy and so much better than the bottled stuff.

Thousand Island Dressing is similar to Russian Dressing.. it also has mayo, chili sauce, shallot and sweet pickle relish… but that’s where the similarities end… Russian has more zing … Thousand Island has a milder flavor.

I know there are lots of variations.. this one is ours… I’ve tweaked it a bit from my Mother’s version… with the addition of sweet pickle relish and pimentos…

TIPS

I usually use two hard boiled eggs when I make this quantity… you can use only one if you prefer.

I use a shallot because of the mild taste… if you don’t have a shallot.. you can substitute onion.. but I would try and use a sweet onion…. You will need about 1-2 tablespoons of chopped onion.

It’s great on salads and sandwiches…

Although it tends to be a bit runny for a spread on a sandwich… try it anyway… just make sure you put it in the middle of the bread… it probably will still seep out the sides… but it really is so good.. it’s worth the sticky fingers.


Recipe: Thousand Island Dressing

All you need:

1 cup Hellman’s Mayo
2 hard-boiled eggs, peeled and chopped
½ cup Heinz Chili Sauce
1 medium sized shallot, finely chopped
2 tablespoons chopped pimento
1 heaping tablespoon sweet pickle relish
Salt and white pepper to taste

All you need to do:

Combine all ingredients in a small bowl.

Cover with plastic wrap and refrigerate 1 hour or until needed.

What is Pumpernickel Bread?


The question is a good one… not sure how many varying answers I would get… but I’m willing to bet… more than a few.

So just what is Pumpernickel Bread?…. it’s a dense, dark, rye bread… but unlike a rye bread as we know it.. the rye flavor in pumpernickel bread is light… almost sweet.

The bread is almost crust-less… a good thing for those that don’t care for crusts…

Pumpernickel bread dates back to the mid 1400’s in Germany…. the Westphalia region of Germany… and for many of you that know about German foods… the region is also associated with Westphalian Ham…. a fine quality smoked ham from pigs that are fed acorns. I mention this because this brings back memories of sandwiches made of Westphalian Ham on pumpernickel… a true German delight.

The pumpernickel from Germany is different from that of pumpernickel breads made in North America.

The German version is made of course rye flour and baked slowly for a long period of time… which gives it its dark color. It is traditionally made with sourdough starter. They are baked in loaf pans, and the resulting breads are very dense. I always found the German version a bit dryer in texture.

The North American version…(pictured above) is made by combining wheat and rye flours …. and often is made with cocoa, molasses and/or coffee. This version is almost always made without a loaf pan and is rounded and not as dense as the German version.

Pumpernickel is used in many traditional deli sandwiches. Growing up in the ethnic neighborhoods of New York with its abundance of German delis, I never gave it a thought .. to me it was just another bread to make a sandwich with. It wasn’t until I moved to regions where the ethnic neighborhoods were different that I came to appreciate its availability in New York…

With that said … the American version of the bread can be found in most supermarkets, albeit usually only one brand to choose from… but well worth the purchase just the same… it makes for a delicious ingredient in a host of fabulous sandwiches.

The true German version can sometimes be found in the gourmet sections of the grocery store. It is often paired with steak tartar,smoked salmon, sturgeon, caviar or herring to make hors d’oeuvres.

Recipe: Bacon Potato Salad


You simply cannot have too many potato salad recipes… for that matter you can’t have too many salad recipes… after all.. variety is the spice of life… this Bacon Potato Salad is perfect for your next cook-out.

What could be better than bacon and potatoes… tossed in a dressing made of sour cream and mayo…. throw in some celery, some green onion…. some chopped pimentos.. and you’re done! It’s as simple as that!

TIPS

I used 4 slices of thick sliced smoked bacon… which I made in the oven… line a pan with foil and you don’t have much clean-up… just throw away the foil!

For instructions on how to make bacon in the oven… click here.

The potato quantity is approximate… it should be about 3 pounds … of course adjust the quantity to whatever you need… and ..to use Rachael Ray’s favorite phrase.. eyeball adding more of the other ingredients…

The dressing amount is really perfect for the quantity listed so if you’re making more.. you will need to mix more dressing.

Be sure to dice the potatoes as evenly as possible so they cook evenly. About ½ to ¾ inch dice is about how I cut them.

I use both the green and white parts of the green onion.

After draining the potatoes and allowing them to cool… I added them back into the pot and mixed the salad there… why dirty another bowl?

Don’t over salt this… remember you have bacon in it which is salty… adjust the salt and pepper just before serving after you’ve given the salad a chance to chill.

I hope you try this!


Recipe: Bacon Potato Salad

All you need:

About 6 large potatoes, peeled and diced
4 slices thick sliced smoked bacon, cooked, drained and crumbled
4 large green onions, chopped
¼ cup finely diced celery
¼ cup chopped pimento
½ cup sour cream
½ cup mayonnaise
Salt and pepper to taste

All you have to do:

Place the diced potatoes in a large pot and cover with water. Bring to a low boil and cook until tender. Check them after about 10 minutes… and keep an eye on them… they can turn to mush rather quickly.

Drain the potatoes and run cold water over them to stop them from cooking. Allow them to drain and cool.

Meanwhile, in a small bowl mix the mayo and sour cream until well blended.

Put the cooled potatoes back into the pot and add the bacon, celery, green onion and pimentos. Toss gently to mix.

Pour the sour cream mixture over the potatoes and gently mix until evenly coated.

Cover and refrigerate for about an hour…. Add salt and pepper to taste just before serving.

19 Easy Desserts for that Backyard Get-Together


Slaving in the kitchen in the hot days of summer is something no one likes to do.. but as parties a place to showcase great foods and beverages... slave most of us will... well I'm here to give you some ideas for desserts from the simply to the not so simple.. these will not only please but some will even look like you spent hours in the kitchen...


Let's start with the simple...


Fruit Salad - I always like to include Fruit salad on my summer desserts list.. it's not only easy.. but a great healthy alternative for guests not wanting to partake in sweets. Serve this with a Yogurt Sauce... it's delicious!


Tarts make such a fabulous presentation and are surprisingly easy to make...


Amaretto Peach Tart


Very Berry Tart - this looks like you slaved hours... but it really is not too bad on time and is easy.. my step by step instructions and tips to getting the fruit to look just right makes this recipe a snap.


TRIFLES - are always a great dessert...individual or one big one... they always seem to please... here are a few..


Tropical Trifle - this quick and easy recipe combines coconut and fruit flavors like pineapple and strawberry... make this as individual desserts or one big beautiful trifle..


Banana Strawberry Trifle


Red White and Blue Amaretto Mascarpone Trifle


Triple Chocolate Trifle


No-Bake Pies are quick and easy.. and always a crowd pleaser! Here are a few favorites...


Pina Colada Pie


No-Bake Chocolate Cream Cheese Pie


Bananas Foster No-Bake Cream Cheese Pie


Chocolate Hazelnut No-Bake Cream Cheese Pie


Banana Pie


White Chocolate Amaretto No-Bake Cream Cheese Pie


No-Bake Banana Split Pie


Pound Cake Desserts - Store bought or made ahead pound cake makes a terrific base for many desserts... here are just two suggestions... you can adapt these in countless ways to make quick and easy desserts...


Patriotic Star Pound Cake Dessert


Grilled Pound Cake with Strawberry Cream


Mini Desserts are also easy and give your guests a chance to have a little sweet without over-eating.. and if you make a variety.. they can have fun taste testing!


Mini Banana Cream Pie Desserts


Cheesecake Dessert Shooters


Boston Cream Dessert Shooters

Looking for More Recipes?

If you are looking for more recipes click the "Older Posts" link to page back to older posts or go to the archives in the right column. The list of labels at the bottom in the right column will help you find specific types of recipes or try our search engine at the top and search by name or ingredient.


What's more comforting on a cold day than Homemade Chicken Noodle Soup? .. and it's so easy to make!

Chicken Noodle Soup