Recipe: Bruschetta Chicken Bake


This recipe for Bruschetta Chicken Bake is adapted from one of the Kraftfoods.com recipes. I read the reviews of their recipe and combined some of the reviewer’s advice with some changes I felt would improve the dish. We really liked the result and will definitely make it again.

It’s a quick and easy recipe that can be put together in no time.


PRINT RECIPE

Recipe: Bruschetta Chicken Bake

All you need:

About 1 ½ pounds boneless skinless chicken breasts, cut into bite sized pieces
1 (28 ounce can) diced tomatoes (plain)
1 package Stove Top Stuffing Mix (Savory Herb flavor)
½ cup water
1 teaspoon garlic powder
1 teaspoon dried basil
2-3 cups Kraft Mozzarella Cheese, shredded

All you need to do:

Preheat the oven to 400 degrees F.

Spray a 13x 9 baking dish with olive oil cooking oil spray. Set aside.

In a medium bowl, combine the Stove Top Stuffing and half the can of diced tomatoes.

Add the teaspoon of garlic powder and dried basil.

Add the water and mix well.

Spread the bite sized pieces of chicken in the bottom of the pan.

Sprinkle the chicken heavily with garlic powder and dried basil.

Sprinkle half of what’s left in the diced tomato can over the chicken.

Sprinkle 1 cup of the Mozzarella cheese over the chicken.

Sprinkle the stuffing mixture over the cheese.

Sprinkle the remaining diced tomatoes over the stuffing mix.

Sprinkle 1-2 cups of shredded mozzarella over the diced tomatoes and stuffing. Amount of cheese is dependant on how much you like cheese.

Cover with foil… tent the foil a bit so the cheese won’t stick to the foil.

Bake for 30 minutes.

Remove foil and serve.

Recipe: German Potato Salad


This recipe for German Potato Salad is very simple. There are numerous ways to make and serve German Potato Salad… some people serve it cold… some serve it warm… some people like the bacon crisp … some like it cooked but still a bit chewy…..but they are all basically the same in structure… potatoes, onion, bacon, vinegar sugar, and water.

TIPS

I like to serve my German Potato Salad warm….

And I prefer the bacon not be too crisp.

Another thing I do is use red potatoes…. I clean them and dice them… I sometimes quarter them if they're small .... but I don’t peel them.

Anyway you make German Potato Salad … it’s sure to be delicious… I never have leftovers when I bring it anywhere…. I think that’s also because it’s a refreshing change from the mayonnaise potato salads.


PRINT RECIPE

Recipe: German Potato Salad

All you need:

3-4 cups red potatoes, cleaned and diced
4 slices of thick sliced bacon
¼ cup finely diced onion
¼ cup vinegar
2 tablespoons water
3 tablespoons white sugar
1 teaspoon salt
Freshly ground pepper to taste
2-3 tablespoons chopped fresh parsley for garnish (optional)

All you need to do:

Place the diced potatoes in a large pot. Add enough water to just cover them.

Bring to a slow boil, and cook for about 8-10 minutes or until potatoes are easily pierced with a knife. Keep an eye on them …. You do not want them mushy.

When potatoes are cooked, drain and rinse with cold water, drain again. Set aside to let them cool.

In a large skillet, fry the bacon over medium high heat, turning as needed. Cook until desired doneness (crispy or less crispy). Remove from the skillet and drain on paper towels.

Add the onion to the bacon grease and cook over medium heat until translucent.

Add the vinegar, water, sugar, salt and pepper to the onions.

Bring to a boil.

In the meantime, return the potatoes to their original pot.

Coarsely chop the bacon and sprinkle over the potatoes.

Pour the vinegar dressing over the potatoes.

Turn the potatoes carefully to coat them with the dressing.

Pour the potato salad on a warmed serving platter or large bowl.

Sprinkle chopped parsley over the potato salad. (optional)

Recipe: Chinese Coleslaw


This recipe for Chinese Coleslaw comes to me from a friend in Arizona. Jodi Geiger is famous among her friends and family for this delicious version of coleslaw. It’s quick to throw together and a perfect menu item for a barbecue. You can even add grilled chicken to make it heartier!

Thanks Jodi for this terrific recipe and picture!


PRINT RECIPE

Recipe: Chinese Coleslaw

All you need:

1 large bag shredded coleslaw
1 package raman noodles (toss the seasoning pack and only keep the noodles)
1 apple (any kind with skin), cored and cut into chunks
½ cup sliced almonds
Grilled chicken cut in strips (optional)

For the Dressing:

¼ to 1/3 cup rice vinegar
¼ to 1/3 cup olive oil
1 teaspoon or 1 pack of sweet and low
1 teaspoon black sesame seed salt (can be found in an Asian Market)
Salt and pepper to taste (optional)

All you need to do:

Break up the noodles and lightly brown in the toaster oven. WATCH the noodles .. they get brown quickly.

In a large bowl, dump the coleslaw, browned noodles, apple and almonds.

Add the grilled chicken if you are using.

Mix thoroughly.

In a medium bowl whisk together the rice vinegar, olive oil, sweet and low and black sesame seed salt.

Pour dressing over the salad just before serving otherwise the noodles won’t stay crisp.

Recipe: Sloppy Joes


This recipe for Sloppy Joes is one I tinkered with when my son was growing up. We love Sloppy Joes and just didn’t want to use the packaged stuff. The recipe is simple… a good basic recipe….. I know a number of people that have more add-ins than I do… be my guest to do your own tinkering…. I would expect nothing less.

The family will love them and so will you!

Enjoy!


Recipe: Sloppy Joes

All you need:

1 ½ pound lean ground beef
¼ cup chopped onion
¼ cup chopped red or green pepper
½ teaspoon garlic powder
1 teaspoon prepared yellow mustard
1 cup ketchup
3 teaspoons brown sugar
1 tablespoon Worcestershire sauce
Salt and pepper to taste

All you need to do:

In a large skillet brown the ground beef over medium heat.

As the meat begins to brown, break it into small pieces.

Turn to brown evenly.

Add the onions and peppers and cook until the onions are translucent.

Add the remaining ingredients and mix well.

Cook for an additional 5 minutes.

Serve on buns.

Recipe: New York Deli Style Potato Salad


This recipe for New York Deli Style Potato Salad has been an evolution over the years… I’d try a recipe… no not right…adapted it…still not right.. and so it went…. until I was adapting an adaptation that was adapted twice since the original…. It’s a wonder I knew what I did.

As many of you know I grew up in Queens…had ties to Brooklyn and also grew up on Long Island…. so trust me… I know New York Deli…. Every neighborhood had them and each neighborhood had their own tweak to the salads…. and the residents of that neighborhood…. die-hard fans of their deli’s salads.

The New York Deli Style Potato Salad was really plain in comparison to other parts of the country… it contains few ingredients… and the dressing is put on heavily. Potatoes, finely chopped onions, salt, pepper, sometimes finely chopped celery, sometimes finely chopped parsley… a dressing made of mayo, white vinegar, sugar… that’s it!

When I hit it right I swear I heard the Alejuluah chorus.

There a million recipes for potato salad…. and I’m sure they are all well liked by somebody… this is one from my childhood and we like it.

The amounts are approximate… the dressing is doubled… I always double the dressing and use what I need… which usually turns out to be the entire batch anyway… this way you can make as many potatoes as you want without worrying if you have enough dressing.

Enjoy!


Recipe: New York Deli Style Potato Salad

All you need:

About 4 pounds potatoes, cooked, cooled then sliced
3 cups Hellman’s Real Mayonnaise
6 tablespoons white vinegar
4 tablespoons sugar
Freshly ground pepper
½ cup sweet onion, finely minced

All you need to do:

Put the potatoes in a large bowl, salt and pepper them, turning to be sure all sides get the salt and pepper.

In a medium bowl, mix remaining ingredients. Mixing until smooth.

Pour dressing slowly over the potatoes.

Turn the potatoes to spread the dressing evenly… add more as needed.

Any left over dressing store in a covered container in the refrigerator.

Refrigerate for at least 2 hours before serving.

Recipe: Cream Cheese Brownies


This recipe for Cream Cheese Brownies combines my Brownie Recipe with a little added cream cheese mixture. Rich, chocolately, brownies with a cream cheese mixture… what’s not to love?

The recipe is quick and easy and sure to please.


PRINT RECIPE

Recipe: Cream Cheese Brownies

All you need:

For the Brownie portion:

4 oz. unsweetened chocolate
2 Sticks (1 cup) butter, cut into 2 tablespoon chunks
2 ½ cups sugar
½ teaspoon salt
4 large eggs
1 teaspoon vanilla
1 ¼ cup flour

For the Cream Cheese Swirl portion:

4 ounces Philadelphia Brand Cream Cheese
2 tablespoons butter, softened
¼ cup sugar
1 egg
2 tablespoons flour
½ teaspoon vanilla extract

All you need to do:

Preheat oven to 350 degrees F.

Line a 9 x 13 baking pan with non-stick foil. (I use Reynolds Wrap)

Lightly spray the foil with cooking spray.

Place the 4 ounces of unsweetened chocolate and the butter chunks in a medium bowl.

Cover the bowl with a piece of waxed paper.

Microwave on high for about 3-4 minutes, or until the butter and chocolate have melted. Stir at 1 minute intervals.

Let the chocolate mixture cool about ½ hour.

In a mixing bowl, beat the eggs until light and frothy, add the salt and the sugar.

Beat the mixture for about a minute.

Fold the chocolate mixture into the egg mixture.

Stir in the vanilla.

Stir in flour.

Pour the brownie mixture into the prepared pan.

In a separate bowl, beat the sugar, butter, and cream cheese until smooth.

Add the egg and beat the mixture.

Add the flour and the vanilla extract, mix well.

Drop spoonfuls of the cream cheese mixture all over the top of the brownies.

Using a knife, swirl the cream cheese mixture into the brownie mixture.

Do not over mix.

Bake in a 350 degree oven for 35-40 minutes.

Cool completely before lifting the brownies out of the pan.

Store on a plate covered with plastic wrap.

Recipe: Banana Cream Pie


This recipe for Banana Cream Pie is so easy and so good…. it actually uses my vanilla pudding recipe and of course, bananas. Warren loves bananas and loves Banana Cream Pie…. so naturally I had to make mine for him. He wasn’t crazy about the crust… he prefers a graham cracker crust… which is fine with me… one less thing I have to do… actually I think he’s right… I like the graham cracker crust best too…. either way you make it… it’s delicious.

You can layer the banana slices on the bottom of the crust or you can do as I like to… mix them in the pudding.

Enjoy!

PRINT RECIPE

Banana Cream Pie Recipe

All you need:

1 (9-inch) pie crust, baked or a graham cracker crust
3 tablespoons cornstarch
¾ cup sugar
Pinch of salt
2 cups milk
3 egg yolks, beaten
2 tablespoons butter
1 ¼ teaspoons vanilla extract
3-4 bananas sliced

For the topping:

1 cup heavy cream
2 tablespoons sugar
½ to 1 teaspoon vanilla (to taste)* I use 1 teaspoon

All you need to do:

In a large saucepan, combine the sugar, cornstarch and salt.

Add milk in slowly, whisking as you pour the milk.

Cook over medium heat, whisking constantly to prevent lumps or burning on the bottom.

Cook until mixture is bubbly, then continue to cook for another 2 minutes, whisking constantly.

Remove the pot from the heat and add the butter and the vanilla.

Whisk the mixture… it should be very thick and smooth.

Cool slightly.

I add the sliced bananas to the pudding.

Pour the pudding mixture into the pie shell. Refrigerate at least 2 hours.

To make the whipped topping….

Whip the heavy cream, sugar and vanilla extract until the cream forms fairly stiff peaks.

Put large dollops on top of the pie and refrigerate until ready to serve.

Recipe: The All- American Milkshake (Vanilla or Chocolate)


Americans have been in love with milkshakes for over a hundred years… ice cream parlors of yesterday are a part of many American’s memories…. especially New Yorkers. I have always made milkshakes for my son… I was thinking about that recently when I wrote the “New York Egg Cream” post. So just for the heck of it I looked around for various recipes… because… you guessed it… this is one of those things I make by eye.

To my surprise…. I found that my recipe was different to begin with… Most recipes use vanilla extract with no sugar (definitely not right)…. or with sugar (better but not quite right) or just milk and ice cream (also definitely not right)….. I use three ingredients… ice cream, milk and syrup.

So I sighed and realized I would just have to make one and watch how much of each ingredient I used…. and then ….of course… I would just have to taste it to be sure it was right… oh darn… the things I must do for this blog…. LOL… believe that? I have a bridge I can sell you real cheap…LOL

I was pretty satisfied with my recipe… but I may have to make another tomorrow just to be sure!

I decided to make a vanilla milkshake, but surely you can use your imagination and make whatever flavor combination you wish… I used Torani’s Vanilla Syrup.

Torani makes a complete line of wonderful syrups… in fact… 80 flavors to choose from…. and of course, there is the famous Fox’s U-Bet Syrups that New York ice cream parlors have used for over 100 years now.

What’s nice about this… is you can use fat free ice cream and fat free milk if you wish.

Make sure the ice cream is frozen hard so you get a thick consistency… do not over blend.

This recipe makes 2.

Enjoy!


Recipe: All American Milkshake (Vanilla or Chocolate)

All you need:

4 cups milk
1 ½ cups ice cream
3 tablespoons syrup

All you need to do:

Put everything in your blender and blend until everything is incorporated…. and still thick.

Pour into glasses and enjoy!

Recipe: Crockpot Barbecue Beef


This recipe for Crockpot Barbecue Beef is a combination of a number of recipes. I wanted to make the barbecue beef in the crockpot and had trouble finding a recipe that actually cooked the beef in the barbecue sauce. I felt the flavor of the barbecue sauce would be best infused over a long cooking time in a crockpot. Most recipes I found cooked the beef separately from the sauce and then combined the two… which to my way of thinking didn’t make sense.

I experimented with barbecue sauce recipes and settled on this one and I decided to cook the roast in the crockpot with the sauce. You can use my sauce or one of your own…. I’m sure either way it will be very tasty.

The Chili Sauce is found next to the ketchup in the grocery store… Heinz and DelMonte, among others, make it.

The recipe calls for a four pound chuck roast… I made one that was smaller and made the same amount of sauce..


PRINT RECIPE

Recipe: Crockpot Barbecue Beef

All you need:

4 pound boneless chuck roast
4 tablespoons butter
¼ cup chopped green pepper
½ cup chopped onion
6 tablespoons white vinegar
2 (12 ounce bottles) Chili Sauce
4 tablespoons Worcestershire sauce
4 tablespoons brown sugar
¼ teaspoons cayenne
2 teaspoons mustard powder
2 teaspoons garlic powder
About 1 teaspoon salt
Freshly ground pepper

All you need to do:

In a large skillet over medium heat, melt the butter.

Add the onions and cook for about 2 minutes.

Add the green pepper and continue cooking until the onions are translucent.

Add the vinegar and stir.

Add the chili sauce and stir.

Fill each chili sauce bottle with water and shake vigorously to get as much as you can out.

Add the water to the pan.

Add the remaining ingredients.

Cook over medium heat for about 5 minutes.

Place the roast in a crockpot and pour the barbecue sauce over it.

Set the crockpot on high and cook for at least 5 hours or until meat is fork tender and pulls apart.

Remove the meat and pull it apart or cut into small pieces. I did end up cutting some of the pieces of meat.

Add the meat back into the crockpot and mix well with the sauce.

Serve on buns.

Recipe: New York Egg Creams


I have no idea where Egg Creams got the name Egg Cream…. They do not contain Egg or Cream… but they were a tradition in ice cream parlors in New York ….

According to most historians a candy store owner named Louis Auster created this New York tradition…. But alas it is dying out. Any New Yorker will tell you that you must use Fox’s U-Bet Syrup to make the authentic egg cream. It was made from three ingredients…. syrup… milk and seltzer.

Ask any New Yorker old enough to remember the ice cream parlors….about Egg Creams… and you will likely take a trip down memory lane. I remember my friends and I used to stop into an ice cream parlor in Brooklyn on the way from school to where my Dad worked…. We’d all have Egg Creams….

I’m partial to Vanilla…. What I made is, unfortunately a pale imitation of what I remember…. but really good nonetheless.

I had trouble finding U-Bet syrups and had to settle with other brands for the vanilla and chocolate syrup… and honestly you can tell the difference…. I couldn’t find seltzer so I had to use club soda… which should be okay… both are carbonated and should be able to be used interchangeably … however… I think the seltzer water keeps the fizz longer while in the glass… at least it has been my experience anyway. The “head” on the egg creams was deflating as I was taking the pictures…. Another annoyance… but … I happily drank mine anyway!

Enjoy!


Recipe: Egg Cream

All you need:

Milk
Chocolate Syrup or Vanilla Syrup
Seltzer or Club Soda

All you need to do:

Take an 8 ounce glass and pour about 1 inch of milk in the glass.

Add 1 inch of chocolate or vanilla syrup.

Add the seltzer of club soda to within 1 inch of the top of the glass…. Stir vigorously with a long ice tea spoon.

Serve immediately.

Baking Large Cakes for a Crowd with Cake Mixes

Cooking Tip of the Day

Baking large cakes or cakes using non-standard size cake pans can be difficult. I have all sizes… and admittedly, Wilton (the brand I bought) does attach cake recipes suitable for the size pan. However, as a busy Mother, I didn’t always want to bake a cake from scratch and wanted to use a mix…. well just how much cake batter do you use?… and better yet… just how long do you bake it? These are not silly questions… yet finding the answers to them is not always easy.

I have a soft cover book from Pillsbury …Pillsbury Classics No 27 from 1983… yes… you read that right… 1983… I guess I’m dating myself… let’s just say my Mother bought it for me when I was a toddler… that’s my story and I’m sticking to it….

Anyway… it's probably the best little cook book for party planning I have…. They have a wonderful piece on baking a wedding cake. The information can be used for any occasion …. and not only for making a tiered cake… keep in mind though that it assumes you are using a 2 inch deep cake pan….

I wanted to share this really good information with you…. I hope you find it helpful.

The Antique Satin Wedding Cake recipe was specially developed for Pillsbury Plus White Cake Mix and the 2 inch deep pans used for wedding cakes. They don’t guarantee successful results with any other cake mix (I am assuming brands). Jump over to the recipe for complete details.

Some General Tips:

To save time you can mix a double batch of cake batter. Beating time is the same (2 minutes at the highest speed).

Correct oven temperature is critical. Use an oven thermometer, for consistent cake results.

Layers must be level on top. Trim with a sharp knife if necessary.

Cake layers can be baked in advance, cooled, then wrapped in foil and frozen. Unwrap and thaw at room temperature for 3 to 4 hours before frosting and decorating.

Large Quantity Recipe: Antique Satin Wedding Cake

This wedding cake recipe is from the folks at Pillsbury, as my Tip of the Day tells you… I’m posting this to give you an idea about amounts of batter needed and baking times for odd size pans.

This was specially developed for Pillsbury Plus White Cake Mix…. They can’t guarantee successful results for any other cake mix (I am assuming other brands).

I hope you find this information helpful.

Antique Satin Wedding Cake Recipe:

All you need for each package of cake mix:

1 pkg. Pillsbury Plus White Cake Mix
1 egg
1 ¼ cups water

All you need to do:

Preheat oven to 325 degrees F.

Generously grease and flour 2 inch deep cake pans.

In a large bowl, blend all cake ingredients until moistened.

Beat 2 minutes at the highest speed.

Fill cake pans one-half full or use the amounts listed below.

Bake at 325 degrees F as directed or until a toothpick inserted in the center comes out clean and top springs back when touched lightly in center.

Top will be golden brown. (Do not underbake)

This makes 4 ½ cups cake batter.

Pan Size...................Cake Batter...........Baking Times
6-inch round layer...............1 ¾ cups................35 to 45 minutes
8-inch round layer...............3 cups...................40 to 50 minutes
10-inch round layer..............5 cups...................45 to 55 minutes
12-inch round layer..............7 ½ cups...............50 to 60 minutes
14-inch round layer..............11 cups..................55 to 65 minutes
16-inch round layer..............14 ½ cups.............55 to 65 minutes

Cool 15 to 20 minutes on a cooling rack, then remove the cake from the pan and cool thoroughly. Be sure the cooling rack is large enough to support each layer to avoid cracking of layers.

General Notes:

A typical wedding cake made up of a 12-inch, a 10-inch and a 6-inch tier requires seven packages of Pillsbury Plus White Cake Mix. About 1 ½ cups of batter will be left over.

Remember each tier is made up of 2 layers frosted together.

Approximate Number of Servings from Layers

6x4-inch round layer = 15 servings
8x4-inch round layer = 25 servings
10x4-inch round layer = 40 servings
12x4-inch round layer = 65 servings
14x4-inch round layer = 90 servings
16x4-inch round layer = 110 servings

Number of servings is based on a 2x2-inch piece of cake.

High altitude; Above 3500 feet – Heat oven to 350 degrees F. Add 3 tablespoons flour for each package of dry mix. Increase water to 1 1/3 cups. Bake at 350 degrees F. Decrease baking time by 5 minutes.

Source: Pillsbury Classics No 27 from 1983

Large Quantity Recipe: Buttercream Decorating Icing and Frosting

This buttercream icing and frosting recipe is from Pillsbury and is meant to go with the Antique Satin Wedding cake recipe. I’m posting this so you have an idea of quantities that are necessary to frost and decorate various size cakes.

This recipe can be used for both frosting and decorating the cake. It’s easier to use than the traditional Royal Icing for decorating. Icing for decorating should be stiff but smooth. A thinner consistency is needed for writing and string work.

With this recipe the cake can be frosted and decorated the same day.

I hope you find this information helpful.

Enjoy!


Buttercream Decorating Icing and Frosting Recipe:

All you need:

½ cup butter or margarine
½ cup shortening
1 teaspoon vanilla
1/8 teaspoon salt
4 cups powdered sugar
3 tablespoons milk

All you need to do:

Cream the butter and shortening together.

Add the vanilla and salt.

Beat in the sugar, 1 cup at a time.

Scrape the sides and bottom of the bowl often to be sure the powdered sugar is well blended.

Add the milk and beat at high speed until light and fluffy.

Keep icing covered in the refrigerator when not in use.

This makes 3 cups of icing.

TIP:

Frosting and decorating a 12-inch, 10-inch, and 6-inch tiered cake requires 5 times this recipe.

Frosting Required Chart:

Pair of:………………………Between Layers……………..Sides & Top
6-inch round layers………….1/3 cup +……....…………..…………2 cups
8-inch round layers………….3/4 cup +……………......…….…….2 ½ cups
10-inch round layers….……..1 ¼ cups +………..…………...……3 ½ cups
12-inch round layers………...1 ¾ cups +…………………....…….4 ½ cups
14-inch round layers…………2 cups +……………….......………….6 cups
16-inch round layers…………2 ½ cups +………......……………….8 cups

TIPS:

Plan out the design and color of the decorations on paper so you have a guide.

Smooth frosting on the cake by dipping a metal spatula in hot water, pressing against the cake and slowly turning the cake until the sides and top are smooth.

The heat from your hands may cause the icing in the tube to soften. If this happens refrigerate until it stiffens.

Store frosted cake in a cool place or in the refrigerator.

Source: Pillsbury Classics No 27 from 1983

Recipe: Vanilla Pudding


As much as I love chocolate… I’m really a vanilla person at heart…. I love anything vanilla… and pudding is no exception. This recipe for vanilla pudding is so good… and sweet…. yummmm …. We devoured it shortly after it was made… no leftovers here.

Once you make this pudding from scratch… you won’t want to buy those packages… and definitely not instant…. To me… instant pudding is not real pudding… I am a pudding snob and proud of it…. it’s got to be cooked..

This is a sweet pudding… if you don’t like sweet much… then start with ½ cup of sugar and add some more later after tasting it…. we like the recipe just as written… very tasty indeed!

Enjoy!


Recipe: Vanilla Pudding

All you need:

¾ cup sugar
3 tablespoons cornstarch
Pinch of salt
2 cups milk
2 tablespoons butter
1 ½ teaspoons vanilla extract
Whipped cream for garnish (optional)
Chopped pecans for garnish (optional)

All you need to do:

In a large saucepan, combine the sugar, cornstarch and salt.

Add milk in slowly, whisking as you pour the milk.

Cook over medium heat, whisking constantly to prevent lumps or burning on the bottom.

Cook until mixture is bubbly, then continue to cook for another 2 minutes, whisking constantly.

Remove the pot from the heat and add the butter and the vanilla.

Whisk the mixture… it should be very smooth.

Cool briefly in the pot and then pour into dessert glasses.

Cool in the refrigerator or serve warm.

Recipe: Lemonade


This recipe is so simple and so good…. very refreshing… perfect for a hot afternoon.
You need to make a simple syrup first (sugar and water) then simply add fresh lemon juice and water…. what could be easier than that….

Serve lemonade with delicious Blueberry Muffins... that recipe is extremely easy also.

Enjoy!


Recipe: Lemonade

All you need:

1 ½ - ¾ cup sugar (depends on how sweet you like your lemonade)
1 ½ cups lemon juice
8 cups water

All you need to do:

In a small pot, combine the sugar with 1 ½ cups of water.

Bring to a boil and stir until the sugar is dissolved.

Let cool.

Cover and refrigerate until cold.

Juice the lemons making sure you leave the pulp but remove any seeds.

In a large pitcher combine the chilled syrup, lemon juice and remaining water.

Stir.

Pitcher by Reco International, available at Romertopf online and other fine stores.

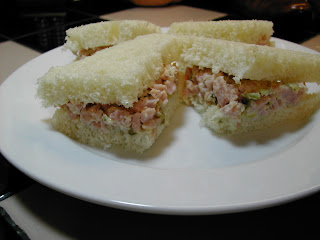
Recipe: Ham Salad Tea Sandwiches


Ham Salad is a perfect tea sandwich spread… so if you’re thinking of serving tea sandwiches for a party or gathering… this spread should at least make your possibilities list. It’s relatively inexpensive to make and quick and easy…. and sooo delicious.

This recipe for Ham Salad evolved when I was first married… funny story..

 I had a friend I worked with, Eleni, who was my lunch buddy.  Every day we would go to lunch together.

we had a a couple of options for places to eat.  There was a really cheap cafeteria and a department store restaurant that gave us a discount that was even good on their lunch special.

We also had another public cafeteria in the next building over that was excellent and cheap.

With plenty of options… we would rotate where we ate.

 It seemed every time we ate in the department store restaurant.. Chopped Ham and Pickle was the special sandwich… and we would go ewww… pickle… and order something else.

On other days we ate at the cafeteria next door and we’d always make a beeline to their Ham Salad sandwiches… we loved them… this went on for months.

One day we’re sitting in the cafeteria eating our Ham Salad sandwiches when I noticed something green in the salad… yep… sure enough.. there were little specks of green… in hers too…

One of the little green pieces was a little bigger… we giggled when we realized… duh… it was chopped pickle.

Funny thing.. after that whenever we went to the store restaurant they never had chopped ham and pickle on the sandwich special… go figure.

It was after that I played with making a recipe for ham salad… trying different pickles etc…. I settled on Bread and Butter pickles… it makes the yummiest ham salad…

TIPS

I used 2 very lean Smithfield ham slices, both just under a pound each.  After processing it made about 4-5 cups of chopped ham.

I always use Hellman's mayonnaise.

I used about ½ a small jar of pickles  to get ¾ cup chopped pickle.

The finished salad yields about 5 ½ cups.

You can easily adapt this recipe to smaller or larger quantities.   Just start out with your desired amount of chopped ham... and add the amount of chopped pickle and mayo you like.

I hope you try it and enjoy!


PRINT RECIPE

Recipe: Ham Salad

All you need:

2 lean ham slices (about a pound each)
¾ cup chopped Bread and Butter pickles
1 ¼ cup Hellman’s Real Mayonnaise
Salt to taste
Pepper to taste

All you need to do:

Chop the ham and pickles very fine (I use my mini chopper or food processor… a few pulses should do it fine).

Dump the chopped ham and pickles in a large bowl.

Add the mayonnaise, mix well.

Salt and pepper to taste.

Recipe: Tomato Basil Bisque


This recipe for Tomato Basil Bisque evolved over time, as most recipes do. I tried using plain tomatoes… the soup was a bit too bland unless I wanted to make it very rich… which I didn’t. I tried fresh tomatoes and they ended up a lot of work and frankly, I don’t think they were as good as when I used canned. I tried canned whole tomatoes and I tried diced…. diced won out.

The final recipe is a wonderfully rich flavorful tomato bisque… good enough for a special occasion and good enough for those “soup days”. You can add as much or as little of the cream as you wish… remember half and half has less butterfat than heavy cream but is also thinner…

I hope you enjoy this quick and easy soup.


Recipe: Tomato Basil Bisque

All you need:

2 cans (14.5 oz) Del Monte Diced Tomatoes with Basil, Garlic & Oregano
2 ½ cups chicken stock
3 tablespoons butter, divided
¼ cup finely chopped shallots
3 tablespoons finely chopped fresh parsley
Salt to taste
Freshly ground pepper to taste.
About ½ cup heavy cream
About 1/3 cup half and half
Dash of sherry. (optional)

All you need to do:

In a large pot over medium heat, melt 1 tablespoon butter.

Add the shallots and stirring occasionally, cook for 1-2 minutes until translucent.

Add the chicken stock and canned tomatoes…. Sprinkle in the chopped parsley.

Heat until simmering…. then cook for an additional 5 minutes.

Remove from heat and pour the mixture through a sieve, pushing with the back of a cooking spoon to get all possible liquid into a large measuring cup or bowl..
Pour the sieved soup back into the pot.

In a small pot over medium heat, melt the remaining 2 tablespoons of butter.

Whisk in 2 tablespoons flour (make a roux)… it will be a paste.

Add some of the stock mixture into the flour mixture, whisking vigorously to remove all lumps.

Heat until thick…. about 2 minutes.

Pour the flour/stock mixture into the big pot and whisk until thick…

Remove from the heat.

Add the creams until desired consistency… salt and pepper to taste.

Just before serving add a dash of sherry if using.

Makes about 2 large bowls or 4 small cups of soup.

Recipe: Classic Macaroni Salad


There is nothing like a Classic Macaroni Salad… oh everyone has their little touches … they add this or that… and for the most part… they are all great….

This recipe for macaroni salad is a true classic… the basic salad from which you can be as creative as you want...very easy to make and very easy to adjust the amounts to larger batches. I have also listed some add-ins for you to choose from… pick and choose what you like…

TIPS

The age old problem of the mayo dressing getting “sucked into” the macaroni can be prevented for the most part by making sure your macaroni is ice cold. I boil it and drain it… run cold water over it… drain it some more… than put it in a bowl and cover with plastic wrap and refrigerate a couple of hours before adding all the other ingredients. Another “must do” to avoid the problem is the addition of vinegar and sugar to the dressing.

I wrote the recipe for 2 cups uncooked macaroni which will yield approximately 4 ½ cups of cooked macaroni…. This is about half a one pound box. I keep elbow macaroni in a large jar… this way I can buy the economy size that’s cheaper and I can make whatever amounts I want and store the rest.

For the mayonnaise, I used Hellman’s Real Mayonaise.

I hope you enjoy!


Recipe: Classic Macaroni Salad

All you need:

2 cups uncooked elbow macaroni
1 cup mayonnaise
4 teaspoons sugar
4 teaspoons vinegar
¼ cup chopped red pepper
¼ cup chopped green pepper
¼ cup onion, finely chopped
3 tablespoons fresh parsley, chopped
½ teaspoon salt or to taste
Ground pepper to taste

Other Add-ins – Optional:

Chopped hard boiled egg(s)
Chopped celery
Shredded carrot
Celery seed
Tuna
Chopped black olives
Pimento
Halved grape tomatoes

All you need to do:

Cook macaroni according to package directions, drain and rinse with cold water and drain again.

Allow to cool.

Place in a bowl covered with plastic wrap in the refrigerator for about two hours.

In a small bowl mix thoroughly the mayo, sugar, salt and vinegar.

To the macaroni bowl add the remaining ingredients, toss to mix well.

Add the mayo dressing, mix well.

Add ground pepper and mix well.

Cover bowl and refrigerate until serving.

Making Cucumber Slices Fancy


Tip of the Day

A quick and easy way to make cucumber slices fancy is to score them with a fork. Just run your fork down the length of a peeled cucumber… working your way around until the entire cucumber is scored.


When you slice them they look like pretty flowers. They look especially nice when you make the New York Deli Style Cucumber Salad… since the dressing is clear… they show through really nicely.

Recipe: Hungarian Cucumber Salad


This recipe for Hungarian Cucumber Salad is one I grew up with as a child. We all love sour cream… my Dad and I could eat it with a spoon, we like it so much… so this salad was made in heaven for us… cucumbers, onions, sour cream and of course… paprika… what would a Hungarian cucumber salad be without paprika….

This is so....hmmmmm …. so good!

I make this all summer long when I can get cucumbers at local farm stands and farmers markets…. there is nothing like fresh produce used to make wonderful meals.


PRINT RECIPE

Recipe: Hungarian Cucumber Salad

All you need:

3 cucumbers, peeled and thinly sliced
1 medium to large onion, thinly sliced (sweet onion preferred)
1 teaspoon salt
1 cup sour cream
2 teaspoons fresh lemon juice to taste
1 teaspoon Hungarian sweet paprika
Hungarian hot paprika to taste

All you need to do:

Place the sliced cucumber in a large bowl and sprinkle with salt.

Allow the cucumbers to rest for about 2 hours.

Water may accumulate at the bottom of the bowl… drain it.

Add the onion. Mix completely.

In a small bowl, combine remaining ingredients and mix well.

Pour the sour cream dressing over the cucumbers and mix well.

Refrigerate for at least 2 hours before serving.

Note: If you have leftovers …. The cucumbers will continue to draw water which will separate from the sour cream… just pour off the little bit of water that accumulates and stir the salad again.

Recipe: New York Deli Style Cucumber Salad


New York delis have wonderful salads…. The New York delis that I grew up with had a wide variety of all kinds of salads …. and one of my favorite is cucumber salad. It’s a really simple salad… but oh so good.

The sweet and sour flavor of the dressing just enhances the cucumbers and onion. It is a summer staple in our house….. it’s perfect for barbecues and picnics…. It goes with so many foods… an easy and quick salad to add to your menu.

I originally got the recipe from my friend Stephanie’s Mother when I was in college. I was at her house for a barbecue and sure enough there was the cucumber salad…. I asked her what deli she had gotten it from and that’s when I found out it was homemade… Steph’s Mom gladly shared her recipe with me… and I’ve made it ever since.


New York Deli Style Cucumber Salad Recipe

All you need:

3 cucumbers, peeled and thinly sliced
1 medium to large onion, thinly sliced (sweet onion preferred)
2/3 cup white vinegar
2/3 cup water
4 tablespoons sugar
1 teaspoon salt
1/4 teaspoon pepper

All you need to do:

Place the cucumbers and onions in a large bowl. Mix well.

In a small bowl, combine remaining ingredients and mix well.

Pour the vinegar water mixture over the cucumbers and onions and mix well.

Cover with plastic wrap and refrigerate at least two hours.

Stir well before serving.

Recipe: Banana Bread


This recipe for Banana Nut Bread is the same as my Banana Nut Muffins… just in bread form…. but I get a lot of requests for Banana Nut Bread … people don’t realize they are one and the same… so I decided to post the recipe again… this time under Banana Bread.

It’s a very simple recipe… The bread is delicious and I get requests to make it all the time… the secret is in the butter and sprinkling of the baking soda.

I hope you enjoy it!

PRINT RECIPE

Banana Nut Bread Recipe

All you need:

4 ripe bananas, mashed
6 tablespoons butter, melted
1 cup sugar
1 large egg, beaten
1 teaspoon vanilla
1 teaspoon baking soda
Pinch of salt
1 ½ cups flour
1 cup chopped walnuts

All you need to do:

Preheat the oven to 350 degrees F.

Spray a loaf pan with cooking oil spray (butter flavor preferred).

In a large mixing bowl, mash the bananas with a fork until fairly smooth.

Add the melted butter and stir completely with the fork.

Add the sugar, egg and vanilla, and salt….mix completely.

In a small bowl mix the together the baking soda and flour, mix completely.

Add the flour and mix until the flour is completely mixed into the batter.

Add the walnuts mix completely.

Pour the batter into a prepared loaf pan.

Bake at 350 degrees F. for 60-65 minutes or until a toothpick inserted in the center comes out clean.

Recipe: Ratatouille


Ratatouille is wonderful … all the fresh flavors of all the vegetables… they are so good… and for you. Most recipes for Ratatouille are almost the same... methods change a bit... some people add summer squash.. (I do)...some don't...herbs vary slightly... but they are all basically the same recipe and foolproof at that.

Ratatouille is a traditional French dish… served mainly as a side dish but also can be served as the main meal with rice or bread. It includes tomatoes, onions, garlic, red and/or green pepper, zucchini, eggplant and herbs (basil, parsley) … and I always include summer squash.

This vegetable stew is chock full of vitamins… and tastes fabulous.

You can make this in your crockpot too… just add all the ingredients to your crockpot and your good to go... I always set the heat on low and let it cook for 5-6 hours or until the vegetables have softened.

I adapted this recipe to an Italian version that I have made for years… I call it my Italian Stew… I posted the recipe a few months back… basically… I added mushrooms and cooked hot and sweet Italian sausage… I added oregano to the herbs… and I always give it a good shot of red wine (Cabernet). We love it… sometimes we eat it as is with crusty bread… or over some pasta.... sprinkle a little Parmigiano Reggiano over it... it's heavenly.

Enjoy!


Recipe: Ratatouille

All you need:

1 small eggplant, chopped
1 small zucchini, chopped
1 small summer squash, chopped
3 tablespoons olive oil
2 (14.5 oz.) cans of diced tomatoes
1-2 large onions, sliced
4 cloves of garlic, finely chopped
1 green pepper, cut into strips
1 red pepper, cut into strips
¼ cup chopped fresh parsley
3 tablespoons chopped fresh basil

All you need to do:

In a large pot over medium heat, add the olive oil.

When oil is hot, add the onions. Cook for about 2 minutes.. then add the garlic.

Continue to cook until onions are soft… do not let them brown, stir frequently.

When onions are soft, add the eggplant and sauté for about 3 minutes.

Add the zucchini and cook for another 3 minutes.

Add the remaining ingredients and simmer for about 30 minutes or until the vegetables are cooked but still a little crisp… not mushy.

Recipe: Old Fashioned Chocolate Pudding


This recipe for chocolate pudding is one like your Grandmother probably made. It’s rich and chocolatey… and oh so good. There will definitely be a fight about who gets to get the last bit out of the pot.

Many people grew up on instant puddings… they’re okay… I personally prefer to have the cooked puddings. My Mother always made those and I always did for my son… to us there is no comparison…. I don’t care what Bill Cosby told you… cooked pudding is the way to go.

I have no idea why I got out of the habit of making it from scratch… maybe because the pudding boxes were so cheap… which they are no longer... making it from scratch is so much better… you can control the intensity of the chocolate and you know what all the ingredients are….

It really is easy and it's made very quickly. The whole cooking process takes about 15 minutes and that includes the bit of prep… you can’t beat that.

This recipe makes 8 half cup servings… but let’s face it.. who eats only half a cup? … figure 4 big servings…

TIPS

If you use this recipe for a Chocolate Cream Pie… use another 1/2 tablespoon of cornstarch because you want the pudding to set-up well so you can cut pieces of the pie.

If you use a lower fat milk you may have to add slightly more cornstarch… make the recipe as written and if you feel it isn’t thick enough… put about a half a tablespoon cornstarch into a measuring cup and add some of the pudding mixture to it.. using a fork beat it until smooth and then add the cornstarch mixture back into the pot and whisk well to incorporate.

I hope you try it and as always…. Enjoy!

PRINT RECIPE

Recipe: Chocolate Pudding

All you need:

1 cup sugar
4 heaping tablespoons unsweetened cocoa
3 tablespoons cornstarch
3 cups of milk (I used whole milk)
2 tablespoons butter
1 teaspoon vanilla

All you need to do:

Combine the sugar, cocoa and cornstarch in a large pot.

Add the milk slowly, whisking vigorously until well mixed.

Cook the mixture over a medium heat, whisking constantly until extremely smooth.

Continue to whisk, mixture will thicken, continue whisking until the mixture begins to boil.

Mixture should be thick enough to coat the back of a spoon.

Remove from heat and add the butter and the vanilla, mix well.

Let mixture cool slightly, then pour into serving cups or a large bowl.

Serve warm or chill in the refrigerator.

Unsweetened Cocoa

Tip of the Day

I get asked many times about what exactly unsweetened cocoa is. It is 100% cocoa and contains no sugar and is therefore NOT sweet. It can come in a powdered form or in chocolate squares.

Many recipes call for the unsweetened chocolate in ounces. You can either use the chocolate squares, which are usually in 1 ounce squares or you can use the powdered version.

If you use the powdered version you will need 3 level tablespoons of cocoa powder plus 1 tablespoon of shortening or oil to equal 1 ounce of Unsweetened Baking Chocolate.

Recipe: Chicken Salad with Cranberries Apples and Pecans


You will love this recipe for Chicken Salad. It not only has cranberries, but also chopped apples and pecans. It’s delicious as a spread in a sandwich or on a plate of lettuce (as in the picture).

As we go into spring and summer… there are many celebrations and the challenge to make the food special and still stay on a budget can be daunting. I recommend making lists of possible spreads you can use in finger sandwiches.

Finger sandwiches are a terrific way to feed a crowd on a budget. Last week I posted the Benedictine Sandwiches that use a cream cheese and cucumber spread. This recipe for Chicken Salad is another great candidate for a menu.

I used a boneless chicken breast that I had which ended up an odd piece.. so I decided to make chicken salad for lunch. I cooked it with vegetables and chicken broth… you can use leftover chicken from a meal also.

TIPS

If you decide to make the chicken breasts for it… figure about one chicken breast half per person … if you have big eaters add a couple of extra ones in.

I garnished my salad with apple slices and Parmesan Crisps.

The recipe below is for 4 servings.


PRINT RECIPE

Recipe: Chicken Salad with Cranberries Apples and Pecans

All you need:

To prepare the chicken breasts:

4 Boneless skinless chicken breasts halves
Chicken Broth
1 carrot, peeled and cut into chunks
1 celery stalk, cut into chunks
1 medium onion
5-6 sprigs of fresh parsley
¼ teaspoon thyme
Pinch of salt
Dash of pepper

To prepare the salad:

¼ cup finely chopped celery
¼ cup finely chopped onion
¾ cup dried sweetened cranberries
½ cup chopped pecans
1 Granny Smith apple, chopped
1 Granny Smith apple, sliced for garnish (optional)
¼ cup mayonnaise * you may need to add more to get it to the consistency you like.
1 tablespoon lemon juice
Salt and pepper to taste

All you need to do:

Place the chicken, carrot, celery, onion, parsley, salt and pepper in a small pot.

Add chicken broth to just cover everything.

Over medium heat, cook the chicken until cooked through (simmer for about 20 minutes).

When cooked, remove the chicken allow to cool enough to handle. Discard the vegetables or use them for something else.

Dice the chicken into small cubes and place in a large bowl.

Add the chopped celery, chopped onion, dried cranberries, diced apples and pecans.
Mix well.

In a small bowl combine the mayonnaise and lemon juice.

Add salt and pepper to taste.

Add the mayonnaise mixture to the chicken and toss until the salad is well coated. * you may need to add more to get it to the consistency you like.

Serve as a chicken salad sandwich or on a bed of lettuce.

Recipe: Egg Biscuit and Egg Muffin Breakfast Sandwiches


This recipe for Egg Biscuit and Egg Muffin Breakfast Sandwiches is so easy and at a fraction of the cost it would be to take the family out for the fast food versions…. And best of all… it’s a great Kid-Friendly meal that you know your kids will love.

You can use your own biscuits or if you use the refrigerator ones… use the “Grands” size. By the way... this is excellent on bagels as well.

For the eggs… you can either scramble your own or use egg substitute… I doubt anyone will notice if you use the substitute…

I use my mini tart pans for these…. if you don’t have any… you should consider purchasing them.. they are well worth it and not expensive.

You can use Canadian bacon, bacon, sausage or I used thin sliced deli ham… or you can leave the meat out completely.

I use a bit of shredded cheese in the egg because I use egg substitute and it adds a bit of flavor. For the sliced cheese on top… you can use whatever you want…. American, Cheddar, Monterey Jack… whatever you prefer.

The quantities will depend on how many you are making… figure about 3 eggs for every 2 sandwiches you make.

You can make these ahead and store them in an airtight container in the fridge. Just give them a minute in the microwave to reheat… and another minute with the cheese… and you are good to go!


PRINT RECIPE

Recipe: Egg Biscuit and Egg Muffin Breakfast Sandwiches

All you need:

Eggs, beaten
Shredded Cheese (optional)
Sliced cheese (any variety)
Sausage, Canadian bacon, bacon, thin sliced deli ham (optional)
English Muffins, toasted
Biscuits

All you need to do:

Pre-heat the oven to 350 degrees F.

Spray the mini tart pans lightly with butter flavored cooking oil.

Place the tart tins on a foil lined cookie sheet or baking pan.

Pour the egg into the tart pan to just below the top lip. (see photo)

Sprinkle with a little shredded cheese (optional).

Bake at 350 degrees F until set…. about 20 minutes.

Remove the egg patties to a plate.

Place a slice of desired breakfast meat (if using) on the egg patty and a slice of cheese on top of the meat.

Microwave for 30 seconds or until cheese has just started to melt (you don’t want it too hot to eat).

I put a little margarine on the Muffin or biscuit before assembling the sandwich.
Place the egg on a toasted English muffin or biscuit split in half.

Saturday Morning Kid-Friendly Breakfast

Commentary

Each week for a while now I have been posting Sunday Morning Breakfast Ideas…. and while they can often be considered kid-friendly… not many are specifically for a kid in mind…. so I decided to post a Kid-Friendly Saturday Morning Breakfast Idea.

Kids (and adults too) love McDonalds’ Egg McMuffins or their Egg Biscuit breakfasts…. but it can get expensive taking the kids out to McDonalds for breakfast… and while McDonalds has come a long way in curbing fat… it still isn’t the best option.

Today’s post will feature my “homemade” Egg McMuffin and Egg Biscuits. They are so easy and absolutely delicious. Serve them with a piece of fruit and juice and you have a great breakfast… one the kids will love and you will too!

Recipe: Potatoes Anna or Classic Pommes Anna


This recipe for Potatoes Anna or the French Classic Pommes Anna is so good. I grew-up in a family that made virtually the same thing except it wasn’t made so attractive… my Grandmother used a deep roasting pan and kept piling on the potatoes…. I don’t think she ever made enough… we loved the buttery, crisp potatoes…. We would just pull apart sections and devour them.

TIPS

There are fancy baking dishes for this recipe… and I’m sure fancy prices to go with it…. I used an 8-inch non-stick cake pan….. if I was serving more people… I’d use my 10 inch springform pan and maybe make two…

The picture you see was made for the two of us… I used 3 medium potatoes… nothing was left… we had it with steak and string beans… the meal was absolutely terrific! These potatoes go with just about everything…. and so quick and easy.

Adjust the amount of your ingredients to suit how many people you plan to feed. Figure at least one potato per person. Figure about one tablespoon of melted butter for every 3 potatoes.

I don’t like to stack my potatoes higher than 3 layers… because we really like them to crisp up.


PRINT RECIPE

Recipe: Potatoes Anna (Classic Pommes Anna)

All you need:

Russet potatoes
Melted butter
Salt and Pepper

All you need to do:

Pre-heat oven to 425 degrees F.

Peel and clean potatoes.

Slice the potatoes very thin… no more than 1/8 inch thick.

Melt butter.

Using a pastry brush, brush butter on the bottom of an 8 inch non-stick cake pan.

Layer the potatoes starting against the outer rim, overlapping slightly. Use the best looking slices for the bottom layer since these will be on top.

Continue until the bottom layer covers the cake pan.

Brush with melted butter.

Sprinkle with salt and pepper.

Repeat the using the same instructions with the second and third layer.

Place in a pre-heated oven at 425 degrees for 50 minutes or until potatoes are golden and crisp.

Remove from the oven and invert on a platter.

To serve cut into wedges…. It also can be pulled apart and served in sections.

Recipe: Peach Melba Waffles


This recipe for Peach Melba Waffles is so good…. and easy… what a perfect combination … and perfect for Mother’s Day. If small children are involved.. they can help with the assembly and maybe setting the table. If it’s just adults that want a great breakfast idea… well here you have it!

I used canned peaches… you can use fresh. I made my own whipped cream (Chantilly Cream)… it really is the best… but if you must… you can use the store bought kind. I found Smuckers Raspberry syrup in the honey and syrup aisle of the grocery store… it was perfect for these.

You can find my Waffle Batter Recipe and Chantilly Cream Recipe by clicking the links.

You may also want to see my Tips on Waffle Making.

I hope you enjoy!


Recipe: Peach Melba Waffle

All you need:

Waffles
Canned sliced peaches
Vanilla Ice Cream
Raspberry Syrup
Whipped Cream

All you need to do:

Prepare waffles according to the waffle recipe.

Place about 3 slices of peaches on the waffle.

Place a small scoop of vanilla ice cream in the center.

Drizzle raspberry syrup over the whole waffle and toppings.

Plop a dollop of Chantilly Cream (whipped cream) on top.

Serve immediately.

Sunday Morning Breakfast Idea- Peach Melba Waffles

Commentary

Another Sunday Morning Breakfast Idea post…. and this is for Mother’s Day… This is a great idea for the adult to make the waffles… and have the younger children help assemble them…. and everyone can enjoy them.

Even if you’re a single Mother… celebrating Mother’s Day with special food… is important. I was widowed at a fairly young age and my son was young. We celebrated all holidays… Mother’s Day included. I didn’t mind making the things he couldn’t…. he would set the table… help assemble it (like this recipe idea) and he would serve it. It was so much fun watching him… he was so proud to be able to do something to help…. I wouldn’t have missed it for all the money in the world.

And if you’re not celebrating Mother’s Day… well … then these are still a fabulous breakfast!

They are extremely easy to make…. And soooo good.

Recipe: Fajita Chicken and Cheese Quesadillas


This recipe for Fajita Chicken and Cheese Quesadillas combines some of the flavors of Fajitas (my all time favorite Mexican food) and a Cheese Quesadilla (another favorite of mine).

I take 2 chicken breasts and let them soak in a “Fajita marinade”… it’s not a real “marinade” since it doesn’t have a an acidic ingredient… but piercing the chicken a bit allows the flavor to permeate into the meat. I then grill it… and it’s the main ingredient into these terrific Quesadillas.

You can use a pre-packaged Fajita mix or use my recipe for Fajita Seasoning…
I also make up a separate batch of Fajita seasoning sauce to drizzle in the Quesadilla… don’t use any of the leftover sauce you that you used on the raw chicken… it’s not safe to do that.

I used Pepper Jack cheese on these… but you can use Cheddar or Monterey Jack cheese. I sprinkled some chopped tomato, chopped red and green peppers and green onion in these… you can leave them out and it would be delicious also.

Serve with sour cream, guacamole and salsa.

These are terrific… I hope you enjoy them!


PRINT RECIPE

Recipe: Fajita Chicken and Cheese Quesadillas

All you need:

Boneless chicken breasts
Fajita seasoning
Pepper Jack, Cheddar, or Monterey jack cheese (shredded or thin sliced)
7-inch flour tortillas
Chopped green pepper (optional)
Chopped red pepper (optional)
Chopped green onion (optional)
Sour Cream
Guacamole
Salsa

All you need to do:

Mix up two batches of fajita seasoning and mix each in ¾ cup water.

Place one of the mixtures in a shallow dish and allow the chicken breasts to soak for about 1 hour.

Spray a sauce pan with cooking oil spray.

Remove the chicken and place in a hot sauce pan over medium heat to cook.

When one side is brown, flip to brown the other side.

When both sides have browned to a golden brown… add about ¼ cup of fresh fajita seasoning (from batch 2 you made earlier)… cook until chicken is cooked thoroughly.

Remove from heat and allow to cool enough to handle.

Then slice the chicken and set aside.

You can make these in a Quesadilla maker … if you don’t have one… follow these instructions..

Spray a grill pan with cooking oil and heat it over medium heat.

Place a tortilla on the grill pan and lay thin sliced cheese or sprinkle with the cheese.

Layer some of the chicken on top…. drizzle some of the Fajita Seasoning liquid on the chicken.

Layer any other of the optional ingredients you want.

Lay thin sliced cheese or sprinkle with the cheese and place a tortilla on top.

When the bottom layer of cheese has melted and the bottom tortilla is lightly browned.. flip the quesadilla (see my Tip of the Day for pointers on flipping tortillas).

Cook until the bottom is lightly browned… and slide onto a cutting board… using a pizza cutter, cut the Quesadilla into wedges.

Serve with sour cream, guacamole and salsa.

Looking for More Recipes?

If you are looking for more recipes click the "Older Posts" link to page back to older posts or go to the archives in the right column. The list of labels at the bottom in the right column will help you find specific types of recipes or try our search engine at the top and search by name or ingredient.


What's more comforting on a cold day than Homemade Chicken Noodle Soup? .. and it's so easy to make!

Chicken Noodle Soup