Pizza Night Tips


We have what we call “Pizza Nights”… not nights when we buy pizza .. but instead… nights I make pizza. I make all kinds.. the key here is… quick and easy… I either make the dough ahead or purchase dough at the grocery store… while it doesn’t compare to getting one from a pizzeria .. it does just fine for those nights we want to kick back a bit.

TIPS

I like to serve a big antipasto salad with it… it makes a perfect meal.

One of the biggest things I get asked is how to get the cheese to be ooey gooey like a pizzeria pizza… I asked a pizzeria owner years ago and his advice has worked perfectly for me ever since..believe it or not there is a simple answer… after you finish putting your toppings on and sprinkle the shredded cheese over the top… spray it lightly with olive oil cooking spray.

I make all kinds of toppings … one of my favorites is mushroom and onions…. I sauté the onions first in a little olive oil… just until they’re soft and remove them with a slotted spoon from the pan onto the pizza.

You can buy shredded mozzarella mixed with Parmesan and Romano cheeses.. which give it great flavor.

When I make Italian sausage or meatballs for a meal.. I cut up a little and put it in freezer bags so I have a topping for pizza without the work on pizza night.

So kick back.. give yourself a break now and then and have a pizza night… one that won’t break the bank and everyone will love.

Recipe: Light and Fluffy Pancakes


Nothing is better for a Sunday morning breakfast than light and fluffy pancakes…well… okay.. if you’re a breakfast lover like me.. the list of perfect Sunday morning breakfasts is long…. BUT… you do have to admit that light and fluffy pancakes are on the list... light as in light as a feather...not light as in Weight Watchers light... after all.. it does have butter in it.

I’ve posted my Buttermilk Pancake recipe previously… I like the taste of buttermilk and the taste it gives pancakes... but sometimes light and fluffy pancakes are what I crave...

And for some reason I never realized I hadn’t posted my other pancake recipes… probably because Warren is not a fan of pancakes.. he claims they lay like lead in his stomach.. well.. there are two things wrong with that… 1) he probably ate too much.. but we won’t mention that… and … 2) probably the recipe used was not as good as this one.. which is really the better answer…

So what makes my pancake recipe better than others??… several things… in my somewhat humble opinion… (I’m fairly proud of my light and fluffy pancakes… because they ARE light and fluffy)… here are some tips for making the pancakes light and fluffy…

TIPS

The recipe calls for a significant amount of baking powder… 3 ½ teaspoons… which as most bakers and cooks know.. that is a lot.. you need it…. furthermore …. make sure your baking powder is not expired… I can’t impress on you enough the importance of fresh baking powder..

I sift the dry ingredients twice… it takes just a few extra seconds and is well worth the effort.

I put the milk in the microwave just long enough to take the chill off it…

Mix the batter lightly.. don’t whisk it… just stir it until it’s fairly smooth … mine has tiny lumps left but nothing too sizeable… don’t over mix it.. but don’t under mix it either.

I use vanilla sugar… adds a little flavor without overpowering it.. see my post about vanilla sugar for information about it… you can use regular sugar also.

I add a teaspoon of vanilla… again.. it adds flavor without making it obvious… it’s optional.

I use a ¼ cup dry measure to scoop the batter… I fill it to about 1/8 inch from the top.. it makes 3 ½ inch pancakes…. you can make them larger but… this is a good size.

Flip the pancake only once.. any more and you toughen it.

This recipe makes about 14-16 pancakes… figure at least 3 per person…

The leftovers keep well in an airtight container.. just put them on a plate with a piece of waxed paper over them and give them a quick nuke in the microwave to reheat them… great for quick breakfasts during the week.

That’s it… trust me.. you’ll put this batter on a hot griddle and watch them puff up … just delicious!


Recipe: Light and Fluffy Pancakes

All you need:

1 ½ cups flour
3 ½ teaspoons baking powder
1 tablespoon vanilla sugar or white sugar * see Tips
Pinch of salt
1 egg, slightly beaten
1 ¼ cup warm milk
3 tablespoons unsalted butter, melted
1 teaspoon vanilla (optional)
Butter flavored cooking spray

All you need to do:

Sift together the flour, baking powder, sugar and salt… then sift it again into a large bowl.

In a medium bowl, whisk the egg and milk… then add the melted butter and vanilla, whisk until mixed well.

Add the wet ingredients into the dry, mixing with a spoon. Mix until fairly smooth with tiny lumps.

Let the batter rest for 20 minutes.

Spray a griddle pan with butter flavored cooking spray.

Heat the griddle over medium high heat. Scoop scant ¼ cup measure of batter onto the griddle for each pancake.

Check the bottoms of the pancake periodically so they don’t get too dark.. adjust the heat if necessary…. when the top has lots of bubble.. flip them over and cook until light golden on the bottom.

Recipe: Grilled Bacon Tomato and Cheddar Cheese Sandwich


Here’s another stellar grilled cheese sandwich… a Grilled Bacon Tomato and Cheddar Cheese Sandwich....after all… who says grilled cheese has to be boring… thick sliced Tuscan Bread… sliced beefsteak tomato… and smoked thick sliced bacon… topped off with wonderful sliced sharp cheddar cheese…. definitely not boring!

TIPS

The bacon can be a snap to make and cleaned up in the time it takes to throw out foil…. make the bacon in the oven and line your pan with foil…. try it … you’ll never go back to making bacon in a pan on the stove…. for instructions… click here.

You can use any bread… but definitely try using bread from the bakery that you can slice into nice thick slices… makes a very hearty sandwich.

I personally love Sargento cheeses… and they have sharp cheddar slices that are delicious and work really well for sandwiches.

Quantities have been left off… make them as thick as you like…. I use 2 strips of bacon… 2 slices of tomato and about 3 slices of cheese for each sandwich.

I hope you do away with boring sandwiches and try this one!


Recipe: Grilled Bacon Tomato and Cheddar Cheese Sandwich

All you need:

Thick sliced fresh bread
Butter or margarine
Sharp cheddar cheese slices
Thick sliced smoked bacon
Beefsteak tomato slices

All you have to do:

Spread margarine on 1 side of each slice of bread.

Place 1 of the slices, margarine side down, layer the bacon, tomato and cheese on the dry side.

Place 1 of the slices, margarine side up, on top of the bacon, tomato and cheese.

Place on a hot griddle.

When the bottom is golden in color, carefully flip it over and press it gently with a spatula.

Cook until the bottom is golden and cheese has melted… remove it from the griddle and allow it to set for 1-2 minutes. Cut it in half and serve.

Recipe: Apple Crumb Pie


Let me first say … the picture does not do justice to this recipe… Apple Crumb Pie is delicious and easy to make… but… do not talk on the phone while this is baking… my timer went off… and well… let’s just say my crust is usually lighter in color than it is on this one… I will replace the picture when I make another one…

Surprisingly though… everything tasted wonderful… my crumb topping had just the right amount of crunch to it…

Okay for the easy part…

TIPS

The topping uses butter and a flour brown sugar mixture… you cut the butter into it… this is the best tip… trust me… use very cold butter… and cut the butter into separate tablespoons then into little cubes… 4 per tablespoon… put the flour, brown sugar and cinnamon into your food processor fitted with the blade and pulse 3 times to mix it… add your cold cubes of butter and pulse until crumbly… about 6 pulses… comes out perfect every time.

Use whatever apples you like best… Granny Smiths will be a bit tart… Golden Delicious are sweet.. and Empires (which are a cross between Red Delicious and McIntosh) and Cortlands are slightly tart. All are excellent apples for this recipe.

Use whatever pie crust you prefer, store bought or homemade.

This is an easy pie to put together and so delicious.. serve it warm with a scoop of vanilla ice cream… yummmmm!


Recipe: Apple Crumb Pie

All you need:

1- 9 inch pie shell

For the Apple Mixture:

3 large apples, peeled and thinly sliced
Lemon juice
¾ cup sugar
2 tablespoons flour
½ teaspoon cinnamon
1/8 teaspoon nutmeg

For the Topping:

1 cup flour
1 cup brown sugar
½ teaspoon cinnamon
1 stick (8tablespoons)cold butter

All you have to do:

Preheat the oven to 375 degrees F.

Mix the apple mixture ingredients together in a large bowl. Toss to evenly coat the apples.

Lay the pie crust in a 9 inch pie plate and crimp the edge.

Pour the apple mixture into the shell.

To prepare the topping see Tips above if you want to make it in a food processor.

In a medium bowl mix the flour, brown sugar and cinnamon. I use a wire whisk to mix it evenly.

Cut the butter in half then turn it and cut it in half again… then slice off tablespoons… you will have 4 small cubes per tablespoon.

Cut the butter into the flour mixture using a pastry blender until crumbly.

Sprinkle the topping over the top of the apples.

Place on a foil lined baking sheet … then loosely cover with foil.

Bake for 20 minutes then remove the foil and bake for 30 minutes or until top is golden brown.

Serve warm with vanilla ice cream.

Recipe: Beef Bourguignon


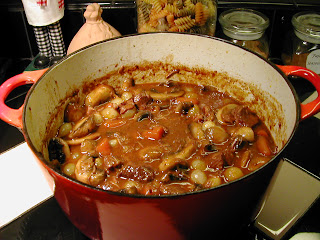
Beef Bourguignon is basically a fancy beef stew… here in the United States we claim beef stew to be our own… but in reality.. it has deep roots in Europe… especially France…. Their version of beef stew is cooked with wine… lots of it… and cooked very slowly in a low heat oven… and finished off with pearl onions and mushrooms... just delicious!

Americans also throw in a host of vegetables… the French pretty much limit it to onions and carrots… in any case the result is melt in your mouth beef and a fabulous gravy with it… oh and let’s not forget those carrots…

This is extremely easy to make… it takes some time cooking…… but the reward is a wonderful meal! The house will smell fabulous!

My family has made a version of this for as long as I can remember… it was just natural to add wine to it… albeit not as much as this recipe has today.

One tip I found especially helpful from Ina Garten was using frozen pearl onions instead of fresh ones… I loved the result and it did cut down on the work a bit.

TIPS

Many recipes thicken the stew toward the end… my recipe thickens naturally while cooking… because I dredge the meat in seasoned flour before I sear it… if you haven’t tried this method… try it you just may like my way better.

Use a good table wine.. one that you would consider drinking… don’t use those “cooking wines” .. they have terrible flavor and add a lot of salt to your dish. I suggest a Pinot Noir.. it doesn’t have to be expensive.

You can make this in a crock pot… BUT… you lose some of the flavor from the crusty browning remnants.. if you do decide to do this in a crock pot as opposed to baking in the oven… be sure to follow the first steps of cooking the bacon and searing the meat and softening the onions, garlic and carrots… place them all in the crock pot.. then deglaze the pot with some of the wine and pour that into the crock pot as well… then follow the rest of the instructions.

Note that I don’t add salt.. the bacon and the little bit of salt in the seasoned flour should be enough.. if it’s not to your tastes… and some at the end to your tastes.

This recipe makes about 5-6 servings… you can easily cut it in half .. as I usually do since there is only two of us… I usually have about a serving leftover… which makes for a mighty nice lunch.

Serve this with fresh bread and a small salad… and enjoy!


Recipe: Beef Bourguinon

All you need:

3 strips thick sliced smoked bacon, chopped
2 ½ pounds chuck beef cut into 1 inch cubes
½ cup flour
Salt
Pepper
Garlic powder
2 tablespoons olive oil
2 onions, chopped
2 large garlic cloves, finely chopped
About 2 cups carrots, chopped
3 cups dry red wine
3-4 cups beef broth
2 bay leaves
½ teaspoon dried thyme
1 ½ tablespoons tomato paste
1 small bag frozen pearl onions
3 tablespoons butter
1 pound mushrooms, thick sliced

All you need to do:

Preheat the oven to 325 degrees F.

In a Dutch oven that can go into the oven also, cook the bacon over medium heat until slightly crisp and fat has rendered.

Remove the bacon with a slotted spoon and drain on a paper towel. Set aside.

Meanwhile, pat the meat dry with a paper towel then dredge in seasoned flour (flour, sprinkle of salt and pepper, and a heavy sprinkle of garlic powder).

Sear the meat in batches in the hot bacon grease. Add a bit of olive oil as needed if the pot gets dry.

Remove the meat with a slotted spoon to a plate.

You will need about 2 tablespoons of fat or olive oil in the pan… if you don’t have that much bacon grease left.. add olive oil.

Add the onions, garlic and carrots and stir well. Cook until onions are soft.. about 10 minutes.

Add about a cup of wine to deglaze the pot.

Add the meat, bacon and vegetables back to the pot. Add the rest of the wine.

Add enough beef broth to cover the meat to 2/3 or so. Stir well.

Add the tomato paste and stir well.

Add the thyme and bay leaves.

Bring the pot back to a low simmer.

Put a lid on the Dutch oven and place in the preheated oven.

Add beef broth as needed about 1 ½ into the cooking and stir. You don’t want it swimming but you don’t want it too thick either. Stir well.

Cook for another 1- 1 ½ hours or until meat is tender.

Add the pearl onions, replace the lid and continue cooking.

In a large skillet, melt the butter.

Add the mushrooms and cook until they are light brown and have rendered their juice.

Add the mushrooms and their juices to the pot… replace the lid and cook on top of the stove for about 15-20 minutes. Add any additional beef broth to get to consistency you want.

Remove the bay leaves and serve in bowls.

Recipe: Insalata Caprese


Insalata Caprese is very simply a fresh salad made with sliced fresh tomatoes, fresh mozzarella and fresh basil leaves drizzled lightly with good olive oil…. there is a recurring theme here… fresh…. fresh quality ingredients are the most important… and I can tell you… it is wonderful.

I like to make a small plate of it and eat it for lunch.. I’m in heaven… so simple and so good!

TIPS

Use fresh mozzarella… you can find it in the grocery store by the gourmet cheeses… it usually comes in container filled with water… or sometimes in completely sealed plastic. Its soft and so flavorful…

There is nothing like the taste and smell of fresh basil… once you’ve had it.. you will be devoted…

Quantities have been left off… eat to your heart’s content!


Recipe: Insalata Caprese

All you need:

Sliced tomatoes
Basil leaves
Sliced fresh mozzarella
Olive oil
Coarse salt and pepper

All you need to do:

Layer tomatoes and mozzarella on a plate and place basil leaves in between them.

Drizzle olive oil over the top and sprinkle with salt and pepper.

Recipe: Apple Bread


This time of year there is an abundance of apples… crisp fresh tasting apples… and nothing can satisfy more than the clean taste of an apple. There are so many things you can make with apples… and apple bread is one of them.

It goes together quickly and while it bakes…it fills the house with a wonderful aroma… gives the house a homey autumn feel … one of my favorite things.

TIPS

Use whatever apples you prefer… Granny Smith apples make wonderful bread.

The amount of chopped apple is approximate… 2 large apples should make a good amount for the bread…

I rough chopped the apples this time… but sometimes I like to grate the apple… or chop it very finely… try it either way.

The batter will be extremely thick… it will bake fine.

I hope you try this recipe!


Recipe: Apple Bread

All you need:

1 ½ cups flour
1 teaspoon baking soda
½ teaspoon baking powder
½ cup white sugar
½ cup brown sugar
1 egg, lightly beaten
6 tablespoons butter, melted
1 teaspoon vanilla
Pinch of salt
1 ½ -2 cups chopped apple (2 large apples)
1 teaspoon cinnamon
1 cup applesauce
1 cup chopped walnuts (optional)

All you need to do:

Preheat the oven to 350 degrees F.

Grease a loaf pan and set aside.

In a small bowl combine the flour, baking soda, baking powder and salt. Use a wire whisk to mix it so it mixes evenly. Set aside.

In a large bowl, beat the egg lightly. Add the melted butter and vanilla and whisk with a wire whisk.

Add the sugars and mix well.

Add the chopped apples, applesauce and cinnamon and , mix well.

Add the flour mixture and mix well with a spoon.

Pour mixture into the loaf pan.

Bake for 40-45 minutes or until a toothpick inserted in the center comes out clean.

Recipe: Strawberry Salad with Goat Cheese


I love strawberries… I have always loved strawberries… even as a kid I thought it was a treat to eat them… so when I saw a strawberry salad on a café game that I play.. I thought… sure why not?

I found a recipe by Rachael Ray but it didn’t totally ring my chimes… so I set about making my own version…. the result?... pure heaven for a strawberry lover like me.

TIPS

You can use a different salad green but I urge you to try the spinach called for in the recipe.. it really does add a perfect flavor to the salad.

The dressing uses strawberry or raspberry jam… either one will work well.

If you haven’t tried goat cheese… now is the perfect time to try it… it has the consistency of cream cheese… but is a bit tangy like sour cream… the perfect accent to this salad..

The teaspoon used for the jam is a measuring teaspoon not a coffee teaspoon.

The dressing recipe makes enough for 2-3 salads depending on the size of the salad.

Quantities for the salad have been left off… it’s entirely up to you how much to make!

I know this may seem like an odd salad… but try it.. you just may discover a new salad to love!


Recipe: Strawberry Salad with Goat Cheese

All you need:

For the Salad:

Fresh strawberries, cleaned hulled and cut in half
Spinach leaves
Goat cheese

For the Dressing:

3 tablespoons olive oil
2 tablespoons white wine vinegar
3 generous teaspoons raspberry or strawberry jam
Dash of salt and pepper (to taste)

All you need to do:

Arrange spinach leaves on a plate with the strawberries on top.

In a small bowl mix the dressing ingredients with a wire whisk until smooth.

Drizzle the dressing over the spinach and strawberries.

Drop small pieces of goat cheese over the salad.

Recipe: Grilled Smoked Ham and Cheddar Cheese Sandwich


Grilled Cheese Sandwiches are getting something of a revival… suddenly people are loving them again. I plan out my blog posts at least a month in advance… sometimes longer… and I had to chuckle to myself when I saw MSN recently tout Grilled Cheese Sandwiches… guess great minds think alike.

I, honestly, never stopped loving Grilled Cheese… in fact... Warren and I have them and Tomato Soup periodically for supper. My Mother has been a devoted fan of them for as long as I can remember… she would insist on ordering one if we went to a new place for a quick sandwich… because she knew it would be good.

This recipe for Grilled Smoked Ham and Cheddar Cheese Sandwich takes a little different spin on the ordinary Grilled Cheese… it wasn’t rocket science.. and certainly I don’t claim to have invented it… but I thought I would share a really terrific idea for lunch or a quick supper.

TIPS

I used thick slices of Sourdough bread… we happen to have had a Sourdough Boule… I definitely recommend it… makes for a more interesting and substantial sandwich than ordinary sandwich bread.

I love Sargento cheese…they have sliced Sharp Cheddar cheese… makes making the sandwich not only a snap but delicious too!

I use soft spread margarine… you can use butter if you prefer.

There are no quantities listed… it really is personal preference… I say.. pile it on!

I hope you try it!


Recipe: Grilled Smoked Ham and Cheddar Cheese Sandwich

All you need:

Thick sliced sourdough bread
Smoked deli ham, sliced thin
Sargento Sharp Cheddar Cheese slices
Margarine or butter

All you need to do:

Spread margarine on 1 side of each slice of bread.

Place 1 of the slices, margarine side down, layer the ham and cheese on the dry side.

Place 1 of the slices, margarine side up, on top of the ham and cheese.

Place on a hot griddle.

When the bottom is golden in color, carefully flip it over and press it gently with a spatula.

Cook until the bottom is golden and cheese has melted… remove it from the griddle and allow it to set for 1-2 minutes. Cut it in half and serve.

Recipe: Smores Brownies


These Smores Bownies are a decadent mixture of all those things Smores lovers want and more… gooey chocolate … graham crackers and of course… marshmallows… beware they are addicting!

Put these out on football night and watch them disappear! Make them ahead and pop them in the microwave to reheat or eat them at room temperature… just delicious!

This recipe is from Betty Crocker… I made some adjustments…. Instead of the brownie mix called for, I used Betty Crocker’s Fudge Brownies – Traditional Chewy Brownie Mix…. the original brownie mix is way too sweet to use for this recipe.

TIPS

I used an 11 x 7 inch pan… anything smaller will make the brownie layer too thick.

I made the brownies chewy… you definitely want a chewy brownie not a cakey brownie. I’ve used this mix for years… I bake them for exactly 26 minutes.

You can use any brownie recipe you prefer, if you want to make these from scratch. I have an excellent brownie recipe you may want to consider making.

Line your pan with non-stick foil… leave a little over-hang so you can grab the foil to lift out the brownies from the pan… I would have to say this step is a must for these brownies… infinitely easier to get out of the pan this way.

Don’t have non-stick foil?... line your pan with foil and grease the foil as directed in the brownie directions. I also lightly grease the non-stick foil to ensure no sticking.

Use a wet knife to cut these, otherwise they will be difficult to cut.

The original recipe called for Hershey’s Chocolate bars… Warren bought me the really big ones… which were really too thick… use the smaller bars, which are thinner… in fact… those little ones you give out at Halloween would be perfect. The recipe says to break them into 1 inch pieces… mine were hard because the candy bars were so thick… so I cut them into smaller pieces.

Making these for kids?..... Use Teddy Grahams for the graham crackers… they will look adorable.

Try these … you’ll love ‘em!


Recipe: Smores Brownies

All you need:

Betty Crocker Fudge Brownies Traditional Chewy Brownie Mix (18.3 oz)
Water, oil and eggs called for in the brownie directions

About 2 cups of mini marshmallows

4 graham crackers, broken into small pieces

Hershey’s Milk Chocolate Bars, broken into 1 inch pieces (see Tips)

All you have to do:

Preheat the oven to 350 degrees F.

Line an 11 x 7 pan with non-stick foil. Grease the bottom of the pan.

Prepare the brownies according to package directions.

Remove the brownies from the oven when done… Set the oven on broil.

Quickly sprinkle the brownies with the mini marshmallows and graham cracker pieces.

Place under the broiler for about 30-60 seconds or until the marshmallows are lightly browned. Watch them closely, they will burn quickly.

Remove from the oven and sprinkle with the chocolate pieces.

Cool for about 30 minutes, then cut with a wet knife (see Tips).

Serve warm or at room temperature.

Recipe: BBQ Pork Sandwiches


This recipe for BBQ Pork Sandwiches is so easy… it practically makes itself… no kidding… and the end result is restaurant quality pulled pork … at a fraction of the cost it would be to take the family out..

I serve these delicious sandwiches with the pork piled high on rolls…. and with seasoned oven baked fries and coleslaw…. A delicious dinner!

Now for the easy part…. 3 ingredients… and a crock pot… seriously! … Warren made ours… it was so easy he didn’t mind… and what a treat to have a meal cooked for me!

TIPS

This recipe calls for boneless pork ribs… you can also use a Boston Butt… if you do use the Boston Butt.. plan on cooking it longer… 8-10 hours… or until it begins to fall apart.

The beef broth amount will vary with how many pounds of ribs you have… you want to have about 2/3 of your meat covered in broth.

You can make this over night and prepare the meat quickly in the morning. Refrigerate until that evening, all you have to do is reheat it in the microwave or the oven…

This recipe makes 6 servings.

You simply have to try this recipe!


Recipe: BBQ Pork Sandwiches

All you need:

3 pounds boneless pork ribs
1 ½ - 1 ¾ cups beef broth (see tips)
2 bottles BBQ sauce (your favorite)

All you have to do:

Put the pork ribs in the crock pot and add the beef broth. Set the pot on high and cook for about 6 hours or until the meat falls apart when poked with a spoon. Turn the meat once about halfway through cooking.

Allow to cool long enough to handle. Pull meat apart, discarding the fat.

Add about 1 ½ bottles of BBQ sauce to the meat and mix well… add more as needed.

Put in a microwaveable dish and microwave for 8-10 minutes on 80% or until heated through, stirring occasionally.

Recipe: French Dip Sandwiches


French Dip Sandwiches are perfect for a quick weeknight meal. Using thinly sliced deli roast beef and hoagie rolls… all that’s left to make is the au jus…. served with French fries and coleslaw… you have a restaurant quality supper at a fraction of the cost.

This recipe is from Rachael Ray… although it does have to be noted… this recipe originated in one of two restaurants in Los Angeles … Coles Pacific Electric Buffet or at Philippe The Original, both places claim to have invented the recipe… whoever did.. they should be commended … it’s delicious.

TIPS

I made this for two of us and was tempted to cut the recipe in half… I’m glad I didn’t… I don’t think there would have been enough au jus…. I had leftovers but not as much as I thought I would have. It will make just enough for four sandwiches.

Don’t have a heavy hand with the seasoning, I found it a bit salty.

The shallots are something I had never added to this before… and decided to try it.. it gave the au jus a nice flavor as did the sherry. I used 2 good sized shallots instead of the one called for in the original recipe.

I hope you try this quick and easy dish!


Recipe: French Dip Sandwiches

All you need:

2 tablespoons butter
2 shallots, finely chopped
1 tablespoon flour
1 jigger of dry sherry
2 cans beef consommé
1 ½ pounds thinly sliced deli roast beef
Montreal Grill seasoning (or salt and pepper)
4 hoagie rolls

All you have to do:

In a large skillet melt the butter over medium high heat. Add the shallots and sauté for 1-2 minutes.

Add the flour and mix well… cook for a couple of minutes to cook off the flour taste .. it will be bubbly.

Add the sherry and whisk, cook for about 3 minutes or until the alcohol cooks off.
Add the beef consommé, whisking with a wire whisk as you slowly pour it in. Whisk until smooth.

Simmer gently for about 5 minutes.

Slit open the rolls.

Lay the slices of meat on a cutting board. Season lightly with the seasoning.

Using tongs dip the meat in the au jus sauce then pile the meat into the rolls. Cut rolls in half and place on plates.

Fill ramekins with au jus sauce and place one on each plate.

Serve immediately.

Recipe: Chocolate Chip Cheesecake Bars


This quick and easy recipe for Chocolate Chip Cheesecake Bars is perfect to make for bringing to work for a food day or maybe a dessert for watching the cake… it goes together in not time.. and is absolutely delicious!

It’s a shortcut recipe from the folks at Betty Crocker… and uses a cookie mix for the base… yes .. I know.. the blog snob will heart failure… yet another easy recipe that doesn’t take hours to make from scratch.. horrors!!! … how can you possibly make anything that uses a shortcut??? Well I don’t know about you.. for me.. it’s all about the taste… not about the labor… I’m more than willing to work in the kitchen if I have to… but if I don’t… all the better!

TIPS

There were a number of problems with this recipe… I made a few adjustments to the recipe and directions…

I read the reviews on the site and agree with them… this recipe does not make enough for a 9 x 13 pan… pure and simple… so you have a couple of choices here… if you have your heart set on a 9 x 13 size pan… make a double recipe of the crust and press what’s left into a medium to large cookie … decorate it and everyone will think you baked it just for the cookie cake….

If you do double the crust for the 9 x 13 pan.. you don’t have to double the cheesecake part.. that amount worked perfectly.

Another option… is to use a smaller pan… I used an 7 x 11 pan and the crust was fine… but.. I didn’t have enough crumb mixture left to do a crumb topping…. next time I won’t bother to even try to put a topping on it… it doesn’t really need it…

I kept the name of the recipe the same as the original… but it really is misleading… the original recipe uses an oatmeal chocolate chip cookie mix… I scanned the recipe before going to the store and missed that.. and bought a chocolate chip cookie mix… when I realized my mistake.. I made them anyway… they were excellent … so it’s up to you which one to use.

I lined my baking pan with non-stick foil… let the foil over hang a bit… this way all I had to do was lift them out of the pan onto a cutting board to cut… I still sprayed the foil with cooking oil spray to be sure they didn’t stick.

I got my cream cheese very soft… and it was a snap to make the filling… if you need to soften the cream cheese quickly.. click here for tips.

I refrigerated mine overnight, and they cut fine as long as I wiped the blade in between cuts… the Betty Crocker people suggest using a wet knife and wiping the blade after each cut…

Try these… you will like them!


Recipe: Chocolate Chip Cheesecake Bars

All you need:

Crust:

½ cup cold butter
1 pouch (1 lb. 1.5 oz.) Betty Crocker Chocolate Chip Cookie Mix (see Tips)
1 egg, slightly beaten

Cheesecake Filling:

2 pkgs. (8 oz. each) cream cheese, softened
1 cup sugar
2 eggs
1 teaspoon vanilla

All you have to do:

Preheat oven to 350 degrees F.

Line a baking pan (7 x 11 inch) … see tips for baking pan size… with non-stick foil. Spray the foil with cooking oil spray and set aside.

In a large bowl, cut the butter into the cookie mix with a fork or pastry blender until well distributed.

Stir the beaten egg into the cookie mix mixture until it’s crumbly.

If using 1 mix… press all of the mixture into the bottom of your prepared pan…. if using 2 mixes… press 3 cups (for a 7 x 11 pan) or 4 cups for a (9 x 13 pan)… reserve the rest for a crumb topping and another use (see tips)

Bake for 15 minutes. Remove from the oven.

Meanwhile, in a medium bowl beat the cream cheese and sugar until smooth. Add the eggs and vanilla and beat until well mixed.

When the crust comes out of the oven, pour the cheesecake mixture over the crust. If you are using 2 cookie mixes… you will have enough to sprinkle some of the cookie mix mixture over the top for a crumb topping… and use the leftovers for a large cookie “cake” as an extra (see tips).

If you only use 1 cookie mix… that’s fine.. these will taste wonderful without the topping.

Bake 25-30 minutes or until a light golden brown and firm to the touch (mine took 30 minutes).

Cool 30-40 minutes, then refrigerate at least 2 hours or overnight.

Lift the foil out of the pan and place the bars on a cutting board and cut into bars using a sharp knife. For clean cuts, wipe the blade in between cuts.

Recipe: Baked Potato Soup


If you like loaded baked potatoes…. You will love this recipe for Baked Potato Soup… it has all the favori things in it… bacon, cheese, sour cream.. green onion…. So full of flavor!

TIPS

This recipe is from the folks at Pillsbury…. I followed the recipe exactly… I found the soup extremely thick…I like it a bit thinner… I recommend that you start with the quantity of milk listed but be prepared to add more to thin it to your tastes.

My bacon rendered a lot of grease.. I poured all of it off except for about 2-3 tablespoons.. enough to mix well with the flour.

Use both the white and the green part of the green onion.

This makes a lot of servings… the recipe says 7 servings (1 ½ cup)…

This is sooo good…. perfect with sandwiches.


Recipe: Baked Potato Soup

All you need:

4 large baking potatoes
4 slices of bacon
6 cups milk (see Tips)
½ cup all purpose flour
4 green onions, sliced
1 ¼ cups shredded sharp Cheddar cheese
Salt and pepper to taste
1 (8 oz.) container sour cream

All you have to do:

Pierce the potatoes with a fork and place on a microwave safe paper towel or roasting rack in a microwave oven. Microwave on high for 15 to 20 minutes or until tender.

Turn once after 10 minutes.

In a large pot, cook the bacon over medium heat until crisp. Remove from the pot and drain on paper towels. Crumble the bacon and set aside.

Remove all but about 2-3 tablespoons of the bacon grease from the pot.

Add the flour and cook for about 3 minutes to cook off the flour taste.

Slowly add the milk, whisking with a wire whisk as it pours into the pot. Whisk vigorously until smooth and cook over medium heat about 15 minutes or until thickened. Stir frequently.

Cut the potatoes in half and scoop out the potato and discard the potato skins. Mash them with a fork.

Reserve a little bacon, green onion and shredded cheese for garnish.

Add the potatoes, and remaining bacon, onions, and cheese. Mix well. Cook until cheese is melted.

Add salt and pepper to taste.

Add the sour cream and mix well.

Serve in cups or bowls and garnish with a little shredded cheese, onions and bacon.

Recipe: Mushroom Risotto Cakes


Who knew leftovers could look and taste better than the original dish… and mind you the original was delicious! Mushroom Risotto Cakes are so quick and easy when you use leftover Mushroom Risotto.. and they can look so elegant.. perfect for company… they’ll never know it was leftovers.

TIPS

Make the Mushroom Risotto for one meal.. and make enough to have about 3 cups of leftovers… then this recipe for the cakes is a snap.

If you decide to make this for guests… make the Mushroom Risotto the day before… make the cakes before your guests arrive .. drain on paper towels then place on an oven proof plate and keep warm in a warm oven … they should be fine for at least an hour.

I use shredded Asiago in this recipe.. it blends well with the Parmesan cheese that was used in the original Mushroom Risotto recipe… I wouldn’t recommend skipping this ingredient.

I hope you try this fabulous side dish!


Recipe: Mushroom Risotto Cakes

All you need:

3 cups Mushroom Risotto, chilled
2 eggs, slightly beaten
½ cup dry Italian seasoned bread crumbs
½ cup shredded Asiago cheese
Olive oil

All you need to do:

Mix the Mushroom Risotto, eggs, bread crumbs, and Asiago cheese together in a large bowl.

Scoop out about an ice cream scoop amount of mixture (I actually use an ice cream scoop). Roll into a ball, then flatten it to form a disk.

Do this until you have used up all the mixture.

In a large skillet, add enough olive oil to cover the bottom of the pan. Heat over medium high heat.

Fry the prepared Risotto cakes for about 3 minutes a side or until golden brown.

Remove from the skillet and drain on paper towels. Add more oil as needed.

Keep warm until ready to serve.

Recipe: Grilled Ham and Cheese Breakfast Sandwich


The other night we had grilled cheese sandwiches for supper and I got to thinking about a Denny’s breakfast sandwich that I had a while ago… and decided to make it the next morning… a quick and easy breakfast… a grilled cheese with ham and eggs… yummm!

TIPS

Denny’s uses 2 kinds of cheese… and I heartily agree… it really adds flavor.. I used American cheese and Swiss… a mild cheddar or a Monterey Jack cheese would also work well.

Sliced deli ham … I used smoked ham.. also adds flavor.

When making the scrambled eggs… make big pieces of egg… they will stay on the sandwich better.

I left quantities off… much like a regular sandwich.. how much you use is a personal choice.

A great way to start the morning!


Recipe: Grilled Ham and Cheese Breakfast Sandwich

All you need:


Smoked deli ham
Swiss cheese
American cheese
Scrambled eggs
Bread
Butter or margarine

All you need to do:

Spread butter or margarine on one side of each slice of bread.

Place the butter side down of one of the pieces of bread on a hot grill pan.

Working quickly, lay one of the cheese on the bread.. then the hamm… then the scrambled eggs… then the other cheese.

Lay the second slice of bread on top … butter side up.

When the bottom slice of bread is golden brown (you will need to peek to check on it)… carefully flip the sandwich over… gently pressing the sandwich with a spatula.

When the bottom slice is also golden brown and cheese has melted… remove from the pan and place on a cutting board. Allow the sandwich to sit for about 2 minutes.. then cut in half… and enjoy!

Recipe: Portobello Burgers


The first time I had a Portobello Burger was when I was with my son… we had gone out to lunch and he had ordered one … I thought the whole idea of eating a mushroom instead of beef was ridiculous… I love mushrooms.. but instead of beef??? … total lunacy… so much for what I knew…. he insisted I taste it and to my utter surprise it was absolutely delicious…

He cooked many a Portobello Burger for me over the years.. and when I realized just how easy it was… I became a devotee… now Warren is your typical “guy”… likes all the guy things we women know nothing about nor do we want to know…. and he does love his red meat… so I hadn’t attempted to make him a burger minus the beef… and decided it was time… and lo and behold… he was open minded about it and did like it.. I’m not sure he’s ready to trade in his beef for a mushroom all the time.. but he liked it well enough to declare it a “do-over”.

TIPS

Make sure you get large buns for these… they tend to be large and don’t shrink all that much in cooking.

I marinated mine in a seasoned balsamic and olive oil mixture…. I also brushed them with the marinade when they were cooking… that really is optional.

I used a cast iron grill pan to cook them.. you can also cook these on an outdoor grill or even a a hot flat pan.

I lightly oiled the pan and grilled the sliced buns first… I think it just adds a bit of crunch.

I garnished them with lettuce, sliced tomato and sliced red onion. I also used garlic mayo

This marinade will be enough for 2-4 large mushrooms.

If you haven’t tried a Portobello Burger… you really need to try one!


Recipe: Portobello Burger

All you need:

Portobello Mushrooms, stem removed
½ cup balsamic vinegar
¼ cup olive oil
1 teaspoon basil
1 teaspoon oregano
3 garlic cloves, finely chopped
Dash of coarse salt
Dash of freshly ground pepper
Large buns
Lettuce
Tomato
Sliced red onion
Garlic Mayo

All you have to do:

Lay the mushrooms in a glass dish, smooth side down.

In a small bowl, combine the balsamic vinegar, olive oil, basil, oregano, chopped garlic, salt and pepper. Mix well.

Pour the mixture over the mushrooms. Turn the mushrooms over.

Allow the mushrooms to marinate for about 30 minutes, turning once.

Brush olive oil on a hot grill pan over medium high heat.

Lay the buns on the hot pan… cut side down. Grill until lightly browned… remove and set aside.

Brush a little olive oil on the hot pan.

Lay the mushrooms on the hot pan. Cook 5-6 minutes a side (larger mushrooms will take the 6 minutes)… turning once.

Assemble the Burgers:

Slather on the garlic mayo on the bun.

Layer lettuce, Portobello mushroom, tomato and onion.

Serve immediately.

Recipe: Southern Apple Crumble


This recipe for Southern Apple Crumble is a quick and easy… shortcut…. Yes… I said that … it’s a shortcut version… and every bit as good as any other crumble recipe….

It goes together quickly … and all you have to do is wait until it comes out of the oven.. that’s the hard part… the waiting… as the aroma wafts through the house…. making the house smell oh so good… a perfect fall dessert.

This recipe is from the folks at Betty Crocker… and a total winner! …

TIPS

An easy way to cut the butter into small pieces…. cut the butter down the middle (the long way)… turn it one side over… cut again down the middle.. then slice into ¼ inch slices… resulting in 4 cubes per slice.

Be careful when serving this to guests… be sure no one has a food allergy to nuts or a health reason not to eat them. You can omit the nuts and simply bake it for 55-60 minutes.

This makes 9 servings.

Enjoy this dessert warm with vanilla ice cream or homemade Chantilly Cream… yummmm!


Recipe: Southern Apple Crumble

All you need:

For the Filling:

3 large apples, peeled and coarsely chopped
½ cup sugar
¼ cup packed brown sugar
1 teaspoon cinnamon
1 stick (1/4 cup) cold butter or margarine, cut into small cubes

For the Topping:

1 pouch (1 lb. 1.5 oz.) Betty Crocker oatmeal cookie mix
½ cup butter or margarine, melted
½ cup chopped pecans

All you have to do:

Preheat the oven to 300 degrees F.

Spray the bottom and sides of an 8 inch baking dish (2 quart size). Set aside.

In a large bowl, toss the filling ingredients with a spoon until well mixed.

Spread the filling on in the baking dish.

Using the same bowl, mix the melted butter and cookie mix until crumbly.

Sprinkle the topping over the apple mixture.

Bake for 40 minutes. remove from the oven and sprinkle with the chopped nuts. Bake for an additional 15-20 minutes or until topping is golden brown.

Serve warm or at room temperature.

Recipe: Mushroom Risotto


Mushroom Risotto is … well… just heavenly… the risotto itself is wonderful… add mushrooms, shallots and garlic… and it just goes to a whole new level. While this recipe is, in my opinion, easy… it … unfortunately is not quick. For a microwave queen like myself… if it’s not quick.. it darn well better be fantastic… and happily I can report… it is!

Arborio rice will be “al dente” … cooked but still a little chewy.. the dish itself will be a bit creamy.. the perfect combination.

TIPS

Numerous recipes add some dry white wine… right after the rice is sautéed … I honestly don’t see it as necessary.. the flavor just doesn’t survive all the cooking.. and this is coming from a person that loves wine… I truly do… and I love to cook with it.. but not in this case.

You can snip some chives over the top for a pretty presentation.

This rice will take about a half an hour to make… so pull up a stool and get ready to stir…. Trust me the result will be worth it.

I hope you try this!


Recipe: Mushroom Risotto

All you need:


5 cups of chicken broth
1 pound mushrooms, sliced
4 tablespoons olive oil
4 shallots, finely chopped
2 large garlic cloves, finely chopped
1 ½ cups Arborio rice
4 tablespoons butter
½ cup grated Parmesan cheese
Salt and pepper to taste

All you have to do:

In a large pot, heat the chicken broth over low heat.

In a large skillet, heat 2 tablespoons of olive oil over medium high heat.

Add the sliced mushrooms and cook for a few minutes until they soften and turn brown. Remove the mushrooms and juice to a bowl and set aside.

Add 2 tablespoons to the skillet and reduce heat to medium heat. Add the shallots and garlic… and cook for 2 minutes, stirring constantly.. you do not want them to brown.. just soften a bit.

Add the rice and stir to coat the rice well with the oil. Turn heat up to medium high and cook for about 5 minutes .. rice should turn golden.

Add 1 ladle of chicken broth at a time.. stirring constantly until the broth has been absorbed… then add another until you have added all the broth. The rice should be al dente. If it is still too hard.. and a bit more broth and continue cooking.

Add the butter (cut the butter into 4 pieces).. stir well. Remove the skillet from the heat and add the reserved mushrooms and juices.

Add the Parmesan cheese and stir well.

Add salt and pepper to taste.

Recipe: White Chocolate Popcorn


This recipe for White Chocolate Popcorn… barely qualifies to be called a recipe…. two simple ingredients… white chocolate and popcorn… now you can’t get any easier than that.

The other day I told you how my boss… the No-Bake Kinda Guy won the Bake-Off at work with a simple no-bake recipe…. well… as I wrote that post I got to thinking about all the people I worked with for years and all the delicious food days we had… and how many terrific recipes I had gotten over the years … some of them had regular spots on the “buffet table”…. one in particular was something a supervisor always brought in around Halloween and Christmas… White Chocolate Popcorn… she kept telling me… this is so easy… and it is!

She’d bring in a huge bowl and a scoop… and we’d start in the morning and scoop all day… well.. if it lasted that long.. the stuff is positively addicting.

This is perfect for all kinds of get-togethers and parties… something a bit salty and sweet.

TIPS

Use non-stick foil to line your baking sheets… this way it won’t stick to the pan when cooling.

This starts out extremely sticky.. but after cooling they aren’t sticky. If some clump together just separate them with a spoon.

You can add other things to this…. pretzels, nuts, mini M&Ms, or dried fruit….. add the additions after the popcorn has cooled and no longer sticky.

If you’re making this for a party… nuts probably are not the best choice for an addition because of possible food allergies.

If you have trouble melting the white chocolate to a smooth creamy consistency… add 1-2 tablespoons of shortening and stir until smooth enough to coat the popcorn.

Use a large bowl… you will need it.

I hope you enjoy this delicious snack!


Recipe: White Chocolate Popcorn

All you need:

5 cups of popcorn
1 cup white chocolate chips
1-2 tablespoons shortening (optional – see tips)

All you have to do:

Line a large baking sheet with non-stick foil and set aside.


Melt the white chocolate chips according to package instructions. Stir until creamy.


Place the popcorn in a very large bowl. Using a spoon, drizzle the chocolate over the popcorn…. Some will come out in a dollop…. that’s okay… use a large spoon to mix the chocolate and the popcorn, coating them as you stir.


When the popcorn and chocolate is well mixed… turn out onto the prepared baking sheets.


Allow to cool …. about an hour. Serve in a bowl or store in an airtight container at room temperature.

Recipe: Italian Mac and Cheese


I was trying to use up some ingredients in the fridge and thought I’d try to make an Italian Mac and Cheese… I had the already assembled the main ingredients when I took a look at a recipe from Rachael Ray… and decided to try her version of the recipe… with just a few changes… it turned out to be what .. in this house .. we call a “do-over” … a recipe we will definitely make again.

Her recipe was a bit bland… so I made some changes…her recipe calls for ground Italian sweet sausage… we like a little zip… so I used 2 links of hot Italian sausage and 2 links of sweet Italian sausage… I just cooked them and sliced them.

I also added more seasoning… the canned tomatoes I used were Hunts Tomatoes with Basil Garlic and Oregano. I also added some Italian seasoning to the recipe. Since I made the “parts” ahead to speed the cooking time up at night… I baked the dish rather than just putting it under the broiler.

TIPS

The recipe is a bit rich… it uses heavy cream that can easily be substituted with milk… which I will do when I make it again… just add some more flour… about 1 more tablespoon.

I par boil the sausages for about 10 minutes .. then take them out and cook them in the skillet... this way they cook through and don't get overly dark and crusty when I cook them in the skillet.

My sausage didn’t render a lot of grease, so I needed to add more butter than her recipe called for… I highly recommend you don’t substitute using all olive oil for the butter in the recipe.. the butter flavor adds to the flavor of the sauce.

I would definitely bake the casserole… it came out of the oven bubbly … and really good… we baked the leftovers the next night… and they were even better.

This is different spin on macaroni and cheese… one I think you will like!


Recipe: Italian Mac and Cheese

All you need:

1 pound rotini, cooked
2 links of hot Italian sausage, cooked and sliced
2 links of sweet Italian sausage, cooked and sliced
2 tablespoons olive oil
2 tablespoons butter
4 garlic cloves, finely chopped
1 pkg. (8 oz.) of mushrooms, sliced
2 tablespoons flour
1 cup chicken stock
1 cup heavy cream or milk (see Tips)
2 ½ cups shredded Italian 4 cheese blend
1 can Hunts Diced Tomatoes with Basil Garlic and Oregano, well drained
2 teaspoons Italian seasoning
½ cup Parmesan cheese

All you have to do:

Preheat the oven to 350 degrees F.

Cook the rotini according to package directions, drain and set aside.

Cook the Italian sausage, allow to cool enough to handle. Slice and set aside.

In a large skillet, melt the butter with the olive oil over medium high heat. Add the garlic and mushrooms and cook for about 3-5 minutes until mushrooms are soft.

Add the flour and stir well… cook for about 2 minutes to cook off the flour taste… then add the chicken stock, whisking until everything is well mixed.

Add the cream or milk and stir well.

Bring the sauce to a bubble. .. then add 2 cups of the shredded cheese, stirring well.

After the cheese has melted, add the drained canned tomatoes, stir well.

Add the Italian seasoning and salt and pepper to taste.

Add the cooked macaroni back into the pot you made the macaroni in. add the sliced sausage and stir to mix well.

Add the sauce to the pot and mix well. Pour the mixture into a 9 x 13 Baking dish.

Sprinkle the remaining shredded cheese and parmesan cheese over the casserole.

Bake at 350 for 20 minutes or until casserole is bubbly and cheese is lightly browned.

Looking for More Recipes?

If you are looking for more recipes click the "Older Posts" link to page back to older posts or go to the archives in the right column. The list of labels at the bottom in the right column will help you find specific types of recipes or try our search engine at the top and search by name or ingredient.


What's more comforting on a cold day than Homemade Chicken Noodle Soup? .. and it's so easy to make!

Chicken Noodle Soup