Chicken and Dumplings


A Repost ..of sorts

Ahhhh comfort food... perfect when the weather gets cooler... Chicken and Dumplings... a Southern favorite.... and what better way than making it in a crock pot...  no fuss ... one pot and it cooks for you.. now how great is that??

Be warned this is not the dumplings my Mother made.. nope... not those floury dry things floating in stew... some people adore those dumplings... all the power to them..  I don't care for them....
These are little doughy lumps infused with the flavor of the chicken.. are made from biscuit dough... either homemade or canned....  absolutely delicious...

So now about the "repost part"  I posted this recipe with veggies added... I have since been advised.. the traditional one doesn't have veggies in it... okay.. so I'm open minded.. I did it the other way.. and it was delicious just the same...

And... there is a slight update... I read you can make it with the chicken totally frozen... that it would be moister and more tender... so I tried it... I agree it worked wonderfully... so if you forget to defrost the chicken... and you need to do something for supper.. this recipe is for you!
TIPS
This is what I'm told... the traditional Chicken and Dumplings recipe... chicken and gravy and dumplings.... some people like to add other ingredients.. and sometimes I do too... and that's fine.... if you add mushrooms or vegetables.. add them toward the end of the cooking time... I'd suggest adding them when you add the biscuit dough.
I serve cranberry sauce and vegetables on the side.
I used Campbell's Soup Cream of Chicken with Herbs... I think the light flavor of Herbs really adds to this.. but you can use plain Cream of Chicken Soup.... I wouldn't suggest substituting Cream of Mushroom Soup... it's just not the flavor you're going for.
You will ned to have enough chicken broth to almost cover the chicken breasts.... I buy those cartons and use what I need and store the rest in the fridge.  I used about 2 cans worth... I poured the chicken broth into the empty Cream of Chicken cans and then poured it into the crockpot.
Don't fret about how thin the liquid is when you add the biscuit dough... it will thicken up.. mine thickened to a perfect consistency... the dough absorbs the extra liquid.. which is perfect.. it gives them a light chicken flavor.

Don't omit the butter.. I almost did and it would be a mistake.. it helps thicken the gravy and it adds a bit of flavor..
Make sure you use Homestyle Biscuits.. you don't want the flaky variety for this.
I used all boneless skinless chicken breasts to keep the fat down to a minimum... you could use other parts of chicken.. but then you will need to skimp excess fat off the top before adding the biscuit dough.
I sprinkled the frozen chicken breasts with salt, pepper, garlic powder and paprika.  Sprinkle them inside the crockpot.. the spice will "fall off" because the breasts are frozen... but it will still be in the pot and the flavors will be in the sauce.  Thyme and sage are other good additions... add a sprinkling if you like a little more flavor.
The chicken breast quantity is listed in a range.. 3 good sized breasts are enough... 4 will make it meatier...
This recipe will serve 4.
Try this super easy recipe!


Recipe:  Super Easy Chicken and Dumplings
All you need:
3-4 good sized boneless skinless chicken breasts
2 cans Campbell's Cream of Chicken with Herbs Soup
About 20-24 ounces of chicken broth See TIPS
1/2 medium onion, diced
Sprinkling of salt and pepper
Sprinkling of garlic powder
Sprinkling of paprika

2 tablespoons butter
1 can of Pillsbury Grands Homestyle Biscuits, cut into quarters
All you need to do:
Put the 2 cans of Cream of Chicken with Herbs Soup into the crockpot.
Lay the chicken breasts in the soup... sprinkle one side with the salt, pepper, garlic powder and paprika... flip them over and do the same to the other side.
Add the diced onion and add enough chicken broth to cover... I used a spoon to swirl the Cream of Chicken soup around a bit to mix with broth.. but it will mix on its own as it cooks.
Put the lid on and cook on high for 3 hours.... then remove the chicken and shred or cut it up and put it back into the crockpot... the gravy will be very thin.. don't worry...

Add the 2 tablespoons of butter... swirl it around to melt it.
Separate the biscuits and cut them into quarters... and drop them into the pot.  They will float.  Take a cooking spoon and push them down to cover them in broth.. they will pop up again.. that's okay...
Replace the lid and cook for 2 more hours.  If possible check on it after about an hour and run a knife around the side.. my biscuits tended to stick to my pot and I didn't want them to get too dark in the sides.
And that's all folks..... told you this was amazingly easy...
Serve in bowls with veggies and cranberry sauce on the side.

Bacon and Cheddar Potatoes


Mmmmm.... Bacon and Cheddar Cheese Potatoes .... sliced potatoes a creamy cheddar cheese sauce... bits of bacon..... so perfect!

This recipe is a "2 serving" size...  The recipe as written will serve 2 generous portions or 3 average size servings.... I've included notes on how to adjust it for 4 servings...

I thought it would be helpful to post a smaller size recipe for those cooking for two.... the recipe does adjust easily for more servings.

TIPS

You will have a little leftover cheese sauce… but it stores well in the fridge and is delicious over a vegetable… or eggs… or boil a little macaroni and have baked macaroni and cheese for one.

To adjust the recipe for 4 servings… use 3-4 potatoes, 3 slices of bacon, 1/3 of a cup chopped green onion … keep the sauce ingredients the same… just use all the sauce.


Recipe: Bacon and Cheddar Potatoes

All you need:

2 medium size russet potatoes, peeled and sliced fairly thin
2 slices of bacon, cooked and chopped
¼ cup chopped green onion
2 tablespoons margarine
2 tablespoons flour
1 cup skim milk
2 cups shredded sharp cheddar cheese
Salt
Pepper
Cayenne pepper (to sprinkle on the top)

All you need to do:

Preheat the oven to 400 degrees F.

Cook the bacon and drain on paper towels. Set aside.

Peel, rinse and slice 2 russet potatoes.

In a medium sauce pan melt the margarine over medium heat.
Add the flour and mix.

Add about ½ the milk and using a whisk, whisk the mixture until all lumps disappear.

Add the remaining milk.

Stir until sauce begins to thicken.

Add the shredded cheddar cheese, stirring until fully incorporated.

Remove from heat.

Note: You will be using only about 2/3 of the sauce… otherwise it will be likely to run over the side during baking.

In a medium size Au Gratin dish ladle a small amount of cheese sauce to lightly cover the bottom of the dish.

Layer the potatoes in a single layer on the bottom.

Sprinkle salt and pepper over them.

Sprinkle 1/3 of the bacon over the potatoes.

Sprinkle 1/3 of the green onion over the potatoes.

Ladle sauce over the potatoes to cover.

Repeat by layering the potatoes, sprinkling salt, pepper, bacon and green onions.

Ladle sauce enough to cover.

Layer a final layer of potatoes… turning them over as you layer them so the top has some sauce on it.

Sprinkle bacon and green onion.

Sprinkle lightly with cayenne pepper.

Cover a small baking sheet with foil.

Place the au gratin dish on the baking sheet.

Cover the baking sheet with foil to cover the potatoes.

Bake at 400 degrees for 40 minutes.

Remove the top foil and bake an additional 10 minutes or until lightly brown and bubbly.

Irish Pub Food


Classic Irish Pub Food is a terrific way to celebrate St. Patrick's Day... delicious and hearty home cooking... there's a wide variety to choose from.. something for every taste.. all easy to make. So whether your celebrating with family or friends.. these dishes are sure to please.

Try one of these terrific recipes!


Start out with a Typical Irish Breakfast ... a couple of bangers (sausages) and fried eggs, baked beans, Boxty (Irish Potato Pancakes) and some Irish Soda Bread.... just delicious!


Potatoes O'Brien - a delicious combination of potatoes, onions and peppers... a great side dish... serve with eggs and all the breakfast trimmings


Irish Sausage Rolls - these are easy to make... they go great as an appetizer with a pint... or a light lunch.


Irish Beef Hand Pies - are nifty little beefy pastries that are a terrific also for a lunch or light super.  A delicious ground beef mixture wrapped in a flaky pie crust... great for snacking and on the go.


Crock Pot Irish Potato Leek Soup -  a hearty soup... great when served with a crusty bread...so easy to make.. just set up the crock pot and go watch the parade.. come home to a soup that needs very little finishing.


Irish Soda Bread - what better bread to go with soup than Irish Soda Bread.... it goes with so many meals including breakfast!


Crock Pot Corned Beef and Cabbage - no list would be complete without Corned Beef and Cabbage.. this recipe is made in a crock pot.. worry and fuss free!


Shepherd's Pie - truly a satisfying meal.. a popular favorite.. topped with mashed potatoes, this recipe uses ground beef.. it's easy to make.. and can be prepped and made ahead... just pop it in the oven when you need it!


Boxy - Irish Potato Pancakes - who doesn't love a great potato pancake?  Add a small dollop of sour cream.. and all I can say is YUM!  Make these as a side to a meal or smaller as an appetizer... either way you have a winner for sure!


Irish Beef Stew - A hearty beefy stew... served with mashed potatoes and Irish Soda Bread... a true delight!


Bangers and Mash - a traditional Pub Food for sure... sausages and mashed potatoes in a gravy... so good!


Colcannon - a traditional Irish dish of mashed potatoes with kale or cabbage, onions and often with bacon, is a perfect addition to any menu especially a St. Patrick’s Day celebration.

Chicken Cutlets with Hunter’s Sauce


This recipe for Chicken Cutlets and Hunter’s Sauce evolved years ago when I worked on the recipe to mimic a restaurant dish I had liked in a German restaurant.

The chicken cutlets are prepared as you prepare schnitzel…. and smothered with the sauce.

Usually if you ask for Schnitzel with Hunter’s Sauce you would be served Jagerschnitzel… which is very different from this… this dish uses a French Hunter’s Sauce or Sauce Chasseur as the base for the sauce… it has a few changes from the classic sauce… I assure you… you will love this dish.

This dish is fairly quick and easy to prepare.

TIPS

This dish can be somewhat prepared ahead… I wouldn’t make this more than an hour ahead… you don’t want the cutlets to dry out in the warm oven.

To save time, you can prepare the chicken to just before the cooking step... store in the fridge until you are ready cook them.

To reheat the sauce simply heat in a saucepan over medium low heat… or microwave, stirring occasionally.

Make sure you dice the carrots fairly small…. I took small Belgian carrots and sliced them… smaller pieces cook quicker and look better for a terrific presentation. Be aware the carrots take a considerable amount of time to cook… you want them cooked but still with a little crunch.. not mushy.

This dish can be made with thin veal or pork cutlets instead of the chicken.

I figure on 2 cutlets per person.

I used a Sauvignon Blanc for the wine… Monkey Bay from New Zealand is good… or use a good American made one.

I served this with creamy garlic mashed potatoes….it was truly delicious… and nice enough to make for a Valentine’s Day celebration for two.


PRINT RECIPE

Recipe: Chicken Cutlets with Hunter’s Sauce

All you need:

For the Chicken:

4-6 thin sliced boneless skinless chicken cutlets
Plain bread crumbs (amount depends on the quantity of cutlets)… about 1 cup for 4-6 cutlets
1 egg with a dash of milk, beaten
Flour seasoned with salt and pepper (amount depends on the quantity of cutlets)… about ½ cup for 4-6 cutlets
2 tablespoons butter
2 tablespoons olive oil

For the Sauce:

2 tablespoons butter, divided
1 tablespoon flour
1 cup beef broth
2 shallots, finely chopped
1 clove garlic, finely chopped
¾ cup diced carrots, small dice
2 plum (Roma) tomatoes, seeded and chopped
½ lb. fresh mushrooms, stems removed and sliced
¾ cup dry white wine
1 tablespoon fresh parsley, finely chopped
Snipped chives (about 2 teaspoons)

All you need to do:

To make the Chicken Cutlets:

Preheat the oven to 250 degrees F.

Set up 3 bowls (wide bowls, if possible).

In one bowl, mix the flour, salt and pepper.

In another bowl, beat the egg and milk until well combined.

In another bowl, add the bread crumbs.

Dip the cutlets, one at a time, first in the flour (make sure the entire cutlet is covered in flour).

Then dip the floured cutlet in the egg mixture.

Then dip the cutlet in the bread crumbs, covering the cutlet completely.

Place on a plate and repeat the steps until all cutlets have been breaded.

At this point, you can cover the cutlets and store in the refrigerator until you’re ready to fry them.

When ready to fry, heat a large skillet on medium high heat.

Add the butter and olive oil to the skillet. Do not let butter burn.

When the butter is melted, add the cutlets to the skillet.

Cook until the bottom is brown and crispy (about 3 minutes).

Flip the cutlets and cook the other side until brown and crispy (about two minutes).

Remove cutlets from the skillet and lay on paper towels to pat off excess grease.

Put the cutlets on a oven proof plate and keep warm in the preheated oven while you cook the remaining cutlets. Cover loosely with foil…. you don’t want moisture from the steam to make the cutlets lose their crispiness.

You will be using the same skillet to make the sauce…see below.

To make the Sauce:

In a small saucepan, melt 1 tablespoon butter.

Add the flour and mix into a paste… let the paste cook for about a minute to cook off the flour taste.

Add 1 cup of beef broth and whisk vigorously until all lumps are out.

Cook the sauce over medium heat until it begins to thicken… whisking constantly.

Add the carrots and the tomatoes,let them cook in the sauce while you start the rest of the sauce in the skillet you made the chicken cutlets in, stirring occasionally.

Add 1 tablespoon butter to the skillet and melt over medium low heat.

Add the shallots and garlic and cook for 2 minutes or until shallots are softened…do not brown.

Raise the heat to medium.

Add the mushrooms and cook for about 3 minutes.

Add the wine and deglaze the pan (scraping up any bits on the bottom of the pan).

Pour the sauce with the carrots into the skillet and stir until incorporated.

Cover and bring sauce to a boil and lower heat and simmer over medium heat for 20 minutes.

Remove the cover and let the sauce simmer and reduce for 10 minutes or until carrots are cooked.

Remove the warmed platter of chicken cutlets from the oven.

Remove the foil and spoon a generous amount of sauce over the cutlets.

Sprinkle with chopped parsley and chives.

Serve immediately.

Serve the excess sauce at the table in small bowl with a ladle.

Mongolian Beef


This copycat recipe for P. F. Chang’s Mongolian Beef dish is absolutely the best.   A basic simple and easy recipe to make… no exotic ingredients to buy… not a lot of work involved either… a perfect week night meal.

TIPS

While it’s always nice to go out to eat.. it can get expensive.. and you can’t control the ingredients…  making this at home is easy… you can easily cut the fat in this recipe and use a lower sodium soy sauce.. cut a little here and there.. it adds up.

Many copycat recipes almost deep fry the meat.. it really isn’t necessary..  it only adds fat and calories.. and really doesn’t do much to add to the flavor.  This recipe uses olive oil but just enough to sear the meat and a small amount in the sauce.

I like a thicker sauce.. so I add cornstarch at the end also to thicken it up.. if you want it runnier.. omit that step.

The sauce has a lot of brown sugar in it.. but honestly.. keep it in.. don’t cut back there.. this sauce is to die for.

You can use fresh ginger… grate it or mince it…start with a small amount .. about ½ teaspoon .. add more to taste.

I served this with white rice and steamed broccoli.


Recipe:  Mongolian Beef

All you need:

About 1 lb. thin cut eye round steak
About ¼ cup cornstarch for dredging the beef in
About 3-4 tablespoons olive oil, divided
Scant ¼ teaspoon ground ginger or to taste
2 large garlic cloves, finely chopped
½ cup soy sauce
½ cup water
¾ cup brown sugar
1 tablespoon cornstarch to thicken the sauce (optional)
2 large green onions cut into 1 inch pieces

All you need to do:

Cut the beef into strips about an inch wide.  Place the ¼ cup cornstarch in a shallow bowl and dredge the beef in it.  Place the beef on a plate and allow it to rest for about 15 minutes.

Meanwhile, in a medium saucepan, heat about 1 tablespoon olive oil over medium heat.  Add the garlic and ginger, and cook for about 1-2 minutes.  Do not let the garlic brown.  Add the soy sauce, water and brown sugar.  Stir until the brown sugar has melted.  Turn the heat up to medium high and bring to a boil.  Cook for about 3-5 minutes.  Turn the heat off.

Heat 2-3 tablespoons of olive oil (enough to coat the pan)in a wok or large skillet over medium high heat.  Add the beef and sear on both sides.  Remove any excess oil.

Add the sauce and simmer for about 5 minutes.  Add the 1 tablespoon of cornstarch and stir it into the sauce to thicken it (if desired).  Add the green onions and cook for a minute.
Serve immediately.

Baked Crab Rangoon


Chinese New Year or The Lunar New Year began this year on January 25th and marks the beginning of the Spring Festival in China and continues until February 8th … which is coming up next Saturday. So what better way to celebrate than with a Chinese food posts.  I thought I would start with Crab Rangoon.

Crab Rangoon are deep fried wontons stuffed with a cream cheese, crab and scallion mixture. If you’ve never had them… you really need to try them.

At one of my previous jobs we would order Chinese food for lunch sometimes and the local restaurant where we would place our order would send free Crab Rangoons with our order… we were positively addicted to them.

Recently I came across a recipe at Kraft that baked them instead of deep frying them… I thought what a great idea… so I decided to use their baking method with my recipe… we loved them!

These are quick and easy to make.. they’re perfect as a quick snack or with a meal… a great little addition to a party too…

TIPS

My oven is accurate… so baking them at 350 degrees F for 13 minutes is exactly how long I baked them… BUT… I strongly suggest you watch them… they brown quickly and I have no doubts they would have burned quickly had I not been there to take them out when they were golden brown.

My mini chopped was in the dishwasher when I made mine… so my plan to mix the ingredients in the chopper was nixed… I chopped them myself and mixed the ingredients with a fork in a small bowl… it worked fine… just make sure your cream cheese is soft…

I nuked my cream cheese in the microwave for 15 seconds to soften it quickly.

You can find won ton wrappers in the refrigerated produce section of the grocery store.


This recipe will make about 24 Crab Rangoon.

These are delicious and are far more heart healthy than deep frying them … not to mention easier and clean-up was a snap.


PRINT RECIPE

Recipe: Baked Crab Rangoon

All you need:

Won ton wrappers
1 pkg. (8 oz.) Philadelphia Cream Cheese
¼ cup thinly sliced green onions
¼ cup finely chopped imitation crab meat or fresh or canned crab meat
Spray cooking oil

All you need to do:

Preheat the oven to 350 degrees F.

Spray cooking oil lightly a regular size muffin tin(s).

Place one wonton wrapper in each muffin cup.

In a small bowl combine cream cheese, green onions and crab.

Drop a rounded measuring teaspoon of the crab mixture into each won ton wrapper.

Bake for about 11-13 minutes or until golden brown… watch them closely … they will go from golden brown to burned very quickly.

Chicken and Broccoli


Chicken and Broccoli is a super fast meal to put together…. Plan ahead and marinate your meat in the morning and have dinner on the table in under 20 minutes…. Delicious and better for you than take-out… you control the salt and no msg.

TIPS
As I pointed out in the beginning… the marinade ahead of time and this recipe cooks fast.  Even though the recipe says to marinate the meat for 15 minutes… I did mine in the morning… I have done it the night before also… so all I had to do was cook it when I got home.

I used a bag of ready to cook broccoli florets I found in the produce section of the grocery store… another time saver.. you cut and clean your own before hand as well to save time.  The actual recipe uses the stalks and florets (cut the stalks off and cut them at an angle.. they go in too… no waste here).
I make my rice .. I used Minute Rice… in the microwave while I cooked the meal.
The recipe calls for fresh ginger… if you are new to purchasing fresh ginger… it usually is not expensive.. and can be found in the produce section of the grocery store.  Measuring a piece and cutting it off… then chopping it in a mini chopper is probably the easiest way to mince it. 
You can mince the ginger and garlic together in the mini chopper… just use half the minced mixture in the marinade and half in cooking.
If you need to substitute garlic powder for the cloves… the conversion is 1 clove equals 1/8 teaspoon garlic powder.  Remember different brands and age of the powder will have different potency.. use the amount in the conversion and adjust to taste at the end of cooking.
If you don’t have fresh ginger .. you can use ground ginger but the taste is slightly different… the potency is also different… so start with less and add more in the cooking stage to your taste.. for the marinade use the teaspoon of ground ginger…. then sprinkle additional ginger in the final stages of cooking if needed.
Speaking of potency of the ginger… the larger the root, the more mature it is and more pungent… wrinkled skin indicates it is aged and less potent. 
Store fresh ginger wrapped in a paper towel for 2-3 weeks in the fridge.
The salt is listed in a range.. I prefer things less salty.. I use the ½ teaspoon.. if you’re used to saltier food.. then use the larger amount.. remember.. you can always add more in the final cooking so I always recommend the lower amount.. but that is entirely up to you.
If you love Asian food and want to cook it at home.. a wok is the best pan to cook in… a good quality wok is worth its weight in gold…  I splurged on a Le Creuset wok at the outlet…. It’s a heavy cast iron wok.. heats up fast and gets really really hot.. perfect for cooking Asian recipes…. Hot and fast is the best cooking method for these recipes.
You can cook this in a regular skillet.. use one that will get nice and hot.
The cooking step that cooks the broccoli will surprise you.. I know it did me… the fresh broccoli gets a beautiful bright green.. my picture does not do it justice because of the sauce on it.
This will make 3-4 servings depending on size.  We had 3 servings from it.
I hope you try it!


Recipe:  Chicken and Broccoli
All you need:
About 1 pound boneless chicken breasts, cut into small chunks
For the Marinade:
3-4 green onions, white only, thinly sliced
1 garlic clove, minced *See TIPS
½ inch minced fresh ginger or about ½ teaspoon ground ginger *See TIPS
1 tablespoon soy sauce
2 tablespoons sugar
1 teaspoon cornstarch
½-1 teaspoon salt
1 tablespoon sesame oil
Additional ingredients for Cooking:
1 tablespoon cornstarch
¾  cup chicken broth
3 tablespoons olive oil, divided
4 cups broccoli florets and cut-up stems *See TIPS
1 garlic clove, minced *See TIPS
½  inch minced fresh ginger or about ½ teaspoon ground ginger *See TIPS
3 tablespoons water
1 tablespoon hoisin sauce
Cooked Rice
Chinese noodles (optional)
Thinly sliced green onion (green parts) for garnish (optional)
All you have to do:
Mix the marinade ingredients together in a glass bowl and place the chicken in it… marinate at room temperature for 15 minutes or you can do this step ahead *See TIPS
In a small bowl or measuring cup, mix the cornstarch and chicken broth.  Set aside.
Heat 1 tablespoon olive oil in a wok or skillet over high heat.  Add the broccoli stems and cook for about a minute.  Add the florets, minced ginger, minced garlic and 3 tablespoons water.  Sprinkle with salt and pepper and stir fry cook for about 3 minutes until broccoli is bright green and cooked but still crisp (you will be adding it back into the pan at the end for more cooking).  Remove the broccoli to a plate.
Add the remaining 2 tablespoons of the olive oil and heat it over high heat.  Add the chicken and stir fry cook until the chicken is cooked and a little brown about 5 minutes.
Add the hoisin sauce and the broccoli and stir fry cook to heat the broccoli.  Add the reserved cornstarch and chicken broth.  Bring to a bubbly boil.  Sprinkle with salt and pepper.  Adjust seasonings to taste if necessary.
Serve over cooked rice.

Cajun Dirty Rice and Smoked Sausage


I was always intrigued by the name of this dish… Dirty Rice… I guess it’s the little kid in me… there was something innately appealing about a food called Dirty Rice. I decided to see what it was all about… so some investigation yielded numerous recipes… some of which I discounted from the beginning due to some ingredients I knew would never fly in my household…. but before I get into that… first some background.

Background

According to Wikipedia, Dirty Rice is a traditional Cajun dish made of rice and chicken livers or giblets… which give it a dark or “dirty” color…. onion, garlic, celery, green pepper and parsley round out the flavors. Dirty rice is often served as a side dish to salmon or pork.

So I searched for a recipe.. most were very similar.. and did indeed use chicken livers… I happen to love chicken livers, pate in particular… it’s an old family recipe… but in recent years one by one of us has given up eating it because it’s so unhealthy… it’s loaded with cholesterol … and I knew Warren won’t touch the stuff… so I looked for a recipe high in flavor and one without the liver. I found, what I thought sounded like a great recipe by the Neely’s that I decided try.

I did end up altering it a bit though. They used chicken stock, which I found to be rather bland… I decided beef stock or broth would be more flavorful. I also increased the amount of rice and some of the other ingredients, as well.

TIPS

This is a great weeknight meal.. it really can be made in 30 minutes or less. You can use Minute rice instead of long grain rice (long grain rice was what the Neely’s used) which will cut the cooking time down considerably. If you do use long grain rice, make it according to the package instructions, using beef stock or broth instead of water.

I made my Minute rice in the microwave while I cooked the other ingredients… which also helped move things along faster.

I decided to use a Hillshire Farms Smoked Beef Sausage. You can use a Cajun sausage, if you can find it or a pork sausage instead… it’s up to you.

My recipe will make 4 generous portions. I served this with corn bread made with red and green pepper added.

Keep this in mind for next month....This is a great dish for a Mardi Gras celebration… it’s low maintenance and delicious!


Recipe: Cajun Dirty Rice with Smoked Sausage

All you need:

3 cups Minute rice or long grain rice (See Tips)
4 cups beef broth or stock, divided
1 large and 1 small onion, finally chopped
2 large garlic cloves, finely chopped
1 large green bell pepper, chopped
1 celery stalk, chopped
1 smoked beef sausage, sliced
2 tablespoons olive oil
¼ cup chopped fresh parsley
½ teaspoon cayenne pepper
Salt and pepper to taste

All you have to do:

Prepare rice according to package directions using beef broth or stock instead of water (if using Minute rice… you use equal parts rice and stock, so 3 cups of each for this recipe).

In a large skillet, heat 2 tablespoons of olive oil over medium high heat.

Add the sliced sausage and brown lightly on both sides.

Add the celery, green pepper, onions and garlic.

Stir well to coat the veggies with the oil and cook over medium high heat until soft, about 5 minutes.

Add 1 cup of beef stock and cayenne. Cook for about 5 minutes.

Add the cooked rice and parsley. Stir well.

Add salt and pepper to taste.

Zucchini Pancakes


These Zucchini Pancakes are so much like Potato Latkes (Pancakes)… I bet if you closed your eyes you wouldn’t be able to tell the difference.

If you’re not familiar with Latkes… they are wonderful Jewish Potato Pancakes made of shredded potato. These Zucchini Pancakes are made of shredded zucchini… and very simple ingredients.. flour, finely chopped onion, egg or egg substitute (more on that in a minute), a little salt and pepper… that’s it!

Their quick and easy to make.. and positively addicting!

TIPS

I mentioned earlier that you can use egg substitute… and you can.. 1 large egg equals about ¼ cup of egg substitute like Egg Beaters… check your carton for the substitution. This recipe uses 2 eggs or ½ cup of egg substitute.

This can be a truly lowfat pancake, use butter flavored cooking oil spray… but I must admit… the mixture of olive oil and butter is really, really good…

The amount of flour is approximate.. zucchini can be quite wet… I drain mine in a colander for about an hour or so… and squeeze out any excess… add the amount of flour listed… then the egg, mix well.. if it is runny then add more flour.. you want a very sticky consistency not runny.

Make these small or large… small ones make great little hors’dourves or medium size as a side or appetizers and larger ones for... well… larger sides…

This recipe will make approximately 15 medium pancakes.

Serve with sour cream and chopped chives.

Try these.. you will be amazed at how yummy they are!


Recipe: Zucchini Pancakes

All you need:

3 cups shredded zucchini (peeled then shredded)
1 medium onion, finely chopped
½ - ¾ cup flour *See TIPS
2 eggs or ½ cup egg substitute
Sprinkling of salt and pepper
2 tablespoons butter
2 tablespoons olive oil
Sour cream for garnish
Chives for garnish

All you need to do:

In a large bowl, mix the zucchini and onion until the onion is distributed evenly.
Add the ½ cup of flour and mix until evenly coated.

Sprinkle with salt and pepper.

Add the egg and mix well.

Add additional flour is batter is too runny. You want a thick sticky consistency.
In a large skillet over medium high heat, melt the butter with the olive oil.

Drop the mixture by spoonful and flatten slightly. Cook until the bottom is lightly browned. Flip over and cook until the other side is lightly brown and pancake is cooked through.

Drain on paper towels.

Serve with sour cream and chives.


Ricotta Fritters


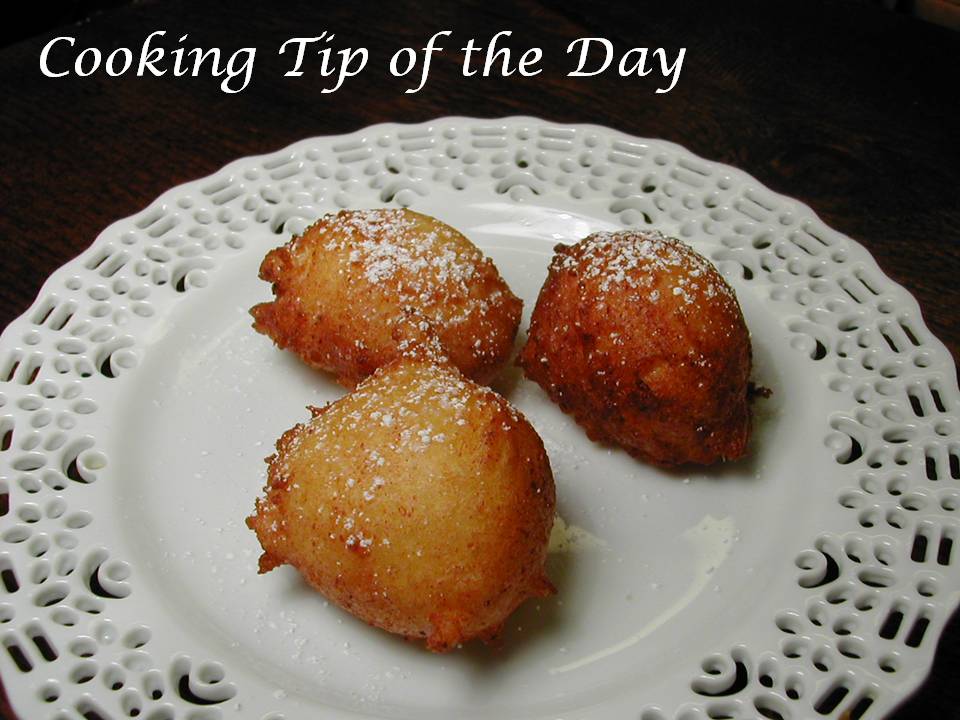
These melt in your mouth Ricotta Fritters are surprisingly quick and easy to make... a quick mix of the batter and drop then in hot oil for a quick fry... they only need about 2-3 minutes to cook... it's that easy!
Now I know frying is not a usual thing here at Cooking Tip of the Day... but occasionally I do like to make something like this.. only when the end product is not greasy.. and this is not...
This recipe is from an old Gourmet recipe by Lillian Chou.   The original recipe says you get 3 dozen fritters... I got only about 2 dozen and mine were not too large...
TIPS
Because I used a bottle of oil I had... I knew exactly how much oil was in my pot... after cooking... I removed any tiny pieces of stray dough... and used a funnel to put the oil back into bottle... I noticed only a tiny amount was missing... very tiny amount..
I used about 48 oz oil in a large deep pot.. you could probably use a bit less... you want it about 2 inches deep.
The key to frying without it saturating your food into a greasy mess is frying at the proper temperature. 
The small investment in a good frying/candy thermometer is well worth it.  It clips on the side of the pot... and when it gets to the right temp... you can start cooking.  It also helps you regulate the heat... if the temperature starts getting too high you can easily adjust the heat ... so you don't overcook your food either.
I used a measuring tablespoon to measure what I was dropping into the hot oil... the dough is a bit sticky so I had a coffee spoon to help drop the batter off the measuring spoon.  A small melon baller or cookie scoop that is about 1 tablespoon size (one that looks like a tiny ice cream scoop) would work well.. I never thought of it until I was almost done...
Once your oil reaches the correct temperature... start scooping... I honestly couldn't scoop fast enough before the ones already in the pot needed to be rolled over for a quick minute and then removed... it was that quick... so have your plate lined with paper towel ready when you start.
Allow them to cool for about 5-10 minutes... by the time you're done cooking them... the first ones are ready to eat (the cook always gets the first ones... after all you have to try them... right?)
The original recipe listed whole milk ricotta, as other recipes do, I had only part skim ricotta in the house... and used that instead and it worked fine.
If you are serving these for guests... figure about 3 (assuming you make them the size I did) for each person.
This delicately flavored fritter makes a simple yet delicious dessert... just a little powdered sugar sifted over them is all you need... trust me!


Recipe:  Ricotta Fritters
All you need:
Oil for frying *See TIPS
3/4 cup flour
2 teaspoons baking powder
1/4 teaspoon salt
1 cup whole milk ricotta *See TIPS
2 eggs, lightly beaten
2 tablespoons sugar
1 1/2 teaspoons vanilla extract
1 teaspoon lemon zest
Confectioner's sugar
All you need to do:
Put the oil in a large deep pot and heat to 370 degrees F.
While the oil heats, in a small bowl mix the flour, baking powder, lemon zest and salt with a whisk, to mix evenly.
In medium bowl, whisk the eggs, sugar, ricotta and vanilla.  Add the flour mixture and whisk until smooth.
When oil reaches 370 degrees, drop a tablespoon of batter at a time into the hot oil.  Watch carefully as they brown, roll them over to brown evenly.  When they are golden brown, remove them from the oil to a plate lined with paper towel.  Cool.
Sift confectioner's sugar over them and serve.

Crock Pot Mashed Potatoes


This recipe for Crock Pot Mashed Potatoes was so easy and they came out perfect… a great time saver!  I tried it this on a past Thanksgiving…. I figured nothing ventured nothing gained…. I wanted one food side out of the way with little work and mess.. I got what I wanted.

Many recipes are called “Crock Pot Mashed Potatoes” … but what I found was the recipe would have you boil and mash the potatoes then put them in the crock pot.  To my way of thinking, that simply keeps them warm and maybe cooks them a bit more… and defeats the purpose of the crock pot cooking method.
I wanted a “true” crock pot recipe… so I searched… I found a few recipes… but it came readily apparent that I would be venturing into pretty virgin territory… I needed to experiment.
TIPS

I partially peeled the potatoes because I wanted little bits of skin in the mashed potatoes for a more “rustic” potato dish.. you can peel them completely if you prefer.
I used Russet potatoes because I felt they were heartier.. red potatoes work well too… I just wouldn’t recommend you cook them as long.. check them about an hour sooner if cooking them on low…
Cooking times vary considerably depending on how hot your crock pot runs… so use your judgment when deciding on the length of time.
These worked well for a holiday.. but if you intend to try them for an upcoming holiday or special dinner… do a trial run to test it with your crock pot.. so you have the quantity and consistency to your liking. If you're short on time and can't do a trial run, try my way, it really did work nicely.
I have a 5 ½ quart crock pot.. and 2 ½ pounds of potatoes fit nicely.. I wouldn’t up the quantity in it to more than 3 pounds or so.
I cut the potato into fairly large cubes… they cooked fine.. and mashed easily.  The smaller the cubes.. the quicker they will cook.. so keep that in mind.. Mine took 7 hours on low… if you cut them small..  check on them sooner.
To keep them from turning into glue.. just as when you cook them on the stove.. do not over-work them… mash them by hand with a potato masher… then if you want a smoother mashed potato use your hand mixer, but you will not need to whip them for more than 2-3 minutes at the most.
I used milk (whole milk) and chicken broth.. the chicken broth gave it a slightly yellow color.. the flavor was excellent and it cut the fat.. you can use all chicken broth as well.
Speaking of yellow potatoes.. I haven’t tried this recipe with Yukon gold potatoes… be careful if you use them.. they seem to get “gluey” more easily than the other varieties of potato.

You can make plain, sour cream and chives or garlic mashed with this recipe.   When making Sour cream and chives, chop fresh chives, don't use the dried version, they are basically tasteless.  Fresh chives add a wonderfully light onion flavor.  The quantity is entirely up to you.  I chop, then stir in, and keep going until I like the overall mix.
I used several garlic cloves, minced.. we wanted garlic mashed…  again, be careful.. some garlic is more potent than others.. and the garlic seems to lose it’s flavor over the long cooking… however.. with that said.. if you want garlic mashed… start with the lower quantity and adjust the it later… remember you can always add garlic powder if you want them more garlicy.
Lastly, the liquid does not cover the potatoes… I was very uneasy about that… but they do cook and steam… I did stir them occasionally since I was home and could do it….
Enjoy this easy way to make mashed potatoes!


Recipe Crock Pot Mashed Potatoes
All you need:
2 ½ pounds of Russet potatoes, mostly peeled and cut into cubes *See TIPS
1 cup whole milk
1 cup chicken broth
2-3 garlic cloves, minced OR Chopped Chives *See TIPS
¼ cup butter
¼ cup sour cream or to taste
Salt and pepper to taste
Cooking oil spray (butter flavor preferred)
All you need to do:
Spray the bottom and lower sides of the inside of the crock pot with the cooking oil spray.
Place the potatoes, garlic (if you want garlic mashed), milk and chicken broth in the crock pot.  Cook for 5 hours on high or 8 hours on low.  Remember cooking times will vary with the size of your cubes and how hot your crock pot runs.  I cooked mine on high for 5 hours.
Mash the potatoes with a potato masher.  They should mash easily.  Add half the butter and the sour cream and whip them with a hand mixer until desired smoothness. 
Note:  As potatoes age and depending on the variety potato you use, they can be dry.. just like they can be when cooked on the stove… so be prepared to add a bit of milk or broth to smooth them out… either one works well… it’s just what you prefer….I didn’t have to do this, this time, but I have needed to in the past.  
Add the rest of the butter and chopped chives and stir them in.  Add salt and pepper to taste.  

Add garlic powder if you want a more pronounced garlic flavor (if you want garlic mashed),  That’s it!

Looking for More Recipes?

If you are looking for more recipes click the "Older Posts" link to page back to older posts or go to the archives in the right column. The list of labels at the bottom in the right column will help you find specific types of recipes or try our search engine at the top and search by name or ingredient.


What's more comforting on a cold day than Homemade Chicken Noodle Soup? .. and it's so easy to make!

Chicken Noodle Soup