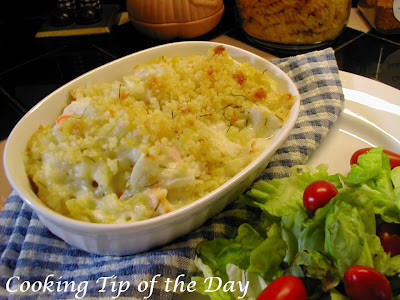
Recipe: Italian Sausage and Mushrooms in a Creamy Tomato Sauce


This easy pasta dish is elegant enough for company or a special occasion meal and yet simple enough for a weeknight meal.

This recipe is a variation of a couple of other recipes I have and was unsure if it would be something Warren would like because of the white wine in it…. although he claims not to like wine.. he has yet to not like anything I cook with it… well… any worries evaporated when I saw him take seconds of the sauce and eat it with a spoon. I totally understood… the sauce is just that good.

TIPS

I use hot Italian sausage, you can use sweet sausage or a combination… personally I like the hot..it gives this sauce just a little zing.. but not too much.

I use link sausage and par boil it to get excess fat out and partially cook it so I don’t have to cook it so long when browning it.

I used crimini mushrooms, baby Portobello mushrooms would also work extremely well.

You can use heavy cream but I like to use Fat Free Half and Half… I think it works as well and cuts the fat in the dish considerably.

The wine is optional, but unless you have a strong objection to it… I would leave it in.. it makes the sauce amazing.

For the wine I used Yellow Tail Sauvignon Blanc.

You can serve the sauce over the pasta… but I like to toss the cooked pasta and the sauce together then plate it… you can do it either way.

Figure 1 cup cooked pasta per serving.

This recipe serves 4.

I hope you try this wonderful pasta dish!


Recipe: Italian Sausage and Mushrooms in a Creamy Tomato Sauce

All you need:

3 links hot Italian sausage
1 medium onion, finely chopped
2 large garlic cloves, finely chopped
2 tablespoons olive oil
1 pkg. (8 oz.) fresh mushrooms, sliced
¾ cup white wine
1 can (14.5 oz) Hunt’s diced tomatoes with Basil, Garlic and Oregano
½ cup Fat Free Half and Half
1 tablespoon cornstarch
Cooked pasta
Grated Parmesan cheese

All you have to do:

Place the link sausage in a small saucepan and cover with water. Bring to a low boil and cook for about 10 minutes. Drain and allow to cool enough to handle. Slice the cooked sausage and set aside.

In a large skillet, heat olive oil over medium high heat. Add the chopped onions and garlic and stir well… cook for a minute.

Add the sliced sausage and cook for about 3 minutes.

Add the mushrooms and cook until the onions are translucent (about 5-6 minutes) .. but don’t brown… if they start to brown lower the heat slightly.

Add the white wine and deglaze the pan. Add the canned tomatoes (do NOT drain the can… add it all).

Place a lid on the skillet and lower heat until it just simmers. Simmer for 10 minutes.

In a measuring cup, combine the Fat Free Half and Half and the cornstarch. Stir until completely blended and no lumps remain. Add the mixture to the skillet and stir well. Simmer for 5minutes.

In a large bowl combine the cooked pasta and enough sauce to coat the pasta. Toss to coat the pasta evenly.

Serve in individual servings with additional sauce and grated Parmesan cheese at the table.

Recipe: Huevos Rancheros Cups


These Huevos Rancheros Cups are spin on the traditional Mexican breakfast... Huevos Rancheros… they’re perfect for two or twenty… an ideal way to serve a terrific Mexican breakfast … an easy way to make a delicious breakfast without all the work.

Best of all… you can prepare these almost completely ahead.. so serving them at a brunch is easy.

TIPS

You can use either corn or flour tortillas.. whichever you prefer… or make them both! The corn flavor of the corn tortillas will be evident.. where the flour tortillas.. let the filling flavors “take over”.

The corn tortillas tend to rip when pushing them into the muffin well… push gently and don’t fret if it rips slightly… just be sure it overlaps a bit.. when baking it will still form a sturdy cup.

I like to steam my tortillas… I boil water in a large pot.. and place a metal colander over it… Place one tortilla at a time in them.. Place a lid on top and steam for about a minute.. Use tongs to remove the softened tortilla.. and be careful of steam burns… by steaming them.. the tortillas are more pliable and easier to push into the muffin tin… more about that later.

I used a jumbo muffin tin… you can also use oven safe ramekins.

Make sure you spray the muffin wells with cooking oil spray.. I used olive oil cooking spray. Also a non-stick pan will be perfect…. but still spray the muffin well.. it will help crisp up the tortilla cup.

In my humble opinion… a circle about 6 ½ inches in diameter would be perfect… make a template out of paper and simply use it as a pattern to cut your tortilla circles for the cups.

Make sure to use fresh salsa.. not the bottled stuff. You can find it in the produce area, or deli or gourmet foods area in the supermarket.

Use both the green and white parts of the green onion.

I figure 2 cups per person.

Baking time will vary… it depends on how you like your eggs…. I have found 13 minutes will give you a soft yolk and a mostly cooked white with some soft spots… 15 minutes will have a slightly runny yolk and a completely set white. Obviously shorter baking times will give you a less done egg. Remember ovens vary.. so if you are going to do this for a party.. do a trial run .. make it for yourself before attempting for a crowd. You can use the end of a sharp knife to “test” the white to see if it’s done enough for you.

You can prepare these ahead and just pop them into the oven 15 minutes before you plan on serving them… keep them refrigerated until baking. I would break the eggs into the cups at the last minute before baking… prepare everything else ahead and cover with plastic wrap…

I hope you try this delicious spin on a Mexican breakfast classic.


All you need:

Corn or flour tortillas, cut into 6 ½ inch circles
Refried beans, store bought or homemade
Shredded Mexican blend cheese
Green onions, chopped
Fresh salsa
Sour cream

All you have to do:

Preheat the oven to 400 degrees F.

Spray the muffin wells of a jumbo muffin tin with cooking oil.

Place a metal colander over a pot of boiling water.


Spray the colander with cooking oil spray to prevent the tortillas from sticking.

Steam the tortilla circles one at a time. Place a lid on top and steam for about a minute.


Remove them with a long tong to prevent steam burns.


Place one steamed tortilla circle over each muffin well… gently pushing it into shape.

Place about 1 ½ - 2 tablespoons of refried beans in each cup. Spring with shredded cheese and chopped green onion.


Break an egg into each well… then sprinkle lightly with shredded cheese.


Bake 10-15 minutes or until eggs are at desired doneness.

Remove from the oven and using a fork.. gently scoop out each cup onto a platter. Garnish with salsa and sour cream.


Serve with additional salsa and sour cream.

Kentucky Derby Brunch


I don't know about you... but I love a good brunch... so many varieties and ways to serve delicious foods... many can be made almost entirely ahead... just a wonderful way to get good friends and food together.

So for Derby Day... why not make it Southern? Here are some ideas to get you started...


Grand Mimosas


Bloody Marys


The Early Times Mint Julep – The Official Mint Julep of the Kentucky Derby


Asparagus and Crab Quiche


Cheddar and Chive Scrambled Eggs in a Puff Pastry Shell with Garlicy Cream Sauce
OR


Bacon Cheese Fritatta


Peach Upside-Down Muffins


Baked Ham with Rum and Coke Glaze or Jack Daniel's Glazed Ham


Baked Garlic Cheese Grits


Slightly Sweet Parslied Carrots


Corn Fritters.. serve these with honey...


Spinach Salad with Warm Bacon and Shallot Dressing


Delicious Geechee Pecan Pie... and while not Derby Pie... it's still wonderful!... add a dab of whipped cream and you have yourself a little slice of heaven!


The Beaumont Inn's Bread Pudding with Bourbon Sauce... All I can say is WOW!


Sweet Tea


Fresh Lemonade


And of course...

Coffee and Tea

Busy Busy Time of Year


Everyone thinks of the end of the year as busy... but when you stop and think about it ... there are plenty of celebrations in the Spring and Summer too!

This year the Kentucky Derby falls on Cinco de Mayo... two really fun celebrations... followed Mother's Day.... and then there are Baby Showers and Wedding Showers, Graduations and Family Reunions... if that doesn't keep you busy... Memorial Day and 4th of July picnics will.

So Party On!

I'm starting off with a few reposts... and what better place to start than with the Kentucky Derby.... Make a day of it... starting with brunch..

Just a Quick Update


Well... it finally has hit me.. the "Cold of the Year" ... sounds like an award... well... it's anything but.... I'm miserable... I drag myself to work... then drag my butt into bed... I've used up almost every tissue in the house and have taken to carrying a roll of TP around with me... you know the stuff is not as soft as I thought...

On a good note.. I think I'm better... so hopefully I'll be back posting again in a few days...

Warren is hoping this cold ends soon.. he's been chief cook and bottle washer and I can tell he's looking forward to getting back to my meals...

So please be patient... and as Ahhnold would say ... I'll be back

Fabulous Finds: Creative Herb Gardens


What is cooking without herbs? Bland bland bland...

Herbs can be expensive... so the best solution is .... drum roll please... GROW YOUR OWN!

Don't have a lot of space? No Problem! There are many options that are perfect for indoors and out... apartments or houses... even tiny kitchens.. read on...

Need to keep them away from kids and critters? The picture above is a hanging Herb Garden by Lakeland Mills and is available online at ATG Stores

Here are some more of the best creative Herb Gardens around... and they won't break the bank either!


This is from Williams Sonoma and is perfect for the person who wants a portable herb garden. Move it to whatever location you want... great for decks, patios and rooftops. This willow basket is lined with a professional grade planting bag... plant directly into the bag or slip in pre-planted pots of your favorite herbs. It folds conveniently flat for easy storage when not in use. At $29.95 and lists free shipping at the moment... it's not a bad deal. They also have some other types of containers from window boxes to a vintage looking crate... all at reasonable prices.. definitely check out the link.


Window Boxes are perfect for an herb garden... and they come in so many sizes, shapes, styles, colors ... from the plain to the nifty... the picture above is a beautifully designed window box for a herb garden. It's available at White Flower Farm.

Planter Boxes are great if you have the space in a yard for one and are perfect for growing herbs... these are from Simply Planters... who says planters have to be boring and ugly....they are not only functional, but they're beautiful and truly add to the decor of your outdoor space. All are reasonably priced (and on sale right now) from $89.98 and up.


Maybe Individual Pots of herbs are more your style... have a sunny location in your kitchen... you can not only cut your food budget by growing your own herbs but also add to your decor at the same time... from plain shiny white pots to an array of colors to accent your kitchen... maybe unique pots to add interest... they're available all over from gardening stores to online stores..

These rustic posts come in "Rosemary" "Parsley" and "Thyme" and are available at Home Decorators.


I hope you found this info helpful... happy gardening!

Recipe: Cherry Cheesecake Brownies


What more can I say? This Cherry Cheesecake Brownie with it's combination of an ooey gooey brownie base…. a sweet cream cheese layer swirled with cherry pie filling…. simply addictive! …just ask my son… who simply worked his way through the batch one piece at a time… well maybe two pieces at a time or two…

The brownie layer can be made from scratch… or from a brownie mix… just use your favorite… and if you like cake-like brownies.. bake it for the time listed… if you like a gooey brownie better.. bake it a bit less… either way… you can’t go wrong with this recipe.

TIPS

As I mentioned … you can use a box mix for the brownie layer or my brownie recipe.. either one will work just fine.

I use Philadelphia brand Cream Cheese… in my opinion it’s the best.. and why skimp on something that tastes this good.

Click here for instructions to soften cream cheese quickly (if you don’t wait for it at room temperature).

You can make this with a lower fat cream cheese… just substitute it for the regular cream cheese.

The easiest way to spread the cream cheese mixture over the brownie layer is to drop spoonfuls all over the brownie layer.. then gently spread it with the back of a spoon.

Make sure to line your pan with foil and have it over hang a bit over the side so you can easily lift it out of the pan. It will lift out easiest after cooling completely. The stronger the foil … the easier it will be.

Move quickly because if it isn’t completely cooled it may want to break apart on the lift out of the pan… grab opposite ends and lift quickly .. onto a cutting board that you have next to the pan.

Don’t over swirl this… just enough to get the pie filling “anchored” into the cheesecake layer.

Store in the fridge in an airtight container… don’t worry about it taking up too much room… it won’t be around long… for sure!


Recipe: Cherry Cheesecake Brownies

All you need:

For the Brownie Layer:

Homemade recipe or
Your favorite brownie mix, mixed according to package instructions

Cheesecake Layer:

2 packages (8 oz. each) cream cheese, softened
1 large egg
½ cup sugar
1 teaspoon vanilla
1 can (21 oz.) cherry pie filling

All you need to do:

Preheat the oven to 350 degrees F.

Line a 9 x 13 pan with foil (non-stick foil works best).

Spray the foil with cooking oil spray (butter flavor preferred).. spray even if you are using non-stick foil.

Mix the brownies according to the recipe or the box instructions.

Spread the brownie mix evenly into the prepared pan.

In a mixing bowl, beat the cream cheese, sugar, egg and vanilla.

Spread the cream cheese mixture over the brownie layer (see Tips)

Drop spoonfuls of cherry pie filling over the cream cheese layer, using the entire can of pie filling.

Using a knife, swirl the pie filling and the cream cheese mixture. It’s okay if you get some of the brownie layer in the swirl… but I would try and avoid that as much as possible… just don’t put the knife all the way down to the bottom of the pan when you are swirling.

Bake for 50-55 minutes (50 minutes should be a little gooey … 55 minutes the brownies will be a bit more cakey). The center will still jiggle a little if you shake it when you take it out of the oven).

Cool for at least 4 hours.

After cooling completely, lift the brownies out of the pan using the foil… place on a cutting board and cut into squares.

Store in an airtight container in the fridge.

Looking for More Recipes?

If you are looking for more recipes click the "Older Posts" link to page back to older posts or go to the archives in the right column. The list of labels at the bottom in the right column will help you find specific types of recipes or try our search engine at the top and search by name or ingredient.


What's more comforting on a cold day than Homemade Chicken Noodle Soup? .. and it's so easy to make!

Chicken Noodle Soup