Recipe: Green Beans with Garlic Shallots and Red Peppers


This recipe for Green Beans with Garlic Shallots and Red Peppers is so quick and easy … and best of all it has the wow factor in its presentation… perfect for a holiday table… or even when you have guests for dinner. The flavors in this side dish are absolutely wonderful.

TIPS

You can cook the green beans anyway you prefer… but I have written the recipe for the stovetop boiling method… it’s quick.. you can do that part ahead… and when you plunge them in ice water or run cold water over them just after cooking.. they turn a show stopping brilliant green… a beautiful contract to the red in the red peppers.

I use fresh green beans found in small bags in the produce department of the grocery store… they’re picked over and cleaned… saves time and you always get a perfect bunch anytime of the year.

I use shallots because of their light onion flavor… I know they seem expensive… but they go a long way when prepared in foods… I highly recommend that you don’t substitute onion.

I like to sprinkle a little Parmesan cheese over the top… but that’s optional..

I hope you try these… I know you will love them!


PRINT RECIPE

Recipe: Green Beans with Garlic Shallots and Red Peppers

All you need:

1 pkg. (12 oz.) fresh green beans
1 red bell pepper, cut into julienne slices
1 medium sized shallot, finely chopped
2 small garlic cloves, finely chopped
1 tablespoon unsalted butter
1 tablespoon olive oil
Salt and pepper to taste
1 tablespoon grated Parmesan cheese

All you need to do:

Bring a large pot of water to a boil.

Drop in the green beans and boil for 3 minutes.


Drain immediately and dump into a large bowl of ice water or run cold water over them to stop the cooking process immediately. Green beans should be a vibrant green.

Drain well.


While the green beans are draining, heat a large skillet over medium heat.


Add the butter and olive oil and allow butter to melt.

Add the shallots and onions and cook about 3 minutes.

Add the red pepper slices and green beans and cook an additional 2 minutes… you do not want the shallots or garlic to brown.. if they start to brown, lower the heat.

Toss the vegetables to completely mix and coat the green beans.

Heat only until the red peppers and green beans are heated through … you don’t want the red peppers or the green beans to lose their crispness.

Remove to a serving dish and sprinkle lightly with Parmesan cheese.

Serve immediately.

Cooking Fresh Green Beans


Fresh green beans are so good and good for you… and you can make them so many ways… with the holiday just a few days away.. I’d like to take the time to post about another fresh vegetable… Green Beans.

We’re so very lucky in this day in age… we can have wonderful fresh produce all the time… why eat canned when you can have fresh?

I while back I noticed in almost every grocery store I went to.. in the produce section you can get wonderful fresh green beans in a bag… and perfect ones… you don’t have to pick through these or even trim them… one better than the next. I also noticed they last in the fridge longer too.

The trouble with green beans is that they can get boring after a while… unless you get a bit creative, that is… they’re perfect for a holiday meal… easy to make… and they can be so pretty on your table. They can be cooked or at least partially cooked several hours in advance and either reheated or finished off just before serving… a perfect addition to a meal that won’t keep you in the kitchen.

This healthy vegetable is perfect when steamed and then a little lemon juice squirted on it just before serving…

Let’s start with cooking methods… they should be just cooked through and a beautiful vibrant green.

In the Microwave:

This method is really quick and easy… just add a little water… about ¼ to ½ cup of water to a cup of green beans… microwave on high for 3-5 minutes for a green bean with a little crisp still left… microwave longer for a softer green bean.

Boiling on Top of the Stove:

I actually really like this method… especially for holidays… just add the green beans to a large pot of boiling water and boil for 3 minutes… drain and run cold water over them or plunge them in ice water. This method is especially good … it makes the green beans a vibrant green and are just beautiful. Let them drain and then use them in a recipe… such as sautéing them briefly by adding them to sautéed shallots and garlic… just cooking them long enough to heat them through… or just zap them in the microwave to reheat quickly.

Steaming:

You can steam either on top of the stove or in the microwave.

Stove Top Method:

You can steam them on top of the stove with a metal steamer set into a pot with enough water to come to the bottom of the metal steamer and not touch the green beans… you do not want to immerse the green beans in the water. Bring the water to a boil and place the green beans in the steamer and steam for approximately 7 to 8 minutes for a tender but still a bit crisp green bean.

Microwave Method:

To steam green beans in the microwave… place about 3-4 tablespoons of water in a microwaveable dish… add the green beans… cover loosely with waxed paper or cover with plastic wrap and leave one corner up to allow steam to escape. Microwave on high for about 5-8 minutes for a tender but still crisp green bean… microwave longer for a softer green bean. This method is similar to just making them in the microwave (see above)... by using more water in the other method the green beans do cook faster but steaming will keep them a brighter green.

There are plastic steamers for use in microwave ovens, much like the metal steamers used to steam on the stove top. I own one and to be honest... I don't see any difference in the end result from cooking them in a steamer versus just using a dish with a bit of water in it. If using a steamer, follow the instructions that come with the steamer for the best results.

Sauté Method:

When sautéing green beans.. cook them first using one of the methods above… drain and then sauté briefly… just long enough to heat through.

Try these terrific Green Bean Recipes... perfect for your holiday table:


Green Beans Almondine


Green Beans with Garlic Shallots and Red Peppers


Green Beans with Onion and Bacon


Recipe: Toasted Ciabatta Bread with Cheddar Garlic and Shallot Butter


Ciabatta bread tastes wonderful toasted and even better with my Cheddar Garlic and Shallot Butter. I wanted to make something different…. I was tired of plain dinner rolls… and well… garlic bread just didn’t ring my chimes this time… so I decided to make a toasted ciabatta bread. This was inspired by Giada De Laurentiis… her recipe had different measurements and used scallions instead of shallots.

This quick and easy bread will go with just about any meal… and is a welcome change from the ordinary bread choices for a meal.

The shallots give it a light onion flavor .. and the combines well with the garlic. The cheddar cheese gives it a slightly different taste from the expected.

TIPS

Cut as little or as much as you like… make the butter and then store the excess for another time.

I lined the baking pan with foil for easier clean-up.

I posted the Cheddar Garlic and Shallot Butter recipe separately… click over to the recipe and then follow these simple steps to make a wonderful addition to any meal.

I hope you try this … you won’t be disappointed!


Recipe: Toasted Ciabatta Bread with Cheddar Garlic and Shallot Butter

All you need:

1 loaf Ciabatta Bread
Cheddar Garlic and Shallot Butter (see recipe)
¼ cup Cheddar cheese, finely shredded

All you need to do:

Preheat the oven to 400 degrees F.


Cut the Ciabatta bread in half horizontally.

Cut the loaf into thirds.


Spread the butter on the cut sides of the bread.


Place on a baking sheet and bake for about 6 minutes.

Remove from the oven.

Sprinkle with the shredded Cheddar cheese.

Put them back in the oven until cheese is melted and a little bubbly.


NOTE: You can serve them in larger pieces or cut them into strips.

Serve immediately.

Recipe: Cheddar Garlic and Shallot Butter


This recipe for Cheddar Garlic and Shallot Butter came about as I was experimenting in the kitchen making various flavored butters...

I recently came across one of Giada De Laurentiis’s recipes that toasted ciabatta bread with a cheddar cheese flavored butter … the butter used scallions and garlic… and sounded really good… very similar to a cream cheese spread I make… it also had more butter used in the recipe to the other ingredients than I thought I wanted… it wasn’t exactly what I had in mind… so I experimented.

I did like her idea of using ciabatta bread… I thought the bread was a wonderful choice.. with the big holes in the bread… I thought the butter would melt wonderfully into it… and it did.

Scallions and onions have a pretty potent flavor… and I wanted a light oniony flavor to match a light garlic and cheddar flavor… so I decided to use shallots…. it was a perfect choice.

TIPS

Dice the shallot and garlic clove into tiny pieces… I did this manually.. I didn’t want to over process them so I didn’t use the mini chopper to prepare them.

Use sharp cheddar.. otherwise the cheddar flavor will be over powered by the shallot and garlic.

Use unsalted butter so you can control how much salt to add… if you use salted butter..omit the salt in the recipe.

The butter was soft… but not runny… I cut the stick of butter into smaller pieces.. about 2 tablespoons each before putting it in the mini chopper.

I only pulsed the chopper a few times… removed the lid and scraped the sides and pulsed two more times… . don’t over process this or you will end up with mush.

This butter can be used on any bread… but I highly recommend you use it on ciabatta bread…


PRINT RECIPE

Recipe: Cheddar Garlic and Shallot Butter

All you need:

1 stick (8 tablespoons) unsalted butter, softened and cut into 4 pieces
1 large shallot, finely diced
1 large garlic clove, finely diced
¼ cup sharp cheddar cheese, finely shredded
3 turns on the pepper mill
Salt to taste

All you need to do:

Add all the ingredients into a mini chopper.

Pulse a few times then scrape the sides and pulse 2 more times.

Use immediately and refrigerate any leftovers.

So Just What is Ciabatta Bread?


Ciabatta bread is an Italian white bread made with wheat flour (white or whole wheat flour) and yeast. Although there are various variations from different regions in Italy, the most popular variety in the United States is a longer, flatter, dense bread with a crisp crust and a inner porous texture.

It is widely used for sandwiches. Toasted sandwiches made from small loaves of ciabatta are known as Panini.

The bread is made from a very wet dough, often requiring a bread machine. Variations include loaves made with milk, olive oil, basil and other herbs.


Source: Wikipedia

Recipe: Southwestern Mini Party Sandwiches


I like to serve casual food for informal get-togethers… especially for watching the game… so I have this terrific idea for you just in time for the March Madness Finals… I’ve previously posted two mini party sandwich recipes… Mini Ham and Swiss Party Sandwiches and Italian Mini Party Sandwiches.

These Southwestern Mini Sandwiches have a little kick to them… how much kick they have is up to you. They’re tasty and add a nice variety to any sandwich platter.

Prices for those mini subs platters or the large one that is just sliced have become pretty expensive… you can make these for a fraction of the cost… and they will be a hit… perfect finger food.. these will be a great accent to the Ham and Cheese Minis… you can serve it with a Mexican Layered Dip and some tortilla chips… a really nice spin on the ordinary sandwich.

TIPS

I used fresh salsa for these sandwiches.. you can use the jarred variety if you prefer…

I mentioned earlier the sandwiches had a little kick to them… well some of the heat is from the salsa depending on which one you make or purchase… and I used Pepper Jack cheese… there are two layers of cheese in these little babies… and I was surprised at the bite it had… I used Medium Salsa and a regular sliced Pepper Jack cheese from Sargento. If you prefer foods without a definite bite just some.. replace one of the layers of cheese with cheddar or just a plain Monterey Jack cheese.


I used completely baked dinner rolls instead of the Brown n Serve rolls I used when I made the Ham and Swiss Minis… both methods worked well… although I did like handling the completely baked dinner rolls better.

The bag of rolls I used had 12 rolls in it… I recommend you work with 6 at a time and try and keep them together ..it will be easier to handle them.

You can easily make six of one type and six of another for a variety.

I used an 11x7 baking pan.. use a pan that will nestle the buns together so the tops won’t slide off.

You will need to lay a piece of foil over the top of the buns so the heat of the oven won’t scorch the buns… you only need the heat to melt the cheese.

I figure 2-3 small buns per person… 3 for bigger eaters.

These are terrific party sandwiches…I hope you enjoy them!


PRINT RECIPE

Recipe: Southwestern Mini Party Sandwiches

All you need:

1 pkg. (12 count) dinner rolls
12 slices of Pepper Jack or Monterey Jack cheese
10-12 slices deli Smoked Turkey, thin sliced
Salsa
Sliced black olives

All you need to do:

Preheat oven to 350 degrees F.


Work with 6 rolls at a time.

Slice the dinner rolls horizontally.


Spread a generous amount of salsa on the cut side of the roll in 6 little mounds for each of the rolls.


Put a few slices of olives on each mound.


Lay 3 slices of cheese on top of the salsa and olives… do not overlap very much… you may have to cut a cheese slices in half.


Lay slices of smoked turkey on top of the cheese, enough to cover the cheese.


Do another layer of cheese over the smoked turkey.


Put a little more salsa on top of the cheese.


Add a few slices of black olive to each mound of salsa.


Place the top of the buns on the base.

Place in a baking pan.

Repeat with the second set of 6 rolls.


Lay a piece of foil over the buns and bake for about 5-10 minutes …keep an eye on them… you only need the cheese to melt.

Remove from the oven and remove the sandwiches from the baking pan… use a spatula to keep the sandwiches intact.


Use a sharp serrated knife to cut the buns apart.


Serve warm or cold.

Recipe: Lasagna


Lasagna has always been a favorite of mine. I remember I had a birthday party one year in high school… in fact I think it was for my 16th birthday… my Mom let me invite a bunch of my friends and we would have a supper… and hang out… girl stuff… I was allowed to pick what I wanted for supper…

I suspect my Mother secretly was hoping I’d pick something like burgers so my Dad would have to barbecue… no such luck…

I chose Lasagna… my Mother wanted to die… because the majority of my friends were from big Italian families… and we are not Italian… my Mother thought her lasagna wouldn’t hold up to what they were used to. Well… let me tell you… everyone loved the lasagna… we all had a great time.

Over the years… I’ve made lasagna… the recipe from memory… and I’m sure over time I’ve tweaked it a bit… well actually I know I did… but it has been a family favorite and always a hit wherever I’ve taken it. The ingredients are really the same as my Baked Ziti… just substituting the lasagna noodles for the ziti.

A lot of people shy away from making lasagna because they think it’s complicated to make… it really isn’t… just do it a step at a time.

TIPS

For the Italian sausage you can use Hot or Sweet … or a combination… use the ground variety as opposed to the link variety… it’s easier to use… but both types will work.. if you use the links.. cut them into small pieces after cooking them…

I use previously made meatballs cut-up for part of the meat mixture…. when you make meatballs… make some extra and freeze them… then when you want to make a meat sauce … just defrost them and cut them up.. it’s great for Lasagna, Baked Ziti and meat toppings for Pizza.

I used 9 lasagna noodles (3 for each layer)… my baking dish is slightly smaller than 13x9… if you use a true 13x9 baking dish… figure you will 4 noodles per layer… you may have to trim the noodles to fit.

I always make 3-4 extra noodles than I need.. some break and tear… you can still use them if you want… depending on how badly they’re broken… I just think it’s easier to use solid complete noodles… I discard the ones I can’t use.

Cook the noodles al dente according to package directions… cooked but still a bit chewy… remember they will cook further when the lasagna is baked.


Cook the noodles in batches of about 3-4 at a time… this helps prevent rips and tears in the noodles… take them out of the water with tongs and drain in a colander… then lay them on a baking rack to dry a bit and cool while you prepare the other ingredients.

Make sure you spray the foil with cooking oil before putting it on… you don’t want the foil to stick to the cheese.

You need to let the lasagna stand for at least 15 minutes before cutting it otherwise it’s difficult to get a clean cut.

The lasagna makes a great leftover… I actually think it’s better after re-heating.

If you’re making this for a party… you can bake it partially in advance…

Don’t put the top layer of shredded mozzarella and grated Parmesan cheese on it…

Make sure you cover it in foil and bake it for the “first” baking (25 minutes)…

Then remove from the oven and let it cool…. refrigerate until you need it…

Then remove it from the fridge about 20 minutes before you want to start baking it…

Put the top layer of shredded mozzarella and grated Parmesan cheese on it and put the foil back on it.

Put the lasagna in a cold oven and set the oven heat at 375 degrees F. … when the oven reaches 375 degrees… bake for about 10-15 minutes or until hot… remove the foil and continue baking for 25 minutes until cheese is melted and sides are bubbly.

Let the lasagna stand for 15 minutes and serve.

I hope you like this recipe as much as we do.


Recipe: Lasagna

All you need:

For the Meat Mixture:

1 lb. ground Hot Italian, bulk
About 8 large meatballs
1 cup tomato sauce

If you don’t have meatballs:

½ lb. ground sirloin
1 egg, beaten (you can also use egg beaters if you want to cut the fat even more)
1/4 cup milk (I use fat free milk, any type of milk will work)
1 medium onion finely chopped
2-3 tablespoons garlic powder (I use 3)
1/4 cup finely chopped fresh parsley (I use curly parsley, but flat leaf works just as well)
2 tsp Italian Seasoning
3/4 cup Italian bread crumbs
1/4 cup grated Parmesan or Romano cheese

For the Cheese Mixture:

1 container (15 oz.) part-skim ricotta cheese
1/3 cup grated Parmesan cheese
1 egg, beaten
1/3 cup fresh chopped parsley
1 teaspoon garlic powder
Pinch of salt

Remaining Ingredients:

1 ½ cups tomato sauce, divided
¾ cup grated Parmesan cheese,divided
1 lb. bag (4 cups) shredded Mozzarella cheese

All you need to do:

Preheat oven to 375 degrees F.

To make the noodles:

Cook the lasagna noodles al dente…according to package instructions. Cook the noodles in batches of about 3-4 at a time… this helps prevent rips and tears in the noodles… take them out of the water with tongs and drain in a colander… rinse with cold water and drain…. then lay them on a baking rack to dry a bit and cool while you prepare the other ingredients.

To make the meat mixture:

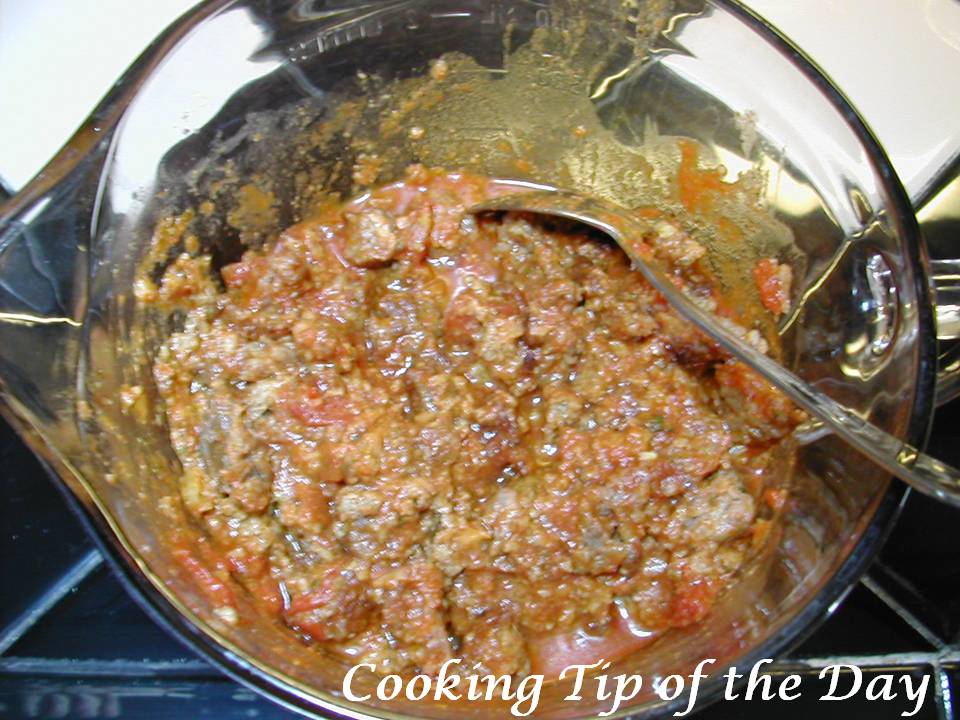
In a large skillet, break up the ground Italian sausage and cook over medium high heat, turning periodically, until cooked completely. Drain on paper towels. Set aside.

Note: If using link sausage… cook until no longer pink inside. Drain on paper towels. Cut the links up into small pieces. Set aside.

In a large bowl cut-up the meatballs.

Note: If making the beef now… mix the ground beef, egg, milk, chopped onion, garlic powder, chopped parsley, Italian Seasoning, bread crumbs and Parmesan or Romano cheese in a large bowl. Mix well. Heat a large skillet over medium high heat. Add the meat in small clumps to the hot skillet and cook until no longer pink… turning the meat periodically. Put the cooked beef mixture in a large bowl.


Add the cooked sausage and 1 cup of tomato sauce to the cooked beef mixture. Stir well, breaking up any large clumps of meat. Set aside.


To make the ricotta cheese mixture:


Mix all the cheese ingredients listed above in the “For the Cheese Mixture” section. Mix well. Set aside.


To assemble the lasagna:


Spread 1 cup of tomato sauce on the bottom a 13x9 baking dish.

Lay 3-4 lasagna noodles over the tomato sauce… don’t overlap noodles… you will probably have to trim the noodles a bit to make them fit.


Spread half of the ricotta cheese mixture over the noodles. Spread evenly.


Spread half of the meat mixture on top of the ricotta cheese mixture.

Sprinkle evenly with ½ of the shredded mozzarella cheese on top of the meat mixture..

Sprinkle ¼ cup Parmesan cheese over the mozzarella.

Layer with the lasagna noodles over the mozzarella and Parmesan cheese.

Spread remaining ricotta cheese mixture over the noodles.

Spread remaining meat mixture over the ricotta cheese mixture.


Sprinkle the meat with ¼ cup Parmesan cheese.


Layer lasagna noodles over the meat and Parmesan cheese.

Spread remaining ½ cup tomato sauce over the noodles.

Sprinkle remaining mozzarella over the noodles.

Sprinkle the mozzarella with the remaining ¼ cup Parmesan cheese.


Spray one side of foil with cooking oil.

Lay sprayed side down over the lasagna.

Place the baking dish on a large metal baking sheet… in case the lasagna bubbles over.

Bake at 375 degrees F for 25 minutes.

Remove the foil and continue baking for an additional 25 minutes. The cheese should have melted and sides are bubbly. Check it periodically… if it looks like the cheese will brown too much… loosely lay a pie of foil over the top… make sure you spray the foil with cooking spray … and lay sprayed side down to prevent any foil from sticking to the cheese. Remove from oven to cooling rack.

Let the lasagna set for 15 minutes before serving.

Recipe: Italian Mini Party Sandwiches


These Italian Mini Party Sandwiches are easy to make and so delicious… they’re the perfect food to serve while watching the March Madness games. Add a Pasta Salad … some chips …some soft drinks and you have yourself a terrific little meal.

These mini sandwiches are similar to the Ham and Cheese ones I posted a while ago.


This time I decided to use completely baked dinner rolls instead of the Brown ‘n Serve kind. These worked out very well… they only took about 5-10 minutes to bake… just leave them in the oven until the cheese melts….


TIPS

You can make your own Pesto or buy the ready-made pesto… both work equally as well. I was running out of it… you can put more on the bread than I did.

I recommend you work with six rolls at a time and try and keep them together... it will make handling them easier.

This time I purchased Valsic Roasted Red Pepper Strips… they were cut smaller than the regular sized ones and were extremely easy to put on the sandwich… if you use the larger peppers… you will need to slice them into small strips… see photo.

I used an 11 x 7 baking pan… use a pan that will nestle the buns together so the tops won’t slide off.

You will need to lay a piece of foil over the top of the buns so the heat of the oven won’t scorch the buns… you only need the heat to melt the cheese.

I figure 2-3 small buns per person… 3 for bigger eaters.

These are terrific little sandwiches…I hope you enjoy them!


PRINT RECIPE

Recipe: Italian Mini Party Sandwiches

All you need:

1 pkg. (12 count) dinner rolls
Pesto
6 slices deli Provolone cheese, sliced thin
6 slices deli Genoa Salami, sliced thin
Roasted red peppers
Sliced black olives

All you need to do:

Preheat oven to 350 degrees F.

Work with 6 rolls at a time.


Slice the dinner rolls horizontally.


Spread a generous amount of pesto on the cut side of the rolls. I was running out of pesto... I would put more on next time.


On the bottom half of the rolls, lay 3 slices of provolone cheese… do not overlap very much… you may have to cut a provolone slice in half.


Lay 3 slices of Genoa salami on top of the Provolone.

Place a couple of strips of red pepper on top of the salami on each roll.


Add a few slices of black olive to each mound of peppers.


Layer 3 slices of provolone on top.


Place the top of the buns on the base.


Place in a baking pan.

Repeat with the second set of 6 rolls.

Lay a piece of foil over the buns and bake for about 5-10 minutes …keep an eye on them… you only need the cheese to melt.


Remove from the oven and remove the sandwiches from the baking pan… use a spatula to keep the sandwiches intact.


Use a sharp serrated knife to cut the buns apart.

Repeat with second set of rolls.


Serve warm or cold.

Looking for More Recipes?

If you are looking for more recipes click the "Older Posts" link to page back to older posts or go to the archives in the right column. The list of labels at the bottom in the right column will help you find specific types of recipes or try our search engine at the top and search by name or ingredient.


What's more comforting on a cold day than Homemade Chicken Noodle Soup? .. and it's so easy to make!

Chicken Noodle Soup